User Guide V2.
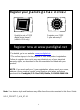
Register your pandigital novel 1 year Qualify to win a FREE digital photo frame!* (valid in USA only) Register your FREE 1-year warranty!** Register now at www.pandigital.net *For details, go to our website: www.pandigital.net **The online signup is for the purpose of user and product registration. Failure to register does not in any way diminish any of your standard warranty rights, as described in the documentation included with your product.
T ab le of Con ten ts Package Contents .................................................................................................... 8 Covers for your p a n d i g i t a l n o v e l ................................................................ 8 Device Overview ....................................................................................................... 9 Power Button Usage ................................................................................................
Notes .................................................................................................................................. 29 Add Note ........................................................................................................................ 29 View Notes ..................................................................................................................... 29 Delete Multiple Notes .....................................................................................
Turn Wi-Fi Off..................................................................................................................... 39 Settings>Subscriptions .......................................................................................................... 39 Settings>Alarm ....................................................................................................................... 39 Settings>Photos ..........................................................................................
Set Alarm Volume .............................................................................................................. 50 Shut Off Alarm Alert ........................................................................................................... 51 Edit Alarm........................................................................................................................... 51 De-Activate Alarms .............................................................................................
pandigital novel A contemporary multimedia device designed for straightforward functionality, featuring a full color TFT LCD display and convenient touch-screen navigation. Your pandigital novel is a light and stylish electronic multimedia eReader which allows you to quickly and easily download and read digital printed material (eBooks, eMagazines, and eNewspapers) anytime and anywhere.
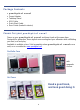
Package Contents pandigital novel Power Adapter Tabletop Stand USB Cable Quick Start Guide User Guide (loaded in device) Covers for your pandigi tal nove l Dress up your p a n d i g i t a l n o v e l and keep it safe at the same time. Designed for protection, these stylish covers safeguard your eReader while still letting you read, surf and play. Available in multiple colors. Sold separately where p a n d i g i t a l n o v e l s are sold, or on our website: www.pandigital.net.
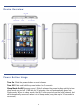
Device Overview Mini USB Power button 2 in 1 card slot Reset Light sensor Volume button DC jack 7.5” 5.6” 4.2” 5.6” Earphone jack Speaker holes Power Button Usage Turn On: Slide the power button on and release. Turn Off: Slide and hold the power button for 3 seconds. Sleep Mode On/Off (energy saver): Slide & release the power button quickly to turn sleep mode on and off. If left idle for 10 minutes, the unit automatically goes into Sleep mode.
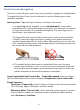
Touch-Screen Navigation The touch-screen allows for quick, easy and convenient navigation for all applications. Throughout the User Guide, you are instructed to use the following tap or touch navigation methods: Selecting Items - Tap: quick tap & release on an item on the screen Your p a n d i g i t a l n o v e l uses a “resistive touch” screen which responds best to a hard pointed object or the tip of your fingernail, as opposed to a tap of the soft skin of an outstretched fingertip.
Highlight text - Touch, hold & slide = touch & hold on a word approx 2 seconds until you hear an audible cue, and then continue to press as you slide across the text, and then release to display the option window; tap Highlight. Display Reader Function Menu = tap in the top row of the screen to display the Reader Function Menu at the top of the screen. Keyboard Functions Multi-language characters – Touch & hold = touch & hold on a key to display alternative characters.
4. Calibration The p a n d i g i t a l n o v e l needs an initial calibration to ensure the touch screen responds accurately. After some use, if the touch screen seems to not respond accurately, use the Calibrate function under Settings to re-calibrate. Tap Calibrate to begin the calibration. When the pop-up windows appear, use a pointed device to accurately tap the “+” in the designated spots on the screen. If calibration is successful, you can proceed with setup.
Home Screen Status of: Wi-Fi connection Battery charge level Alarms Date & Time Bookstore row shows latest books from Barnes & Noble (scrollable). Tap on any media to display description, synopsis and Buy options. Tap Bookstore to launch web browser and go to Barnes & Noble’s website. 05/01/10 06/01/10 06/26/10 Indicates last B&N bookstore update. Sync with your Barnes & Noble account to get the newest issues of active subscriptions.
Application Quick Launch Bar Home Displays the Home screen Reader Display your digital media for reading (PDF, EPUB) My Library Stores your digital media (eBooks, eMagazines and Web Access the Internet and ‘surf the web’ whenever desired Settings Multiple settings for personalizing and enhancing your device Music Play and manage audio files (MP3, WAV, AAC, OGG) Videos Play and manage video files (MPEG4) Photos View and manage photo files (JPG, JPEG, BMP, PNG, GIF) Email Send/Receive email u
Set Up Wi-Fi Network Since many features require a Wi-Fi connection, we recommend you set up your Wi-Fi network now. 1. Select Settings from the Application Quick Launch Bar, tap Network. 2. Turn Wi-Fi on by tapping the Wi-Fi is off/Turn on Wi-Fi. 3. The device automatically scans and list all local Wi-Fi Networks found. A indicates secure networks that require login name/password to connect. 4. Tap the desired network to which you want to connect, enter the Network Password if applicable. 5.
SHOP B&N IMPORTANT: In order to connect with your Barnes & Noble online account, the Date and Time must be set correctly according to your location. Select Shop B&N from the Application Quick Launch Bar to log onto the Barnes & Noble website. Shopping directly on the Barnes & Noble website allows you to view full details about a book, including Editorial and Customer Reviews, along with the synopsis.
Tap to display newly released books Tap Bookstore to launch the browser and display the Barnes & Noble website. Display eMagazines or eNewspapers Tap to update top row from Barnes & Noble website. Tap on any book cover in the Bookstore row to display that book’s descriptive information and synopsis (example below).
Tap on any Magazine or Newspaper cover in the Bookstore row to display that media’s descriptive information and synopsis (example below). Tap Subscribe Now to order a monthly subscription Tap Buy Current Issue to purchase only the current issue Tap to read reviews If you want full details about media, including Editorial and Customer Reviews, use the Shop B&N feature to shop on the Barnes & Noble website (pg. 16).
Purchase an eMagazine or eNewspaper 1. In the Home screen, to be sure you are viewing the most current media on the Barnes & Noble website tap Update above the Bookstore row. 2. If desired, tap eMagazines or eNewspapers to display only that media. 3. Tap on any publication cover to display the publication’s details, including pricing, sample availability, and a synopsis. 4. Tap Subscribe Now to order a monthly subscription. OR Tap Buy Current Issue to purchase only the displayed issue. 5.
3. Tap next to the sample book you want to buy, tap Buy Now. The sample book is removed from My Library. Use the Get Books feature to download your purchased book (pg. 21). Subscriptions The second row of My Library on the Home screen displays your downloaded media. If you have purchased subscription eMagazine or eNewspapers, you should perform regular subscription updates to ensure you have the most current issues.
Sort rows 2-4 by download Date, Title or Author 05/01/10 Simply tap on any media icon to open and display in the Reader 06/01/10 06/26/10 Finger slide upward from the bottom of the screen (with your fingernail) to display the Application Quick Launch Bar Dates on eMagazines and eNewspapers indicate publication issue date. Get Books Use the Get Books feature to download the downloadable eBooks, eMagazines and eNewspapers from your Barnes & Noble online account into your pandigital novel.
2. In the My Library screen, tap Get Books. 3. The first time, you are prompted for your Barnes & Noble login information. CAUTION: Later if you want to switch to a different Barnes & Noble account, you can enter the new account login information when prompted. However, be advised that if you switch accounts, a factory reset occurs which deletes all your personal data (see Reset Defaults, pg. 40). When prompted for the factory reset, tap No to keep the currently saved Barnes & Noble account. 4.
means that those books can be loaned to others who also have a Barnes & Noble account. You must be connected to a Wi-Fi network before you can use the Lend/Return Books function. A number appearing with the Lend/Return icon indicates new activity within this feature. After launching the Lend/Return feature, a pop-up window appears with lend/return options. The number behind Return books indicates books expiring in 3 days or less. The number behind Check for offers indicates new offers pending.
Once you send a loan offer the book is no longer available until the recipient returns the book or rejects the offer. You can use Get Books to download the book when the book becomes downloadable again in the future. Check for Offers Use this function to check for book loan offers made to you. 1. In the My Library screen, tap Lend/Return. 2. Tap Check for offers in the pop-up window. 3. Tap next to the offers you want to accept or decline, tap Accept or Decline accordingly.
3. Enter the desired bookshelf name (i.e., Short Stories, Drama, etc.). 4. Tap to create the new bookshelf. (Use Manage Bookshelf to add media to the new bookshelf.) Display Shelf 1. In the My Library screen, tap Bookshelves. 2. Tap next to the bookshelf you want to display, tap Display Shelf. 3. The screen’s layout resembles the My Library screen, with your last read media in the top row and other downloaded media in rows 2-4. 4.
IMPORTANT: In order to connect with your Barnes & Noble online account, the Date and Time must be set correctly according to your location. You must be connected to a Wi-Fi network before you can perform the Check Subscriptions function. If you want to set a time for automatic daily checks, see Settings> Subscriptions on page 39. 1. In the My Library screen, tap Check Subscriptions. 2.
Reader Function Menu Tap corner to bookmark and un-bookmark page (when Function Menu is not displayed). appears at the top of the screen for 3 seconds and then auto hides. Tap in the top row of the screen to re-display it. Finger slide right-to-left for next page. Finger slide upward from the bottom of the screen to display the Application Quick Launch Bar. Tap anywhere on screen to close again.
Reader Function Menu In the Reader application, the Reader Function Menu is displayed at the top of the screen for 3 seconds, and then auto hides. To re-display the Reader Function Menu, tap on the top of the screen (except in top right corner). My Library To access My Library bookshelf while viewing a media page, display the Reader Function Menu, tap My Library. Contents Display the Table of Contents of the currently open media file, allowing you to quickly display a desired chapter/page. 1.
Notes As you read your media, you can quickly and easily make notes on pages for reference later. Add Note 1. On a page, touch & hold on any word or touch, hold & slide across multiple words to open the Reader options pop-up window. 2. Tap Add Note. The Notes dialog window opens and the selected word(s) are in the note entry area. 3. Tap into the note entry area to enter additional text, tap Save. 4. The word related to the note is highlighted blue. View Notes 1.
2. Tap Highlights. 3. Tap next to the highlights you want to view, tap View. 4. To scroll through the selected highlights, tap . 5. To jump to the page associated with a highlight, tap View Page. 6. To delete the currently viewed highlight, tap Delete. Hide all Highlights 1. To turn all highlights off in the currently open media file, display the Reader Function Menu, tap Bookmarks. 2. Tap Highlights. 3. Tap Highlights Off. Delete Highlights 1. Display the Reader Function Menu, tap Bookmarks. 2.
3. All instances of the found text are highlighted throughout the document. 4. You can scroll through the pages for all highlighted text, tap Cancel Find to return to the original page you were viewing. OR You can touch any of the highlighted text to automatically cancel the find mode, and then that page becomes the current page. Last Read After performing searches, you can quickly return to the last page you were reading. 1. Tap top area of screen to display the top menu, tap Go To. 2. Tap Last Read.
Screen Orientation - Lock For optimal viewing while reading, the orientation of the screen automatically rotates from vertical to horizontal depending on how you hold your device. When desired, you can lock the screen in the desired orientation to prevent the auto-rotation (in Reader only). To lock, while viewing a media page in the desired orientation, display the Reader Function Menu, tap Lock. To unlock, display the Reader Function Menu, tap Unlock.
Tap to Bookmark webpage 2. Tap in the top URL entry field; the keypad appears so you can enter the desired web site address. 3. Tap Go to go to the web site address. 4. Finger slide vertically to scroll the web page. ZOOM Web Page To zoom in on a web page, double-tap on a section you want to view larger. Single-tap an area on a page to view the center of that area. You can navigate around the web page by single-tapping on the section you are currently viewing.
Refresh Bookmarks Windows Find on page More Refreshes the screen by re-loading the current web page. Bookmark currently displayed web page, access list of all bookmarks, or delete bookmarks List of open browser windows You can have up to 8 browser windows open at a time Search for string of text on the current web page Displays Menu page 2 Menu page 2: Back Displays previously displayed web page Forward Returns to web page that was displayed before tapping Back to display the previous web page.
2. If you want to rename the bookmark, tap in the Name field and enter the desired name. 3. Tap Save. Go to Bookmarked Web Page 1. On the browser window, tap Menu, tap Bookmarks. 2. In the Bookmarks window, tap on the desired web page. 3. The browser opens the selected web page. Delete Web Page Bookmarks 1. On the browser window, tap Menu, tap Bookmarks. 2. In the Bookmarks, tap tap Delete Selected. 3. Tap next to the bookmarks you want to delete, to close the window and return to the web page.
3. Tap Done on keypad to initiate the search. 4. All matching text is highlighted. If you want to scroll through multiple matches, tap or . 5. Tap to close the entry box and resume normal viewing. Select You can select the text of a web page address on the web page you’re viewing, and then you can paste the text into the browser entry field. 1. 2. 3. 4. On the browser window, tap Menu, tap Select. Touch, hold & slide your finger across the text you want to copy.
Privacy Settings Set the following options pertaining to your privacy level when viewing web pages: Enable location (allow sites to request access to your location) Remember form data (remembers data you entered into forms for later use) Accept cookies (allow websites to save and read “cookie” data from your device whenever you visit their site) Clear cache (delete all cached information from visited web pages) Clear history (clears the browser navigation history) Clear all cookie data (clears a
4. Select your desired time format: 12HR = 12:00am-12:00pm (default) 24HR = 12:00-24:00 5. Tap in the Language field to select desired language. **Only English available at this time. Multiple languages will be available with future firmware upgrades.** 6. Tap to adjust the screen brightness. When Auto Brightness is selected, your device senses the light exposure and automatically adjusts the screen’s brightness accordingly (i.e., in dark environments the screen automatically brightens). 7.
Connecting to Public Wi-Fi Hotspot If you are connecting via a public Wi-Fi hotspot, it may be necessary to immediately launch the browser and provide the hotspot login information prior to having an active internet connection. 1. Follow steps 1-5 above to select the hotspot Wi-Fi network. 2. Select Web from the Application Quick Launch Bar. 3. Enter the login information as required by the hotspot.
2. Tap the desired Slideshow Interval to set the speed at which the slideshow photos transition from one to another (default = 5 seconds). 3. Tap the desired Slideshow Transition to set the special effects as slideshow photos transition from one to another (default = Random). 4. Tap Enable Music with Slideshow if you want to play background music with your slideshows (default = On). 5.
MUSIC These audio file formats are supported: MP3, WAV, AAC and OGG Methods that can be used to add audio files to your Music List: Import audio files from an SD card Save audio files from email attachments Download audio files from online music websites Play Music 1. Select Music from the Application Quick Launch Bar. 2. If you have an SD card inserted, a Select Media Source pop-up window appears. Select the desired media source from which you want to play your audio files. 3.
Use the control panel to pause/play, play previous/next audio file, and use the volume control panel to adjust the volume. You can also use the volume buttons on the side of your device to adjust the volume. To return to the Music List screen, tap Menu. to minimize the Music Play screen. The music continues to play as Tap background music for the Reader and photo slideshows if you have selected Enable Music with Slideshow (pg. 39).
VIDEOS The video file format supported: MPEG4 Methods that can be used to add videos to the internal memory: Import video files from an SD card Save video files from email attachments Download videos from online video websites While viewing videos, you can turn your device to rotate the orientation of the screen from vertical to horizontal. Play Video 1. Select Videos from the Application Quick Launch Bar. 2.
1. To delete all videos, tap Select All, and then Delete Selected. 2. To delete selected videos, tap on the desired video files you want to delete, tap Delete Selected. PHOTOS These photo file formats are supported: JPEG, BMP, PNG, and GIF (non-animated) The following methods can be used to add photos to the internal memory: Import photos from an SD card (pg.
Display next photo listed in Photo Gallery Next Delete (Internal Memory Only) Delete displayed photo Import (SD Card only) Import photo into the internal memory (pg. 46) Play Slideshow You can set photo slideshow display functions through Settings> Photos (pg.39). To play a slideshow of all photos, in the Photo Gallery screen, tap Slideshow. To play a slideshow of selected photos, tap on each photo you want to include, tap Slideshow.
Indicates selected as wallpaper 5. Tap to return to the Photo Gallery screen. Import Photos You can import individual photos from your SD card into the internal memory when desired. 1. Insert your SD card. 2. Select Photos from the Application Quick Launch Bar. 3. Tap SD Card in the Select Media Source pop-up window. 4. In the Photo Gallery screen, to import all photos, tap Select All Import Selected. OR To import selected photos, tap on each photo you want to import, tap Import Selected.
EMAIL POP3, SMTP, IMAP and Exchange accounts are supported. Setup New or Add Accounts You can enter multiple personal email addresses that you would like to access through your p a n d i g i t a l n o v e l . 1. Select Email from the Application Quick Launch Bar. 2. Tap into the Email address field to launch the keyboard, enter your email address. 3. Tap into the Password field and enter your email password. 4. Tap Next. 5.
Email Inbox 1. Select Email from the Application Quick Launch Bar. 2. If you set up an email account during the initial setup, it is listed in the Email Accounts screen. If you did not set up an email account during the initial setup, or would like to set up a new account, tap Settings, tap Add Account. 3. Tap directly on the email account, or tap tap Inbox. next to the email account, Open Email Message 1. In the Inbox screen, tap on an email to open it. 2.
Add Senders to Contacts 1. If you want to add senders’ email addresses to your Contacts list, tap next to the desired email messages, tap Add to Contacts. 2. The email address is saved. If you want to add additional contact information (i.e., name, phone, address, etc.) to this contact, use the Contacts feature (pg. 54). Folders To help you keep your email messages organized, you can create personalized folders into which you can move your emails. 1. In the Inbox screen, tap Folders. 2.
Set Default Account One email address must be designated as the default account, so if you have multiple email accounts you can designate any one as the default. 1. Select Email from the Application Quick Launch Bar. 2. On the Email Accounts screen, tap Settings. 3. Tap next to the desired account to set as default, tap Set as Default. If you delete the account that was designated as the default account, the next email listed is automatically designated as the default.
In the Alarm screen, tap to adjust the volume of the tone. Shut Off Alarm Alert When a scheduled alarm is activated, a pop-up window with the alarm information appears. Tap on the Alarm pop-up window to stop the alert, tap alert window. to close the Edit Alarm 1. In the Alarm screen, tap on the alarm you want to edit. 2. In the Edit Alarm screen, make desired edits tap Save. De-Activate Alarms You may have instances where you want to temporarily de-activate alarms rather than delete them. 1.
Edit Event 1. On the Calendar screen, tap on the date with the event you want to edit. 2. In the Edit Event screen, tap in entry fields that you want to change, tap Save. 3. Tap to return to the Calendar screen. Snooze or Cancel Event Alert When a scheduled event is activated, a pop-up window with the event information appears. Tap Snooze if you want to be reminded again in 10 minutes. Tap Dismiss to cancel the alert. Delete Event Delete Single Event 1.
IMPORT SD CARD You can quickly and easily import all media files of selected media types from your SD card. 1. Insert your SD card. 2. Open the Application Quick Launch Bar and then select Import SD. 3. In the Import Media window, tap All to import all files of all media types, or tap next to only the desired media type(s). 4. Tap Import. If you import eBooks with eBook cover images, the image file must be named the same as the eBook files. For example, myebook.pdf, myebook.jpg.
CONTACTS You can create an address book of your personal contacts, including personal notes as desired. Select Contacts from the Application Quick Launch Bar. Add New Contacts 1. In the Contacts screen, tap Add Contact. 2. In the Add Contact screen, tap in each entry field to enter the contact information. 3. Tap Save. You can also add contact email addresses directly from received emails (pg. 49). Edit Contacts 1. In the Contacts screen, tap on the desired contact name that you want to edit. 2.
GAMES The following pre-loaded games are provided for your entertainment: Solitaire* Link Up *To view the Solitaire rules and instructions, launch the desired game, tap Help. USER GUIDE The full p a n d i g i t a l n o v e l User Guide is included as a book in your My Library bookshelf. You can view it by tapping on the User Guide book cover. Once open, you can use the standard Reader functions to search and navigate through the document in the same manner as your downloaded media files.
2. If a message appears advising you to install a Driver for your device, simply click Cancel. Example of Windows Vista message: Click Cancel In Windows Explorer, PD_NOVEL is listed as one of the drives connected to your computer. There are 4 pre-assigned folders listed under PD_NOVEL: eBooks (PDF, EPUB) Photos (JPG, JPEG, BMP, PNG, GIF) Music (MP3, WAV, AAC, OGG) Videos (MPEG4) 3.
3. When the message “Safe to Remove Hardware” appears, you can disconnect the USB cable from your p a n d i g i t a l n o v e l and computer. Windows VISTA 1. On the Windows System Tray, click the hardware removal icon. 2. Click the Safely remove USB mass Storage device message corresponding with the p a n d i g i t a l n o v e l device drive. 3.
Adobe Digital Editions Adobe Digital Editions (ADE) is software for viewing and managing eBooks and other digital content. To use ADE, you need a free Adobe account. You can register an account and download the Installer software at: http://www.adobe.com/products/digitaleditions Authorize your p a n d i g i t a l n o v e l for ADE After you authorize your p a n d i g i t a l n o v e l , it appears as a device in ADE (titled PD_NOVEL).
computer to re-activate the authorization. If an Adobe eBook has an expiration, it will expire on your p a n d i g i t a l n o v e l . If an eBook is returned in ADE before it expires, the next time you connect your p a n d i g i t a l n o v e l to your computer, ADE updates the status of the returned eBook on your p a n d i g i t a l n o v e l , and you won’t be able to read it. Delete Adobe eBooks 1. Select Adobe® eBooks from the Application Quick Launch Bar. 2.
2. Click the Update Version download (i.e., [version#].zip) for your model, and save the file on your computer. 3. Copy the [version#].zip file onto a SD card. Do NOT unzip the file before copying to the SD card. 4. Turn your p a n d i g i t a l n o v e l off. 5. Insert the SD card (with [version#].zip file) into the p a n d i g i t a l novel. 6. Press the Volume + key and slide the power key at the same time; hold for 5 seconds, and then release both buttons.
A: You can download media from Barnes & Noble, import media from your SD card, or copy media files from your computer. Q: Can I create personal bookshelves for organizing my media? A: Yes. On the My Library screen, tap Bookshelves (pg. 24). Q: Do I need an account with Barnes & Noble to download from their site? A: Yes. You need an account and media in your Barnes & Noble download library before you can download into your device.
Q: Can I receive books from my friends & family? A: Yes. Refer to the Lend/Return Books function to return books that have been lent to you (pg. 22). Q: How long can I lend or keep a borrowed book? A: Two (2) weeks. READER Q: Can I view media files in either vertical or horizontal orientation? A: Yes, digital media (eBooks, eMagazines, eNewspapers) or photos. To automatically switch viewing orientation, simply turn your device while viewing these types of media.
Q: Can I read books stored on my SD card? A: Yes, however, it’s recommended that you import the book into your pandigital novel so it is available after you remove the SD card. WEB Q: Do I need a Wi-Fi adapter to connect to the Internet? A: No. The Wi-Fi adapter is built-in to your pandigital novel. Q: Can I have multiple browser windows open at the same time? A: Yes, up to 8 windows (pg. 35). Q: Can I change browser settings? A: Yes.
Q: How do I add photo files to my p a n d i g i t a l n o v e l ? A: You can download photo files from your favorite online photo sharing websites, import photo files from your SD card (pg. 53), or copy photo files from your computer (pg. 55). Q: Can I view individual photos as well as slideshows? A: Yes. On the Photo Gallery screen you can select individual photos to view or tap Slideshow to play a slideshow (pg. 44). Q: Can I set preferences for how my slideshow displays? A: Yes.
Battery Management The p a n d i g i t a l n o v e l battery is not fully charged out of the box, so it is recommended that you charge the battery for at least 4 hours before you start to use your device. The rechargeable battery is designed and manufactured to be used and recharged for 500+ complete charge/discharge cycles. The capacity of the battery reduces each time it is charged/depleted.
Technical Specifications Product Specs 7” Digital TFT LCD Display 600x800 pixels outer unit 7.5” x 5.
Limited Warranty The limited warranty set forth below is given by Pandigital with respect to Pandigital brand electronics products purchased and used in the United States of America. Pandigital warrants this product against defects in material or workmanship as follows: LABOR: For a period of one (1) year from the date of purchase, if this product is found to be defective, Pandigital will repair or replace the product, at its option, at no charge.
Some states do not allow the exclusion or limitation of incidental or consequential damages, or allow limitation on how long an implied warranty lasts, so the above limitations or exclusions may not apply. This warranty gives you specific legal rights, and you may have other rights, which vary from state to state.
FCC Radiation Exposure Statement: This equipment complies with FCC radiation exposure limits set forth for an uncontrolled environment. This device is designed for hand-held operation only. The antenna(s) used for this transmitter must not be collocated or operating in conjunction with any other antenna or transmitter within a host device, except in accordance with FCC multi-transmitter product procedures. Disclaimers Barnes & Noble and the “BN” logo are registered trademarks of Barnesandnoble.com LLC.
Use of Digital Content: Upon your payment of the applicable fees set by Barnes & Noble, Barnes & Noble grants you the non-exclusive right to keep a permanent copy of the applicable Digital Content and to view, use, and display such Digital Content an unlimited number of times, solely on the Device or as authorized by Barnes & Noble as part of the Service and solely for your personal, non-commercial use.
General No Illegal Use and Reservation of Rights: You may not use the Device, the Service or the Digital Content for any illegal purpose. You acknowledge that the sale of the Device to you does not transfer to you title to or ownership of any intellectual property rights of Pandigital or its suppliers. All of the Software is licensed, not sold, and such license is non-exclusive.
THIS AGREEMENT SHALL BE LIMITED TO THE AMOUNT ACTUALLY PAID FOR THE DEVICE. THE LAWS OF CERTAIN JURISDICTIONS DO NOT ALLOW THE EXCLUSION OR LIMITATION OF INCIDENTAL OR CONSEQUENTIAL DAMAGES. IF THESE LAWS APPLY TO YOU, SOME OR ALL OF THE ABOVE EXCLUSIONS OR LIMITATIONS MAY NOT APPLY TO YOU, AND YOU MAY HAVE ADDITIONAL RIGHTS.