
Operating Instructions


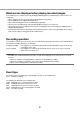

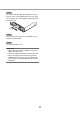
Table Of Contents
- Preface
- Before using this product
- Use an SD memory card
- Operation window
- Basic operation
- Login operation at startup
- Monitor live images
- Record images
- Play recorded images
- Play images from a designated point
- Search and play
- Play back copied images
- Event function
- Copy recorded images
- About the face matching function
- Operate the camera
- Configure the network settings
- Network security of the recorder
- Display the operation window
- About the operation window
- Monitor live images from cameras
- Play recorded images
- Play image recorded at a designated date & time
- Search and play recording events (REC event search)
- Motion detection search and playback (VMD search)
- Check a list of copied recorded images
- Event function
- Copy recorded images
- Download recorded images currently being played
- Play the copied/downloaded recorded images
- Operate the camera
- Setup
- Notification by e-mail
- Troubleshooting
- Glossary

8
9
Step 3
Close the SDHC/SD memory card slot cover.
Note:
• WhenremovingtheSDmemorycardfromthe
slot, push the card until it clicks and pull it out
straight.
• WhenpullingouttheSDmemorycard,holdboth
edges with your fingers.
• TheSDHC/SDmemorycardslotcoveris
designed to come off when an excessive force is
applied. In this case, attach the slot cover to the
original position.
Step 1
Open the SDHC/SD memory card slot cover.
Step 2
Insert a SD memory card to the slot until it clicks.
Hearing a click means that the card is properly insert-
ed.
Use an SD memory card
Insert an SD memory card (option)
Pull the tab
down.
SDHC/SD memory
card slot cover
When inserting an SD memory card,
confirm that the label on the SD
memory card is upside and only the
upper right corner of the card has
different shape.
Insert a DVD disc (commercially available, only for WJ-NV200VK)
Step 1
Open the DVD drive cover.
Pull the tab down.
DVD drive cover
Step 2
After confirming that the power of the recorder is on,
press the eject button located at the center of the
DVD drive and pull the disc tray gently.
Note:
• Aftercopyingtherecordeddataonadisc,per-
form finalization (the procedure to eject the DVD)
to enable play-back on a PC. (☞ Operating
Instructions (PDF))
If the disc is not finalized, the tray may not open
even after the eject button is pressed.
Eject button