
Operating Instructions


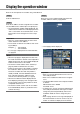
Table Of Contents
- Preface
- Before using this product
- Use an SD memory card
- Operation window
- Basic operation
- Login operation at startup
- Monitor live images
- Record images
- Play recorded images
- Play images from a designated point
- Search and play
- Play back copied images
- Event function
- Copy recorded images
- About the face matching function
- Operate the camera
- Configure the network settings
- Network security of the recorder
- Display the operation window
- About the operation window
- Monitor live images from cameras
- Play recorded images
- Play image recorded at a designated date & time
- Search and play recording events (REC event search)
- Motion detection search and playback (VMD search)
- Check a list of copied recorded images
- Event function
- Copy recorded images
- Download recorded images currently being played
- Play the copied/downloaded recorded images
- Operate the camera
- Setup
- Notification by e-mail
- Troubleshooting
- Glossary

60
61
Step 3
Enter the user name and password registered in the
recorder, and then click the [Login] button.
→ The top page will be displayed.
Important:
• Refertoanetworkadministratorforthesetuser
name and password.
• RefertotheInstallationGuideforhowtoregister
users.
• Thedefaultadministratornameandpasswordare
as follows.
Administrator name: ADMIN
Password: 12345
• Toenhancethesecurity,changetheadministrator
name and password before running the recorder.
Change the password periodically. Refer to the
Installation Guide for how to change the pass-
word.
• Refertopage98 when a message is displayed on
the information bar or when an unnecessary sta-
tus bar or scroll bar is displayed on the window.
Display the operation window
Boot the PC and operate the recorder using a web browser.
Step 1
Start the web browser.
Step 2
Enter the IP address or URL assigned to the recorder
into the address box, and then press the [Enter] key.
→ The authentication window will be displayed. The
authentication window will not be displayed when
"Off" is selected for "User authentication" on the
[Basic] tab of "User management" of the setup
menu.
Important:
• Refertoasystemadministratorforfurtherinfor-
mation about the set IP address.
• Donotattach"0"beforethenumberswhenenter-
ing IP address.
Example: b 192.168.0.50
× 192.168.0.050
• Ifamessageisdisplayedontheinformationbar,
see page 98.
Note:
• Whenthetoppageisdisplayedforthefirsttime,
the install wizard of the ActiveX control required to
display images from the camera will be displayed.
Follow the instructions of the wizard.
• TheActiveXcontrolandtheviewersoftware(☞
page 85) will be installed at the same time.
• Followtheinstructionsofthewizardtocomplete
the installation. When any ActiveX control for a
Panasonic recorder other than this product is
already installed, uninstall "WebVideo ActiveX"
from "Uninstall a program" and then install
ActiveX control for this product. (☞ Page 85)
• Whentheinstallationwizardisdisplayedeach
time displaying other page even though installa-
tion of ActiveX control for this product has been
completed, reboot the PC.
• TheActiveXcontrolusedoneachPCshouldbe
licensed individually. Refer to your dealer for the
software licensing.