Operating Instructions Network Disk Recorder Model No. WJ-NV200K, WJ-NV200VK WJ-NV200K/G (This illustration represents WJ-NV200VK.) Before attempting to connect or operate this product, please read these instructions carefully and save this manual for future use. The model number is abbreviated in some descriptions in this manual.
CONTENTS About the face matching function............................. 45 Face matching alarm actions................................ 45 Reset face matching alarm .................................. 46 Display the face matching thumbnail again.......... 46 Start/stop face matching actions manually........... 47 Operate the camera.................................................. 48 Camera control panel............................................ 48 Panning/Tilting.............................................
Play the copied/downloaded recorded images........ 85 Play recorded images copied on an SD memory card or a DVD disc................................................ 85 Play recorded images downloaded using a web browser................................................................. 85 Install the viewer software..................................... 86 Uninstall the viewer software................................ 86 How to use the viewer software............................ 87 Operate the camera...........
Preface The network disk recorders WJ-NV200K, WJ-NV200VK and WJ-NV200K/G (hereinafter, recorders) are designed for use within a surveillance system, and record images/audio from up to 16 network cameras (hereinafter, cameras) on the hard disk drives. Up to 16 cameras can be registered. This recorder supports HDMI (High-Definition Multimedia Interface) standard which allows displaying playback/ live images with superior quality when connecting to a high-definition monitor using an HDMI cable (option).
Adobe® Reader®: It is necessary to refer to the operating instructions on the provided CD-ROM. * Windows® XP compatibility mode is unavailable. Important: • If using a PC that does not meet the above system requirements, it may cause problems such as slow imaging or the browser becomes inoperable. • Microsoft® Windows® 7 Starter and Microsoft® Windows Vista® Starter are not supported.
Restrictions when using this product When using this product, some functions have the following restrictions. Before using this product, keep the following in mind. When displaying live images from the camera When recording images • The actual time of recording trigger (event occurrence time, start time of the schedule recording, etc.) and the recording start time (time displayed on the recording event list) may not exactly be the same.
Before using this product Face matching function Face recognition refers to a function that uses a connected camera supporting this function to detect facial features of people and matches them against similar facial features recorded earlier or contained in live images. The matching accuracy varies depending on installation, settings and adjustment of the camera, ambient environment and object.
Black screen displayed when playing recorded images In the following cases, a black screen may be displayed during playing recorded images. However, this is not malfunction.
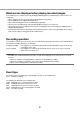
Use an SD memory card Insert an SD memory card (option) Step 1 Step 3 Open the SDHC/SD memory card slot cover. Close the SDHC/SD memory card slot cover. Note: • When removing the SD memory card from the slot, push the card until it clicks and pull it out straight. • When pulling out the SD memory card, hold both edges with your fingers. Pull the tab down. SDHC/SD memory card slot cover Step 2 Insert a SD memory card to the slot until it clicks. Hearing a click means that the card is properly inserted.
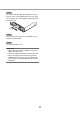
Step 3 Place a disc with the label side up and fit the hole of the disc to the center (spindle) of the tray. Then, push the tray gently. Click sound will be heard and the disc will fit in the tray. Spindle Step 4 Push the tray to the end. Click sound will be heard and the tray will be fixed. Step 5 Close the DVD drive cover. Important: • When opening/closing the DVD drive tray, do not apply force on the tray. • When not using the DVD drive, close the disc tray.
Operation window The recorder can be operated using the provided mouse connected to the mouse connection port on the front side of the recorder. When operating the recorder using a web browser, refer to "Configure the network settings" (☞ page 55). Ctrl (control) screen display The control screen is the default screen at startup. The main operations of the recorder are performed from this screen. q e w r q Image display area Displays images from the camera.
Wide view display This view offers a large image display area, especially suited for monitoring live images. However, operations are restricted (no playback of recorded images). q w e q Image display area Displays images from the camera. (☞ Page 19) r e Operation panel Switches between screens and screen patterns. Displays the current date & time. While daylight saving time is activated, the time will be displayed with an asterisk (*).
Image display area The number of images that can be displayed on the multiscreen differs for the control screen and the wide view screen. Playback of images on a 16-screen is not possible while working with the control screen. The default screen on startup (default screen) can be set for each login user in the image display area. The following screen patterns can be selected. Refer to the Installation Guide for further information about the settings of the default screen.
Status display panel Normal operation w e In case of alarm/error (When the associated buttons are displayed) r q w i t o e y u q Status display area Recorder status indications and their details are shown in the table below. In the event that the recorder enters several statuses at the same time, these are displayed in their order of priority. If both statuses have the same priority, the one that occurred last will be displayed.
e Error button Indicates that an error has occurred. Turn yellow in the error state. Clicking the buttons will toggle between displaying/not displaying buttons such as the error log button and the error reset button. r Alarm log display button The alarm logs are displayed on the operation panel of the control screen. Up to 750 error logs are saved. When more than 750 logs are filed, the older logs will be overwritten by the newer logs. In this case, the oldest log is the first to be overwritten.
Basic operation To operate, use the mouse connected to the recorder to move the mouse cursor displayed on the main monitor and left-click the buttons or tabs displayed on the screen. (Hereinafter, "Left-click..." will be described as "Click..." in this document.) In lines where the [D]/[C] buttons are displayed, the value on which the cursor is placed can be changed by turning the mouse wheel. For example, when setting date & time, the hours, minutes and seconds can be changed.
[Next] button Changes the keys to be displayed for character entry. The displayed keys are changed as follows: Keys for the language selected by the language selection pull-down menu → Combination characters → Special characters [Enter] button Determines the entered characters and closes the onscreen keyboard. Note: • Basic operations are also applied to the "Login" window and the window for entering a password. • Click the [×] button to close the window without determining the entered characters.
Login operation at startup When "Off" is selected for "Auto login" (☞ Installation Guide), the recorder will start up in the logged-out state after completing the system check. When the operation window is displayed on the main monitor, enter a user name and password as follows: Step 1 Step 3 Click the [Login] button on the operation screen. → The "Login" window will be displayed. Click the [OK] button.
Monitor live images When the recorder started up, live images from cameras will be displayed according to the configured settings. Live images from cameras are displayed via the recorder. Image data Network cameras Main monitor Recorder Live monitor It is possible to display live images on a 1-screen or on a multiscreen. Depending on the configuration of the live monitor, cameras can be switched automatically and the respective camera image can be displayed on a 1-screen.
Camera number panel The camera number panel shows all camera-related information, such as registration status, camera title and recording status. Camera number: (Character color) White: Camera is registered. Gray: Camera is not registered. (Background color) Aqua: Image display area is displaying images Blue: Camera is registered and image display area is not displaying images. Gray: Recording is not possible or camera is not registered.
Display images from cameras on a multiscreen (control screen) Live images from cameras can be displayed on a multiscreen (4-screen, 16-screen). • The audio of the selected camera will be output.
Wide view operation panel Camera number panel Multiscreen buttons When the screen segments are not equally divided by the setting (Default) Camera number panel The camera number panel shows all camera-related information, such as registration status, alarm status and recording status. Camera number [CAM]: (Character color) White: Camera is registered. Gray: Camera is not registered.
Change the camera display position on the screen The default camera display positions are as follows: When the screen segments are not equally divided by the setting (Default) 3-screen 3-screen 1 1 6-screen 2 2 3 3 1 1 4 4 9-screen 6-screen 2 2 5 5 3 3 6 6 9-screen 1 1 4 4 2 2 5 5 16-screen 3 637 8 6 8 9 7 9 16-screen 2 3 4 5 6 1 2 3 7 4 8 9 10 5 6 7 1 11 12 13 14 16 8 15 9 10 11 12 13 14 15 16 When the1-screen screen segments are equally (4:3) 12-screen 4-screendivided by the setting 1-sc
Display or hide the camera title It is possible to display/hide the camera title displayed on the monitor. Step 1 Each time the [OSD] button is clicked, the camera title will be displayed/hidden. Note: • The setting to display/hide the camera title will be retained until the power is turned off. Once the power is turned off and on again, the camera title will be displayed on system start. Use digital zoom (control screen only) Images on the 1-screen and 4-screen can be digitally zoomed.
Record images Live images can be recorded on the recorder. Images from up to 16 cameras can be simultaneously recorded with this recorder. Network cameras Image data HDD Recorder Record images (schedule recording) Recording can be automatically started and stopped according to a previously specified schedule. Refer to the Installation Guide for schedule recording. Note: • When event recording is triggered by an alarm during the schedule recording, event recording has the higher priority.
Play recorded images Display the images recorded on the recorder’s hard disk on the main monitor. Playback operation can be made while recording. Playback of images can be controlled from the operation display area. Image data Main monitor HDD Recorder Note: • When playing recorded images on a 1-screen, audio recorded together with these images will be output. • When displaying recorded images on a multiscreen, audio from the camera to be displayed on a screen will be heard.
The functions of the buttons are as follows: Function Example Operation Playback button Plays recorded images. Clicking this button while playback is paused will cancel the pause status. When the playback button is clicked during fast playback/fast reverse playback, the playback speed will be x1. Stop button Playback will stop and live images will be displayed when this button is clicked during playback/pause. Pause button Playback will be paused when this button is clicked during playback.
Play images from a designated point It is possible to start playback from a designated date & time or the latest recorded image. Play image recorded at a designated date & time Start playback by designating the date & time of a recorded image on the date & time operation panel. Date & time operation panel (normal display) Step 4 To stop playback and return to live images, click the [Live] button or the stop button on the playback operation panel. → Playback will stop, and live images will be displayed.
Play the latest recorded image Playback of the latest recorded images will start. The starting point of playback is around 30 seconds before the date & time of the latest recorded images. Date & time operation panel (normal display) Step 1 Click the [Go to last] button. → Playback of latest recorded images will start. The date & time operation panel will change to playback display (☞ page 30).
Playback by designating a timeline When playback starts, the date & time operation panel will change to playback display. This section explains how to use the timeline display to designate a playback date & time by operating the playback slider.
[Playback slider] Displays the time during playback. Drag and drop the playback slider to a desired time on the timeline to start playback from that time. buttons will move the playback point by the amount of time specified under [Jump interval]. Available ranges: 1min/ 3 min/ 5 min/ 10 min/ 15 min/ 30 min Note: • The playback slider may not soon move to the desired position. [Playback of audio] This item is displayed when the recorder is set up to lock in a camera with audio output.
Search and play Search a desired recorded image and play it. There are the following 2 searching methods. • Play images selected from alarm and error logs (Log search) • Search and play images recorded triggered by the motion detection of the camera (VMD search) Play images selected from logs (log search) Display the alarm log list or error log list, and click a date & time to play the corresponding recorded images.
Step 4 Note: • Playback can also be stopped and live images can also be displayed by the following operations: • Clicking the [x] button on the date & time operation panel (playback display) • Changing the playback medium To stop playback and return to live images, click the stop button on the playback operation panel. (☞ Page 26) → Playback will stop, and live images will be displayed.
• The VMD search function searches the entire camera image by default. To designate a search area, click the [Setup] button next to [Detection area / Mask duration] on the "VMD search setup" panel. (☞ Page 34) • It may take some time until the search results are displayed. Step 6 To stop playback and return to live images, click the stop button on the playback operation panel. → Playback will stop, and live images will be displayed.
Step 4 Step 5 If VMD search takes too much time or the search produces too many results, set a mask duration to reduce the search frequency. When mask duration is set, no motion detection will be performed from the time motion is detected to the time mask duration is set. To set, click the [C] button next to [Mask duration setup] on the advances setup panel. Mask duration: 1 s/ 5 s/ 10 s/ 30 s/ 1 min/ 5 min/ 10min Default: 1 s Click the [Back] button or the [x] button.
Play back copied images Display a list of recorded images copied onto an SD memory card or a DVD disc* (copied data), select recorded images from the list, and play them. It is possible to search for copied data using filters. * DVD-drive-equipped models only (No audio will be heard when a DVD disc is being played back.
Event function The recorder will take an event action when any of the following events occur. • Terminal alarm: An event when an alarm input signal is supplied from an external device such as a door sensor to the alarm input terminal on the rear of the recorder. • Camera site alarm: An event when an alarm (camera terminal alarm, etc.) is detected by a camera. • Command alarm: An alarm when receiving an alarm from a PC, etc. via a network.
Event action Alarm action Mode*1 A B The alarm icon will be displayed on the event error b b display area of the web browser. Description Display the alarm icon on a web browser C b D × Display the alarm message on a web browser A window that notifies of an event occurrence will be displayed on the web browser. * The alarm message displayed last has priority. To close the window, click the [x] button.
Cancel the alarm action The recorder will take an alarm action according to the settings configured in advance when an event occurs in the alarm mode (ALM). Information of the occurred alarm will be displayed on the status display panel of the main monitor. (☞ Page 14) To reset the alarm action, click the [Alarm] button on the status display panel, and click the alarm [Reset] button. When an item other than "Ext.
Copy recorded images It is possible to manually copy images recorded in the recorder onto an SD memory card and DVD (DVD-R, +R) disc. It is recommended to make back-up copies on a regular basis for unexpected situations such as malfunction of the hard disk drives. It is impossible to copy recorded images when the recorder is in the following statuses.
Note: • The copy panel cannot be displayed in the web browser when it has already been opened by another user. When copying is already underway, the copy cancel window will be displayed. Note: • To attach a code for alteration detection, click the [Advanced] button. On the advanced setup window, set [Attach the alteration detection code] to "On".
Step 5 Step 7 Enter the password, and then click the [Next] button. For character entry, refer to "About the operation of on-screen keyboard" (☞ page 16). • Enter 5 to 8 alphanumeric characters for a password. • To confirm the password, enter the same password again into the "Confirm" column. • To save the entered password, check "Memorize password temporarily". The next time data is copied, the password entry window will open with the password already filled in.
Click the [Copy] button Clicking the [Copy] button on the operation panel of the main monitor after copying is complete will display the following window: Select "Eject a medium" and click the [OK] button to perform finalization (the procedure to eject the DVD disc). When finalization is complete, the completion window will be displayed, indicating that the DVD disc can be removed. Then, press the eject button.
Format SD memory card To copy recorded images onto an SD memory card, it is necessary to format an unformatted SDHC/SD memory card or an SDHC/SD memory card formatted with a PC or another device with this recorder. Note that formatting the SD memory card will delete all data stored on it. Important: • Formatting will delete all data and setup information stored on an SD memory card. Image data once deleted cannot be restored.
About the face matching function When the face matching function is activated, it detects facial features of people in images, matches them against similar facial features recorded earlier or contained in live images, and issues an alarm when a match is found. Important: • Face matching does not work while recorded images are being played or the setup window is displayed. • Face matching alarm does not apply event recording.
Reset face matching alarm Proceed as described below to cancel the face matching alarm. Note: • To close the face matching result window, click the [x] button. Step 1 Click the [Alarm] button on the status display panel. → The alarm [Reset] button will be displayed. Step 2 Click the alarm [Reset] button. → The face matching alarm indication disappears. Alarm actions (buzzer/terminal output) will be stopped at the same time.
Start/stop face matching actions manually The face matching actions can be changed manually. Step 1 Click the [Alarm] button on the status display panel. → When face matching is stopped, the [Face:On] button is displayed, when it is in progress, the [Face:Off] button appears. : Face matching in progress : Face matching stopped Step 2 Click the [Face :On] button or the [Face :Off] button. → This starts or stops face matching.
Operate the camera When displaying live images from a camera with the panning/tilting function on a 1-screen or 4-screen, the following camera operations are available. Note: • It may be impossible to operate the camera or some functions may be inoperable depending on the model of the camera. • Operations are performed from the operation window. When working with the wide view screen, open a 1-screen or 4-screen operation window by clicking the [Ctrl screen] button in the bottom right corner of the screen.
• [Setup] button Displays the camera setup window for registering a home position (☞ page 53) and executing auto back focus (☞ page 53). • [Back] button Closes the "Camera control [Advanced]" and returns to the camera control panel. Note: • Controlling the cameras is not possible on the wide view screen and on the 16-screens. Panning/Tilting Adjusts the horizontal/vertical position of the camera.
Zooming Zoom the displayed camera image in/out by zooming the camera lens. Depending on the models of the connected cameras, the available zooming factors may be different. Refer to the operating instructions of the camera for further information. Note: • To enable operations in the displayed camera image from the recorder, check "Enable camera control with mouse" on the camera control panel.
Iris (brightness) adjustment Adjusts the lens iris of the camera. Step 1 Step 3 When displaying the images on a 4-screen, select the desired cameras. Click the [–] or [+] button. It is possible to reset the set brightness by clicking the [Reset] button. Step 2 Click the [Detail] button. → The "Camera control [Advanced]" panel will be displayed. (☞ Page 48) Auto mode Activates the auto mode function of the camera. Step 1 Step 4 When displaying the images on a 4-screen, select the desired cameras.
Register camera preset positions Register the current camera position as a preset position. The preset positions can be registered only when using a camera supporting the preset position function. Step 1 Step 4 When displaying the images on a 4-screen, select the desired cameras. Click the [D]/[C] button in the [Position] box to select a preset number. Select a preset number (1 - 256) to be registered. Step 2 Step 5 Click the [Detail] button. → The "Camera control [Advanced]" panel will be displayed.
Register home position The home position is set with the camera positioned at an already registered preset position. Note: • On some Panasonic camera models, preset position number 0 is registered as home position. Refer to the "readme.txt" on the provided CD-ROM about supported cameras. Step 1 Register the camera preset positions on the "Camera control [Advanced]" panel. (☞ Page 48) Step 2 Click the [Setup] button. → The camera setup window will be displayed. (☞ Page 49) Step 4 Click the [Regist] button.
Set up mask areas Set up mask areas of the camera. For further information about this function, refer to the operating instructions of the camera in use. Step 1 Click the [Start] button. → A grid will appear over the image display area and the segments designated as mask areas are covered with white translucent masks. Step 2 Click a segment in the image display area. → Each click of the segment toggles between On and Off for the mask area setting. Step 3 Click the [End] button.
Configure the network settings The recorder can be operated using a mouse connected to the front of the unit or from a web browser on a PC (excluding certain functions and settings). On the following pages, operation from a web browser, setting up the PC and related matters will be described. When operating the recorder using a web browser, it is necessary in advance to configure the network settings of the recorder and a PC.
Step 2 Step 4 Click "View network status and tasks". Click [Properties] → The "Network and Sharing Center" window will be displayed. Step 3 Click "Local Area Connection". → The "Local Area Connection Properties" window will be displayed. Step 5 Click "Internet Protocol Version 4 (TCP/IPv4)", and then [Properties]. → The "Local Area Connection Status" window will be displayed. → The "Internet Protocol Version 4 (TCP/IPv4) Properties" window will be displayed.
Step 6 Select [Use the following IP address] and set "IP address" and "Subnet mask" as follows: • IP address: 192.168.0.9 • Subnet mask: 255.255.255.0 Depending on the network configuration, it is necessary to configure "Default gateway". Refer to a system administrator for further information about the settings. Step 7 Click the [OK] button and close the window.
Network security of the recorder The security function of the recorder q Access restriction by the user authentication It is possible to restrict users to access the recorder by selecting "On" for "User authentication". (☞ Installation Guide) w Access restriction by changing the HTTP port number By changing the HTTP port number, it is possible to prevent illegal access such as a port scanning, etc.
Firewall Router IP address: 192.168.1.1 Subnet mask: 255.255.255.0 Router Network IP address: 192.168.0.1 Subnet mask: 255.255.255.0 Switching hub IP address: 192.168.1.100 Subnet mask: 255.255.255.0 Default gateway: 192.168.1.1 Recorder IP address: 192.168.0.250 Subnet mask: 255.255.255.0 Default gateway: 192.168.0.
Display the operation window Boot the PC and operate the recorder using a web browser. Step 1 Step 3 Start the web browser. Enter the user name and password registered in the recorder, and then click the [Login] button. Step 2 Enter the IP address or URL assigned to the recorder into the address box, and then press the [Enter] key. → The authentication window will be displayed.
About the operation window Top Page Status display area Current time display area Image display area Download operation area [CAM] tab [HDD] tab [Control] button Displays operations such as searching for and copying recorded images, search results and log information. It can also be used to switch camera images between display of live images on a multiscreen, wide screen, etc. Image display area Playback images and live images will be displayed.
Control panel The following operation panels will be displayed when the [Control] button is clicked. List display area [Multiscreen] box Images recorded using up to 4 cameras can be played simultaneously on a multi-screen. Each click of the button switches to the next 4 screens in the sequence: camera 1 to 4→camera 5 to 8→camera 9 to 12→camera 13 to 16. [Copy data] button Select [SD] or [DVD] for "Disk/Medium" to display this button. The copy data search window will be displayed.
List display area Number of data: Displays the total number of listed data. No: The number will be displayed in the order of occurrence. Date & List: Date & time when an event or trouble occurred will be displayed. Log: Details of the occurred event are displayed. Clicking date & time in the list can start playback from that date & time. (When clicking date & time in the log information, playback will be started from a point approx. 5 seconds before the date & time selected.
Setup panel The following setup panel will be displayed when the [Setup] button is clicked. The settings such as the date & time display of the recorder can be configured. [Date/Language] button Displays the "Date/Language" page. Perform settings such as time & date and daylight saving time. [Camera] button Displays the "Camera" page. Perform registration of network cameras. [REC & event] button Displays the "REC & event" page. Configure the settings relating to the recording schedules and alarms.
Status display area q w e r t w Recording indicator Indicates the status of recording. q Live/playback status display area The status of an image (live image/recorded image) will be displayed. The following information will be displayed: : Indicates that live images are being displayed. : Indicates that playback images are being displayed. : Indicates that reverse playback images are being displayed. : Indicates that fast playback images are being displayed.
Download operation area [Start]/[End] setup [Start]/[End] setup Specify the time range for downloading images and audio by setting a start and end time. This operation is available only during playback on a 1-screen. (☞ Page 83) [Viewer] button Download the viewer software for playing the downloaded images and audio. [Download] button Downloads recorded images and audio at the designated date & time.
[Preset Position] box • [Regist] button Registers the current camera position as a preset position. Select a preset position number (1 - 256) by clicking the [C] button after moving the camera to a position to be registered as a preset position, and then click the [Regist] button. It is impossible to register the position as "Home". [Call] button Moves the camera to the preset position registered in advance.
Monitor live images from cameras Live images will be displayed in the web browser window. It is possible to display live images on a 1-screen or a 4-screen (multiscreen) and to expand the image display area across the full screen. Display images on a 1-screen To display live images on a 1-screen, take the following procedures. Step 2 Step 1 Select the title of the camera. → Live images from the selected camera will be displayed. Click the [Cam. select] button.
Display images on a 4-screen (multiscreen) Live images from cameras will be displayed on a 4-screen. Step 1 Click the [Cam. select] button. (☞ Page 61) → A list of the registered cameras will be displayed in the [Camera selection] box. Step 2 Click the [Multiscreen] button. → Live images from the cameras (registered as a group) will be displayed on a 4-screen.
Play recorded images Display camera images recorded on the recorder’s hard disk. There are 2 ways to play recorded images as follows. • Play image recorded at a designated date & time • Search and play recorded images Playback operation can be made while recording. Step 1 Note: • When displaying images on a 1-screen, audio assigned to the camera from which images are currently being displayed will be heard.
About playback operation The following operations are available during playback: Function [Play]/[Rev play] button Example / [Stop] button [Pause] button [FF]/[FR] button / [Next record]/ [Prev record] button / [Next image]/ [Prev image] button / [Go to last] button Operation • Plays recorded images. • Plays back recorded images in reverse. * Playback and reverse playback may not work when the [Play] or [Rev play] button is clicked while recording images at a lower frame rate.
Play image recorded at a designated date & time Start playback by designating the desired date & time of a recorded image. Playback operation can be made while recording. Step 1 Click the [Cam. select] button on the top page of the operation window, and select a camera for playback from the camera selection box. (☞ Page 63) Step 2 Click the [HDD] tab. (☞ Page 61) Step 3 Click the [C] button and determine the date & time of the desired images. Step 4 Click the [Date search] button.
Search and play recording events (REC event search) Search the recording event list for a recording event and play it back. Important: • To use recording event search, "HDD" must be selected for [Disk/Medium]. It is also possible to filter recording events using the search filters. • Face matching alarm cannot be played back by recording event search on the web browser. Start playback from the alarm log list. (☞ Page 62) [Camera] Searches for images recorded using the selected camera.
[Prev page] button Displays the previous page of the list. [Next page] button Displays the next page of the list. [Date & Time] Start time of recording will be displayed. [Cam] The camera which recorded the images will be displayed. [Evt] Event type will be displayed. (☞ Page 73) [HDD] The hard disk drive number in which the corresponding recorded images are stored will be displayed. [Audio] When audio is attached to recorded images, the audio icon will be displayed.
Motion detection search and playback (VMD search) Search for recorded images from images recorded triggered by the VMD function of cameras by designating a time range. Click a date & time on the result list to play corresponding recorded images. Important: • To perform the VMD search, it is necessary to configure the settings of the connected cameras that support the motion detection function in advance. Refer to the "readme.txt" on the provided CD-ROM about cameras supporting the VMD search function.
Step 5 Click the date & time of the desired recording event. → Playback of recorded images of the selected recording event will start. (About playback operation (☞ page 71)) Note: • Up to 100 logs are saved in the list. When more than 100 logs are filed in the search result, "> 100" will be indicated. • Recorded images will be played on a 1-screen. To play on a multi-screen, click the [Multiscreen] button after starting playback.
Check a list of copied recorded images Display a list of data (recorded images) copied on an SD memory card or a DVD disc*, and then select a recorded image to play from the list. It is possible to search for copied data using filters. Available filters are "Date & time range" and "Camera". * DVD-drive-equipped models only Step 1 [Camera] Searches for images recorded with each selected camera. Mark the checkbox corresponding to the desired camera.
[Cam] A camera used for recording will be displayed. [Evt] Event type will be displayed. (☞ Page 73) [Audio] Nothing will be displayed here. Important: • Do not remove the SD memory card during playback of copied data on the SD memory card. It may damage data on the SD memory card. Note: • When checking a list after inserting the other SD memory card, select "HDD" for "Disk/Medium" in the [Search] box first and then select "SD". • Refer to page 85 for information on how to play copied images.
Event function The recorder will take an event action when any of the following events occur. Terminal alarm: An event when an alarm input signal is supplied from an external device such as a door sensor to the alarm input terminal on the rear of the recorder. Camera site alarm: An event when an alarm (camera terminal alarm, etc.) is detected by a camera. Command alarm: An alarm when receiving an alarm from a PC, etc. via a network.
Cancel the alarm action To cancel the alarm action manually, click the [ALM] button in the status display area. → The alarm action will be canceled. The event recording will stop and return to the operational status just before the event occurred. Cancel the error action When an error (trouble) occurred on the recorder, the recorder will take the error action (a series of actions that notifies of the error occurrence).
Copy recorded images Copy images recorded by the recorder on an SD memory card or a DVD disc*. It is recommended to make back-up cop-ies on a regular basis for unexpected situations such as malfunction of the hard disk drives. Refer to page 40 for further information about the copy function. Refer to page 85 for information on how to play copied images. * DVD-drive-equipped models only Step 1 Step 3 Click the [Control] button on the top page (☞ page 61) of the operation window.
[Password] To copy with password protection, mark the corresponding checkbox and enter a password. (5 to 8 alphanumeric characters) The password will be required to play back the copied data. [Data size] When the [Measurement] button is clicked, size of the data to be copied will be displayed. [Free] The remaining capacity of the destination medium (SD memory card/DVD disc) will be displayed. Step 4 Click the [OK] button. The confirmation window will be displayed. Then, click the [OK] button of the window.
Download recorded images currently being played Designate the start point and the end point of recorded images currently being played and download images to a PC. When downloading recorded images, recorded images and audio will be downloaded as an image data file (filename.n3r) and an audio data file (filename.n3a) respectively. Refer to page 85 for information on how to play downloaded recorded images.
Note: • When "With audio" is selected, the "Download" window will be displayed again after the download is complete. • If a message is displayed on the information bar, see page 98. • When playing on a multiscreen, it is impossible to download recorded images.
Play the copied/downloaded recorded images When recorded images are copied/downloaded, recorded images and audio will be copied/downloaded as an image data file (filename.n3r) and an audio data file (filename.n3a) respectively into the copy/download destination. It is possible to play, save and print the copied/downloaded data files using the dedicated viewer software.
Install the viewer software When the older version of the viewer software is installed on a PC, uninstall it before installing the newer version. Step 1 Step 2 Double-click the downloaded file (wvasetup.exe). → The installer launches. Follow the instructions of the installation wizard. Click the [Install] button. → The Installation will start. When installation is complete and the completion window is displayed, click the [Finish] button.
How to use the viewer software Select "ND_Viewer" from the start menu ("All programs" – "Panasonic" – "Network Disk Recorder" – "ND_ Viewer") or double-click the ND_Viewer icon on the desktop. For images copied on an SD memory card or a DVD disc, double-click the executable file (ND_Viewer.exe) to launch the viewer software (see page 85 for the filing location of the executable file).
• When the number of displayed image data files has reached 100, no more files can be added. The total number of selected image data files is displayed under "Total:" on the list. • Clicking the button will delete all data displayed on the list. Another way to clear the list is to right-click the list and select [Clear all list]. • When there is a data in the same directory as the viewer software or the "data" folder in the same directory, the data will automatically be loaded for playback.
Alteration detection It is possible to detect alterations in data (☞ page 83) if a code for alteration detection has been attached to the downloaded data. When data to which the alteration code has been added is selected, the [ALT CHECK] button will be displayed. Clicking the button starts alteration detection and displays the result in a window. [OK (Not Altered)]: No alteration was detected. [NG (Altered)]: Alteration was detected.
Operate the camera When displaying live images from a camera with the panning/tilting function, the following camera controls are available. It may be impossible to operate the camera or some functions may be inoperable depending on the model of the camera. • • • • • Panning/Tilting: Adjusts the horizontal/vertical position of the camera. Zoom: Zoom in/out the displayed image. Focus: Adjust the focal point. Brightness: Adjusts the lens iris of the camera.
Focus adjustment Adjusts the focal point. The auto focus function is available. Focusing can be adjusted by clicking the [Near] button or the [Far] button. The auto focus function can be performed by clicking the [Auto] button. Iris (brightness) adjustment Adjusts the lens iris of the camera. The brightness (lens iris) can be adjusted by clicking the [–] (darker) button or the [+] (brighter) button. It is possible to reset the adjusted brightness by clicking the [Reset] button.
Auto functions Activate the auto function of the camera according to the settings of the camera. Step 1 Click the [C] button in the [Auto mode] box, and then select the desired auto function from the following. Auto track: The camera will automatically track an object moving on the screen. Auto pan: The camera direction will automatically move (pan) between the start point and end point set in advance.
Setup Basic operations Step 3 Step 1 Click the button for the desired submenu. Click the [Setup] button. Step 4 Configure each setting item. Click the [Set] button after completing the settings. → The settings will be applied. When moving to another page without clicking the [Set] button, the configured settings will be canceled. Important: • If the settings are applied, other login users will be forcibly logged out.
Firmware update To update the firmware of the recorder to the latest version, proceed as follows. Refer to the Installation Guide for the operations when the firmware is saved on the SD memory card. Step 1 Download the firmware of the latest version onto a hard disk drive of a PC. Step 2 Click the [Maintenance] button and then click the [System management] tab. Step 3 Designate the downloaded firmware by clicking the [Browse...] button of "Firmware update". Step 4 Click the [Execute >] button.
Notification by e-mail Alarm mail The following mail will be sent to notify of an alarm occurrence to a registered address when the alarm occurs. Contents of the alarm mail (example) In NV200 (192.168.0.250), alarm was occurred. Alarm date : Jan-01-2010 12:00:00 GMT-5:00 Cause of alarm : COMMAND ALARM 5CH URL : http://192.168.0.250/ Warning mail The following mail will be sent to notify of a trouble occurrence to a registered address when the trouble occurs.
Troubleshooting Before asking for repairs, check the symptoms with the following table. Contact your dealer if a problem cannot be solved even after checking and trying the solution in the table or a problem is not described below. Symptom The message "Please insert a medium." is displayed even after an SDHC/HC memory card is inserted. The alarm buttons are the "Face matching stopped" state even though no operations are performed to stop the face matching function.
Symptom Cause/solution Reference Image refresh of the browser is slow. Response of the browser is slow. • Isn't the network traffic heavy? These symptoms may occur when the network traffic is heavy. − A pop-up is not displayed on the browser. • It may be possible that a pop-up blocker other than Internet Explorer is activating. Check the installed software and cancel the pop-up blocker.
Message displayed on the information bar Depending on the operation system in use, the following may occur. Follow the instructions below when the following occurred. By performing the following solutions, other applications may not be affected. The "Information Bar" expressed in the following symptom and solutions will be displayed just below the address bar only when there is information to communicate.
Glossary DNS (Domain Name System) The long lists of numbers or IP addresses that are used in network environments are difficult to remember, which makes them impractical. This is why PCs are given an easy-to-follow name (domain name) which is converted to an IP address before they are communicated with. The DNS provides translation between domain names and IP addresses. ActiveX Control A software module developed by Microsoft.
FTP (File Transfer Protocol) A protocol that is commonly used for transferring files over the Internet. Full duplex Communications method that allows simultaneous sending and receiving by transmitting in both directions using an independent sending line and receiving line. Global (IP) address IP address assigned to each device connected to the Internet that is equivalent to an address on the Internet. IP address is required for Internet communications.
SMTP (Simple Mail Transfer Protocol) A protocol for sending e-mail on the Internet or an Intranet. Used when transferring mail between servers or when clients send mail to the server. Primary (DNS) server DNS servers usually have more than 2 systems and the primary server is the main system. Private (IP) address IP address assigned when connecting primarily to LAN. Private IP addresses can be assigned freely on a network and do not require a formal application.
Time zone A time zone is a region or a country that has uniform standard time. URL (Uniform Resource Locator) An address for locating information resources such as documents and images on the Internet. VGA (Video Graphic Array) Resolution with 640 x 480 pixels. VPN Service used to make public lines as private lines. Many companies are using this as a new medium of communication instead of costly private lines.
For U.S. and Canada: For Europe and other countries: Panasonic System Communications Company of North America, Unit of Panasonic Corporation of North America Panasonic Corporation www.panasonic.com/business/ For customer support, call 1.800.528.6747 Three Panasonic Way, Secaucus, New Jersey 07094 U.S.A. Panasonic Canada Inc. 5770 Ambler Drive, Mississauga, Ontario, L4W 2T3 Canada (905)624-5010 www.panasonic.ca © Panasonic System Networks Co., Ltd. 2012 http://panasonic.