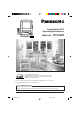
Combination VCR Operating Instructions Model No. PV-C923 As an ENERGY STAR® Partner, Matsushita Electric Corporation of America has determined that this product or product model meets the ENERGY STAR® guidelines for energy efficiency. Please read these instructions carefully before attempting to connect, operate, or adjust this product. Please save this manual. TV/CATV MODE SELECTION When shipped from the factory, the TV/CATV menu option is set to the “CATV.” (Cable Television) mode.
CAUTION RISK OF ELECTRIC SHOCK DO NOT OPEN CAUTION: TO REDUCE THE RISK OF ELECTRIC SHOCK, DO NOT REMOVE COVER (OR BACK). NO USER-SERVICEABLE PARTS INSIDE. REFER SERVICING TO QUALIFIED SERVICE PERSONNEL. WARNING: The lightning flash with arrowhead symbol, within an equilateral triangle is intended to alert the user to the presence of uninsulated dangerous voltage within the product's enclosure that may be of sufficient magnitude to constitute a risk of electric shock.
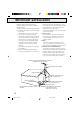
IMPORTANT SAFEGUARDS 9. VENTILATION 13. LIGHTNING Slots and openings in the cabinet back or bottom are provided for ventilation, and to ensure reliable operation of the unit, and to protect it from overheating. These openings must not be blocked or covered. The openings should never be blocked by placing the unit on a bed, sofa, rug, or other similar surface. This unit should never be placed near or over a radiator or heat source.
IMPORTANT SAFEGUARDS 19. DAMAGE REQUIRING SERVICE Unplug this unit from the wall outlet and refer servicing to qualified service personnel under the following conditions: a. When the power-supply cord or plug is damaged. b. If liquid has been spilled, or objects have fallen into the unit. c. If the unit has been exposed to rain or water. d. If the unit does not operate normally by following the operating instructions.
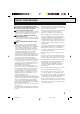
SAFETY PRECAUTIONS MOISTURE CONDENSATION DO NOT OPERATE ANY FUNCTIONS ON THIS UNIT FOR AT LEAST TWO OR THREE HOURS WHEN MOISTURE IN THE AIR CONDENSES ON IT. LET THE UNIT STAND WITH POWER ON (SEE BELOW). WHAT IS MOISTURE CONDENSATION? When a cold liquid is poured into a glass, for example, water vapor in the air will condense on the surface of the glass. This is called moisture condensation. MOISTURE WILL CONDENSE ON THE UNIT IN THE FOLLOWING CASES: • When you move the unit from a cold to a warm place.
SAFETY PRECAUTIONS DRIVING SAFETY • Never watch the TV/VCR or try to adjust settings while driving. Doing so creates the danger of traffic accident. Before operating the TV/VCR, be sure to stop the car in a safe area. • Never install the unit on the dashboard or in any other location where it obstructs forward vision. Items that obstruct forward vision in a motor car may be illegal.
FEATURES TABLE OF CONTENTS Programmable ON/OFF Timer - Allows you to automatically turn on or off the TV/VCR at a set time. Programmable TV Sleep Timer - Operable from the remote control, the TV can be programmed up to 120 minutes to turn off automatically. Automatic Repeat Play System - When Auto Repeat option is turned on, the TV/VCR will automatically play back the same cassette tape repeatedly.
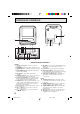
LOCATION OF CONTROLS FRONT REAR 20 1 VIDEO UHF/ AUDIO VHF OUT 2 3 4 5 POWER POWER PROG TIMER VOL CH 6 7 8 17 18 19 REC REC STOP/EJECT PLAY REW/ FF/ 1 9 16 LINE1 10 11 12 13 14 2 VIDEO IN AUDIO IN 15 DESCRIPTION OF CONTROLS FRONT: 1. Cassette Loading Slot - To insert or remove a video tape. 2. POWER Button - Press to turn the TV/VCR on or off. 3. POWER Indicator - Light when the power is turned on. 4. PROG TIMER Indicator - Lights when the unit is in the Timer Record Mode.
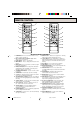
REMOTE CONTROL 1 2 3 9 POWER 1 2 3 4 5 6 7 8 9 15 CC SLEEP EJECT POWER INPUT 10 R-TUNE 1 2 3 4 5 6 7 8 CC 16 EJECT INPUT 0 – SET/TRACKING + MENU – CANCEL 11 CH C VOL – ENTER VOL DISPLAY – REW PLAY ENTER VOL MUTE DISPLAY 24 FF 25 CH D FF REW 19 13 STOP PAUSE/STILL COUNTER TRACKING RESET ZERO SEARCH CM SKIP AUTO COUNTER TRACKING RESET ZERO SEARCH CM SKIP AUTO 14 PROG REC/OTR SPEED PROGRAM TIMER PLAY STOP PAUSE/STILL 20 7 + 18 CH D 6 23 CA
REMOTE CONTROL BATTERY INSTALLATION Open the battery compartment cover. Install two “AAA” batteries, paying attention to the polarity diagram in the battery compartment. Replace the compartment cover. BATTERY PRECAUTIONS The precautions below should be followed when using batteries in this device: POWER SOURCES Use the AC polarized line cord provided for operation on AC. Insert the AC cord plug into a standard 120V 60Hz polarized AC outlet.
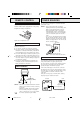
ANTENNA CONNECTIONS NOTES: • ALWAYS TURN OFF TV/VCR FIRST BEFORE SWITCH ON OR OFF THE IGNITION OF CAR ENGINE. • Make sure that the negative terminal of the battery is grounded. This set is designed for use with negative ground system only. • Use the supplied car cord only. • When the TV/VCR is not in use, always disconnect it from the car cigarette lighter socket to avoid a battery drain.
CABLE TV CONNECTIONS This TV/VCR has an extended tuning range and can tune most cable channels without using a Cable TV converter box. Some cable companies offer "premium pay channels" in which the signal is scrambled. Descrambling these signals for normal viewing requires the use of a descrambler device which is generally provided by the cable company.
AUTO CLOCK SETTING The Auto Clock function will automatically set the built-in clock (Month, Day, Year and Time) when the TV/VCR is connected to an Antenna or Cable system and it is turned off. As the TV/VCR searches for a receivable station in your area and it receives a broadcast signal for Auto Clock, the Auto Clock needs several minutes to set itself. 4 Press the SET/TRACKING + or – button to select your AUTO CLOCK SETTING 1 Connect the Antenna or Cable system. • If you use a cable box, turn it on.
MANUAL CLOCK SETTING You must set the date and time manually for Timer Recordings, ON/OFF Timer and Daylight Saving Time if the Auto Clock process did not set them correctly. EXAMPLE: Setting the clock to “8:30 AM”, 29th (WED) October, 2003. 1 Press the MENU button. Press the SET/TRACKING + or – button to select the SYSTEM SETUP option, then press the ENTER button.
MUTE R-TUNE Press the MUTE button to switch off the sound. The TV/VCR’s sound will be silenced and “MUTE” will briefly appear on the screen. The sound can be switched back on by pressing this button again or one of the VOL + or – button. MUTE CH 012 CLOSED CAPTION CHANNEL Press and release the CH C or D button. The channel automatically stops at the next channel set into memory. For proper operation, before selecting channels, they should be set into the memory.
TV OPERATION Captions: This Closed Caption Mode will display text on the screen in English or another language (depending on the setting of the Closed Captions CH. 1 or 2). Generally, Closed Captions in English are transmitted on Captions Channel 1 and Closed Captions in other languages are transmitted on Captions Channel 2. Text: The Text Closed Caption Mode will usually fill the screen with a programming schedule or other information.
SETTING THE V-CHIP TO ADD/DELETE CHANNELS 1 Press the MENU button. 2 Press the SET/TRACKING + or MENU TIMER REC SET TV SETUP CH SETUP AUTO REPEAT ON OFF SYSTEM SETUP – button to select the CH SETUP mode, then press the ENTER button. á +/–/ENTER/MENUñ 3 Press the SET/TRACKING + or CH SETUP TV CATV AUTO CH MEMORY ADD/DELETE – button to select the ADD/ DELETE mode, then press the ENTER button.
SETTING THE V-CHIP 5 Press the SET/TRACKING + or V-CHIP SET V-CHIP : OFF TV RATING : TV—PG MOVIE RATING : PG—13 CHANGE PASSWORD – button to select V-CHIP. 6 Press the ENTER button to 〈+/—/ENTER/MENU〉 display ON. 7 Press the MENU button until the V-CHIP SET V-CHIP : ON TV RATING : TV–PG MOVIE RATING : PG–13 CHANGE PASSWORD MENU screen is cleared. 〈+/–/ENTER/MENU〉 NOTE : The V-Chip function is activated only on programs and tapes that have the rating signal. To use the TV after the TV is protected.
TO SET THE OFF TIMER This feature allows you to have the TV/VCR turn off automatically at a predetermined time. If you program the OFF TIMER once, the TV/VCR will automatically turn off at the same time everyday. 4 Press the SET/TRACKING + or – button to set the desired hour, then press the ENTER button. 5 Press the SET/TRACKING + or – button to set the desired minute, then press the ENTER button. EXAMPLE: Turning off the TV at 11:30 PM. 1 Press the MENU button.
LOADING AND UNLOADING Use only video cassette tapes marked . PLAYBACK To play a prerecorded tape. TO START PLAYBACK LOADING Push the center of the tape until it is automatically retracted into the TV/VCR. AUTOMATIC POWER ON AND PLAY When loading a cassette tape without the erase prevention tab intact, the TV/VCR will turn on automatically and playback will start immediately. Insert the cassette with its labeled side facing you. An inverted video cassette cannot be inserted.
SPECIAL PLAYBACK RECORDING A TV PROGRAM TO VISUALLY SEARCH FOR DESIRED POINTS RECORDING AND VIEWING THE SAME TV PROGRAM When either the FF or REW button is pressed in the PLAYBACK mode, the speed search picture will appear. When pressed twice, the search picture will increase speed. Speed search time depends upon the speed used (SP, LP or SLP) during recording. See chart below. To visually search backward or forward, press the REW or FF button once or twice in the PLAYBACK mode.
ONE-TOUCH TIMER RECORDING (OTR) TIMER RECORDING The One-Touch Timer Recording feature provides a simple and convenient way to make a timed recording. EXAMPLE: One-touch Timer Recording for 30 minutes. 1 Press the POWER button to turn on the TV/VCR. 2 Load a video cassette with the erase prevention tab intact. select the desired tape speed (SP or SLP). SP or SLP will appear on the screen.
USING THE REAL TIME TAPE COUNTER TO SET DAILY/WEEKLY TIMER When setting the date in the step 4 on page 22, press the SET/ TRACKING – button repeatedly when the current day is displayed. The setting changes as follows: Example The current day (Friday) One month later minus one day WKL-WED (Weekly Wednesday) (Sunday to Saturday) MON-SAT (Monday to Saturday) MON-FRI (Monday to Friday) 3 Begin Playback or Recording to WKL-THU (Weekly Thursday) start the tape, the counter will display the elapsed time.
DUPLICATING A VIDEO TAPE If you connect the TV/VCR to another VCR or Camcorder, you can duplicate a previously recorded tape. Make all connections before turning on the power. CONNECTION TO ANOTHER VCR Recording TV/VCR 1 2 Insert a blank cassette with the erase prevention tab intact into the TV/VCR. Insert a previously recorded cassette into the playback VCR or Camcorder. Press the INPUT button twice to select AUDIO/VIDEO input position. The "LINE 2" will appear on the screen.
RECEPTION DISTURBANCES Most types of television interference can be remedied by adjusting the height and position of the VHF/UHF antenna. Outdoor antennas are recommended for best results. The most common types of television interference are shown below. If one of these symptoms appear when the TV/VCR is connected to a Cable TV system, the disturbance may be caused by the local Cable TV company broadcast.
TROUBLESHOOTING GUIDE Check the following chart before requesting service. SYMPTOM CAUSE POSSIBLE SOLUTION PAGE POWER No power. Although the power is on, the TV/VCR does not operate. The AC power cord is not connected. Connect the AC power cord to the AC outlet. 10 The DC car cord is not plugged into the cigarette lighter socket. Connect the DC car cord to the cigarette lighter socket. 10 The DC car cord fuse is blown. Replace fuse. 11 Cassette is not inserted. Insert a video cassette.
SYMPTOM TV shuts off. Closed caption is not activated. CAUSE POSSIBLE SOLUTION PAGE TV station stopped broadcasting. Tune new channel. 14 Sleep timer is set. Set Sleep Timer to "0". 15 TV station experiencing problems or program tuned is not closed caption. Try another channel. TV signal is weak. Check CATV connection of VHF/ UHF antenna, reposition or rotate antenna. 11,12 The CC button is not depressed. Press the CC button to turn on the closed caption.
SPECIFICATIONS TELEVISION Picture Tube: Tuner Type: Receiving Channels: Antenna Input: Speaker: Audio Output Power: VCR Video System: Video Signal: Cassette Tape: Audio Track: Maximum Recording Time: FF/REW Time: Speed Search: GENERAL Power Source: Power Consumption: Weight: Dimensions: (WxHxD) Inputs/Outputs: Storage Temperature: Operating Temperature: Remote Control: Accessories: 9" (measured diagonally) Quartz PLL Frequency Synthesized VHF 2-13 UHF 14-69 CATV 14-36 (A)-(W) 37-59 (AA)-(WW) 60-85 (AA
INDEX OF CONTROLS Remote Control Button POWER See pages 13, 14, 20 DIRECT CHANNEL SELECTION See pages 14, 17, 18, 21, 22 POWER CLOSED CAPTION See page 15 1 2 3 4 5 6 7 8 9 RAPID TUNE See page 15 CC SLEEP See page 15 SET +/– TRACKING +/– See pages 12~14, 16~19, 21~23 SLEEP EJECT See page 20 EJECT INPUT R-TUNE CANCEL See pages 18, 19, 22, 23 0 INPUT See page 24 SET/TRACKING – + MENU ENTER See pages 12~14, 16~19, 21~23 CANCEL CH C MENU See pages 12~14, 16~19, 21,22 VOLUME +/– Se
INDEX OF CONTROLS Front POWER Indicator Light when the power is turned on. Cassette Loading Slot PROG TIMER Indicator Lights when the unit is in the Timer Record Mode. VOLUME +/– See pages 14, 15 REC Indicator Lights when the TV/VCR is recording.
SPANISH QUICK USE GUIDE (GUÍA PARA RÁPIDA CONSULTA) CONEXIONES DE LA ANTENA Antena combinada de VHF/UHF (Cable único de 75 ohmios o cable con doble conductor de 300 ohmios) Conecte el cable de 75 ohmios de la antena combinada de VHF/UHF en el jack de la antena. Si su antena combinada de VHF/UHF posee un cable de dos conductores de 300 ohmios, es posible que sea necesario utilizar un transformador de adaptación de 300-75 ohmios.
SPANISH QUICK USE GUIDE (GUÍA PARA RÁPIDA CONSULTA) SELECCION DE IDIOMA EN PANTALLA 1 Presione el botón MENU. MENU TIMER REC SET TV SETUP CH SETUP AUTO REPEAT ON OFF SYSTEM SETUP Presione el botón SET/TRACKING + ó – para seleccionar la opción SYSTEM SETUP, luego presione el botón ENTER. 2 3 4 AJUSTE DE RELOJ MANUAL EJEMPLO: Ajuste del reloj amiércoles, 8:30 am el día 29 (MIE) de octubre, 2003. 1 Presione el botón MENU.
SELECCION DE TV/CATV COLOCACION 1 Presione el botón MENU. MENU TIMER REC SET TV SETUP CH SETUP AUTO REPEAT ON OFF SYSTEM SETUP 2 Presione el botón SET/TRACK ING + ó – para seleccionar el modo CH SETUP, a continuación presione el botón ENTER.
SPANISH QUICK USE GUIDE (GUÍA PARA RÁPIDA CONSULTA) GRABACION DE UN PROGRAMA DE TV 1 Coloque un cassette de cinta con la lengüeta de GRABACION POR TEMPORIZADOR EN PANTALLA EJEMPLO: Programe una grabación con temporizador para el día 23, canal 007 (CATV), 7:00 - 9:30 PM (VELOCIDAD DE CINTA: SLP). grabación intacta. 2 Presione el botón SPEED de velocidad de la cinta, para escoger la velocidad deseada (SP o SLP). "SP" o "SLP" aparecerá en la pantalla. 1 Presione el botón MENU.
MEMO ○ ○ ○ ○ ○ ○ ○ ○ ○ ○ ○ ○ ○ ○ ○ ○ ○ ○ ○ ○ ○ ○ ○ ○ ○ ○ ○ ○ ○ ○ ○ ○ ○ ○ ○ ○ ○ ○ ○ ○ ○ ○ ○ ○ ○ ○ ○ ○ ○ ○ ○ ○ ○ ○ ○ ○ ○ ○ ○ ○ ○ ○ ○ ○ ○ ○ ○ ○ ○ ○ ○ ○ ○ ○ ○ ○ ○ ○ ○ ○ ○ ○ ○ ○ ○ ○ ○ ○ ○ ○ ○ ○ ○ ○ ○ ○ ○ ○ ○ ○ ○ ○ ○ ○ ○ ○ ○ ○ ○ ○ ○ ○ ○ ○ ○ ○ ○ ○ ○ ○ ○ ○ ○ ○ ○ ○ ○ ○ ○ ○ ○ ○ ○ ○ ○ ○ ○ ○ ○ ○ ○ ○ ○ ○ ○ ○ ○ ○ ○ ○ ○ ○ ○ ○ ○ ○ ○ ○ ○ ○ ○ ○ ○ ○ ○ ○ ○ ○ ○
Limited Warranty PANASONIC CONSUMER ELECTRONICS COMPANY, DIVISION OF MATSUSHITA ELECTRIC CORPORATION OF AMERICA One Panasonic Way Secaucus, New Jersey 07094 PANASONIC SALES COMPANY, DIVISION OF MATSUSHITA ELECTRIC OF PUERTO RICO, INC., AVE. 65 de Infantería, Km. 9.
Limited Warranty Limits And Exclusions This warranty ONLY COVERS failures due to defects in materials or workmanship, and DOES NOT COVER normal wear and tear or cosmetic damage, nor does it cover markings or retained images on the picture tube resulting from viewing fi xed images (including, among other things, letterbox pictures on standard 4:3 screen TV’s, or non-expanded standard 4:3 pic tures on wide screen TV’s, or onscreen data in a stationary and fi xed location).
INDEX A L Accessories ......................................................... 7 Add/Delete Channels ........................................ 17 Antenna Connections ........................................ 11 Auto Clock Setting ............................................. 13 Auto Repeat ...................................................... 21 Auto Rewind ...................................................... 21 Automatic Eject .................................................
Speed Search ................................................... 21 Standard Time ................................................... 13 Still Picture ........................................................ 21 Stop ................................................................... 20 T Timer Recording ................................................ 22 Tracking Control ................................................ 20 Troubleshooting Guide ...................................... 26 TV Operation ........
Panasonic Consumer Electronics Company, Division of Matsushita Electric Corporation of America One Panasonic Way Secaucus, New Jersey 07094 Panasonic Sales Company (“PSC”), Division of Matsushita Electric of Puerto Rico, Inc. Ave. 65 de Infanteria. Km. 9.