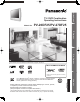
Models No. Getting Started TV / DVD Combination Operating Instructions PV-20DF25/PV-27DF25 TV Operation Disc Operation • Connection and Initial Setup Procedures are on pages 10 and 13. MULTI FORMAT PLAYBACK *Ability to play back may depend on recording conditions. This operating instruction book is designed for use with models PV-20DF25 and PV-27DF25. Illustrations in this manual show the PV-27DF25. Features may vary, so please read carefully.
Before Using Congratulations On your purchase of one of the most sophisticated and reliable products on the market today. Used properly, it will bring you and your family years of enjoyment. Please fill in the information below. The serial number is on the tag located on the back of your unit. Date of Purchase _____________________ Dealer Purchased From ________________ Dealer Address _______________________ Accessories Please check and identify the supplied accessories.
Safety Precautions/Mesures de sécurité TO PREVENT FIRE OR SHOCK HAZARD, DO NOT EXPOSE THIS EQUIPMENT TO RAIN OR MOISTURE. CAUTION TO PREVENT ELECTRIC SHOCK, MATCH WIDE BLADE OF PLUG TO WIDE SLOT IN WALL SOCKET. FULLY INSERT. Getting Started WARNING AVERTISSEMENT : AFIN DE PRÉVENIR TOUT RISQUE D’INCENDIE OU DE CHOCS ÉLECTRIQUES, NE PAS EXPOSER CET APPAREIL À LA PLUIE OU À UNE HUMIDITÉ EXCESSIVE.
IMPORTANT SAFEGUARDS AND PRECAUTIONS WARNING TO REDUCE THE RISK OF ELECTRIC SHOCK, FIRE, INJURY TO PERSONS OR DAMAGE TO THIS PRODUCT, READ AND RETAIN ALL SAFETY AND OPERATING INSTRUCTIONS. HEED ALL WARNINGS IN THE MANUAL AND ON THE PRODUCT. INSTALLATION USING THE UNIT 1 Before unit is brought out of storage or moved to a new location, refer again to the INSTALLATION section of these safeguards. 2 3 4 POWER SOURCE CAUTION Operate only from power source indicated on unit or in this manual.
Table of Contents TV Operation Basic Disc Operation ............................................................................................................ 29 DVD-RAM Operation.............................................................................................................. 33 Disc Operation -Using Information Screen- ........................................................................ 35 Special Disc Operation ..........................................................................
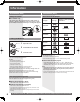
Information Information (Unit) Information (Disc) Safety Precaution Discs that can be played ■ PV-27DF25 only The unit may tip or fall if not situated on a stable surface, if pushed, or during an earthquake. Use a strong rope or chain (not included) to fasten the unit firmly to a strong wall support. Disc type Disc Logo Indication in these operating instructions DVD-Video DVD-V (DVD-Video) DVD-R*1 DVD-RAM*2 Loading the Batteries 1 Open the cover. 2 Insert batteries as marked.
You can play discs with these symbols. Playing DVDs The producer of these discs can control how they are played so you may not always be able to control play as described in these operating instructions. Read the disc’s instructions carefully. DVD-R discs Panasonic DVD-R recorded and finalized* on a Panasonic DVD video recorder are played as DVD-Video on this unit.
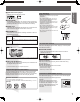
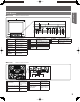
Location of Controls Remote Control Buttons 1 18 19 2 3 4 20 5 6 21 7 22 8 23 9 10 25 11 26 12 13 27 28 14 29 15 16 30 17 31 1 OPEN / CLOSE Opens or closes the disc tray. 2 POWER 4 RAPID TUNE Turns the unit on or off. Displays the TV status and clock. In DVD mode, displays disc and unit information. Displays the last channel you were watching. 5 MUTE 6 INPUT Mutes the sound instantly. Changes input source. 7 ACTION Displays Main Menu.
Front View Getting Started Unit Buttons 1 4 2 Built In Speakers 5 Disc Tray Place compatible discs here. 6 POWER VOLUME UP/ 7 DOWN CHANNEL 8 UP/DOWN Turns the unit on or off. 2 Phones Jack 3 Rear View 9 10 11 12 DVD Operation Video Input Connector 2 Audio Input 4 Connector 2 Equipped with 2 front speakers. Connect an ear phone or headphones. Connect from other component. (LINE 2) Connect from other component.
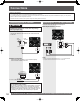
Connections Notes on connections • Turn off the power supply for all components before making any connections. • If the cables necessary for connecting a component to the system are not included with the component or available as an option, you may need to fashion a cable to suit the component concerned. • Read the instruction manual for each system component carefully before connecting it.
Enjoy the powerful movie theater and hall-like sound available with multiple channel audio found on DVDs by connecting an amplifier and speakers. There are two types of connection, digital and analog. WARNING Getting Started Connecting the Audio Output Terminal Don’t place the unit on amplifier or equipment that may become hot. The heat can damage the unit. Digital connection Firmly connect the cable to the connector.
Analog connection Connect an analog amplifier to enjoy high-quality stereo sound with sampling frequencies of 96 kHz. IMPORTANT NOTE: Caution for optical digital audio output connector: • Be sure to refer to page 43 regarding output settings of Dolby Digital, DTS, and PCM. • CDs and Video CDs can be played as usual. • Audio from the Digital Audio Out terminal is only output during playback. • When connecting an amplifier which contains the Dolby Digital or DTS decoder, be sure to select “Bitstream”.
Tuning TV Case 2 EJECT POWER NUMBER Keys If setup is incomplete, the following screen appears. Check connection of Antenna/Cable to the RF in Terminal, then try to manually set the clock as follows. ADD/DLT a. ACTION SELECT ▲▼◄►/ SET AUTO CLOCK SET IS INCOMPLETE PLEASE SET CLOCK BY PRESSING ACTION KEY Press ACTION on the Remote Control to display SET CLOCK Menu screen. SET CLOCK 1/ 1/2005 SAT 12:00AM DST:ON CH ▲▼ STOP b. SET:SET Press ▲▼ to select the month and press SET to set.
Manual Clock Setting Add or Delete a Channel To add channel: Select channel with NUMBER keys and press ADD/DLT. CHANNEL 08 ADDED 1 Press ACTION to display MAIN MENU. 2 Press ▲▼◄► to select “CLOCK.” MAIN MENU DVD LOCK LANGUAGE TV CLOCK SELECT: END :ACTION To delete channel: Select channel with CH ▲▼ or NUMBER keys and press ADD/ DLT. CHANNEL 08 DELETED 3 CH SET:SET Press SET to display SET CLOCK screen. (“TIME ZONE ADJUST” appears only when auto clock is set.
Time Zone Adjust Change Language Setting (Only when Auto Clock is set.) 1 2 1 2 Press ACTION to display MAIN MENU. Press ACTION to display MAIN MENU. Press ▲▼◄► to select “LANGUAGE.” Press ▲▼◄► to select “CLOCK.
TV Operation Method 2: Press INPUT. The display will change as follows. RAPID TUNE MUTE INPUT ACTION SELECT ▲▼◄►/ SET CH▲▼ LINE1 NUMBER keys LINE2 TUNER Method 3: 1 2 100 key Press ACTION for MAIN MENU. Press ▲▼◄► to select “TV”, then press SET for SET UP TV screen. VOL+/- MAIN MENU DVD LOCK LANGUAGE TV CLOCK SELECT: END :ACTION 3 CH SET:SET Press ▲▼ to select “INPUT SELECT,” and then press SET to select “TUNER”, “LINE 1”, or “LINE 2.
Rapid Tune Press R-TUNE to display the last channel you were watching. Audio Mute Weak Signal Display Feature When “ON” is selected, the picture is displayed even when a broadcast signal is weak or non-existent. 1 2 3 Press ACTION to display MAIN MENU. Press ▲▼◄► to select “CH.” Press SET to display SET UP CHANNEL screen. Press MUTE to instantly mute the sound. Press again to restore the previous sound level. MAIN MENU DVD CLOCK SELECT: END :ACTION 4 5 Press ▲▼ to select “WEAK SIGNAL DISPLAY.
MTS Broadcast / TV Stereo System Receivable Broadcast Types The following are possible audio broadcast types and on-screen displays. The signal being received is indicated with a “ ” mark while the selected audio mode is indicated with an arrow. To change the audio mode for these broadcasts, see the “Audio Mode for TV Viewing” section. DISPLAY 1 Press DISPLAY to display the broadcast signal being received. MTS Stereo broadcast: Multi-channel Television Sound Stereo broadcast. Select STEREO audio mode.
TV Timer Features • Make sure a disc is inserted if Disc (DVD/ CD/Video CD) mode is selected. ON-TIMER mode selection order Lowest channel DISPLAY CH01 Disc Highest CH125 channel ADD/DLT SELECT ▲▼◄►/ SET To Make Corrections, use ▲▼ and ◄ ► to move back and correct. 6 Press TIMER to set ON TIMER. • “ON TIMER SET” is displayed. • ON-TIMER Indicator lights up on the unit. CH 05 TIMER CANCEL:ADD/DLT SELECT: END :TIMER SET:SET TV Operation ON TIMER 10:00AM To Cancel ON-TIMER, Repeat steps 1-3.
Closed Caption System 4 5 Press ▲▼ to select “CAPTION”. Press SET to display CAPTION screen. SET UP TV CAPTION INPUT SELECT :TUNER SET UP VIDEO/AUDIO DVD VOL ADJUST :+2 MUTE ACTION SELECT: END :ACTION SELECT ▲▼◄►/ SET 6 7 SET:SET Press ▲▼ to select “CAPTION MODE.” Press SET repeatedly to select mode. CAPTION CAPTION MODE : OFF CC ON MUTE : CAP C1 SELECT: END :ACTION OFF TEXT C2 SET:SET CAP C1 CAP C2 TEXT C1 Caption Mode: CAP C1 or C2 A narration of selected TV programs is displayed.
Caption On Mute Feature 10 Press ACTION three times to return to the normal Closed Caption narration, if available, is displayed when MUTE button is pressed for silence. 1 2 3 11 Press MUTE to mute the sound and display closed Press ACTION to display MAIN MENU. captioning. • To cancel, press MUTE again. Press ▲▼◄► to select “TV.” Press SET to display SET UP TV screen. Note: MAIN MENU DVD CLOCK CH SET:SET Press ▲▼ to select “CAPTION”. Press SET to display CAPTION screen.
Video / Audio Setting 6 7 Press ▲▼ to select “VIDEO MENU.” Press SET repeatedly to select desired mode. SET UP VIDEO/AUDIO VIDEO VIDEO AUDIO AUDIO ACTION MENU :NORMAL ADJUST MENU :MUSIC ADJUST SELECT: END :ACTION SELECT ▲▼◄►/ SET 8 SET:SET NORMAL Factory setting. MOVIE Picture is adjusted for a movie-like feel. NIGHT Color and picture intensity are adjusted to be easier on the eyes for night viewing. Press ACTION three times to end setup. Audio Menu 1 2 3 Perform steps 1 - 5 at left.
Video Adjustment 1 2 3 Audio Adjustment 1 Press ACTION to display MAIN MENU. MAIN MENU Press ▲▼◄► to select “TV.” Press SET to display SET UP TV screen. DVD TV LOCK LANGUAGE CLOCK SELECT: END :ACTION 6 7 CH Press SET to display SET UP TV screen. SET:SET Press ▲▼ to select “SET UP VIDEO/AUDIO.” Press SET to display SET UP VIDEO/AUDIO screen. DVD TV 4 5 CH SET:SET Press ▲▼ to select “SET UP VIDEO/AUDIO.” Press SET to display SET UP VIDEO/AUDIO screen.
V-Chip Control Features 4 Press NUMBER keys to enter your secret code. • Take care that you are not observed entering the secret code. LOCK ENTER 4-DIGIT CODE NUMBER keys ACTION **-- ADD/DLT (CLEAR) ENTER :0-9 END :ACTION SELECT ▲▼◄►/ SET 5 Enter same code again for confirmation. LOCK CONFIRM 4-DIGIT CODE **** **** RECOGNIZED CHANGE CODE:ADD/DLT CONTINUE:SET END :ACTION To Make Corrections a. Press ◄ repeatedly to move the cursor. b. Press NUMBER keys to make the correction.
If LOCK menu is not displayed, perform “Enter Secret Code” steps on page 24. US TV PROGRAMS Ratings 1 US MOVIES Ratings 1 2 Press ▲▼ to select “US MOVIES.” • “NEXT PAGE” displays CANADIAN V-Chip settings menu. Please refer to page 26 for more details on Canadian tapes or broadcasts. Press SET to set “ON” or “OFF.” ON: V-Chip Control is activated. OFF: V-Chip Control is deactivated. Press SET to set “ON” or “OFF.
Canadian English Language Ratings 1 2 3 4 1 2 Press ▲▼ to select “NEXT PAGE.” Press SET to display screen. 7 8 LOCK US MOVIES :OFF CHANGE SETTINGS US TV PROGRAMS :OFF CHANGE SETTINGS NEXT PAGE SELECT: END :ACTION SELECT: END :ACTION 3 4 CANADIAN ENGLISH :OFF CHANGE SETTINGS CANADIAN FRENCH :OFF CHANGE SETTINGS PREVIOUS PAGE LOCK CANADIAN ENGLISH :OFF CHANGE SETTINGS CANADIAN FRENCH :OFF CHANGE SETTINGS PREVIOUS PAGE SELECT: END :ACTION 5 6 SET:SET Press ▲▼ to select “CHANGE SETTINGS.
US MOVIES Ratings Chart G PG GENERAL AUDIENCE: All ages admitted. G General Audience PARENTAL GUIDANCE: Some material may not be suitable for children. 8 ANS + Not recommended for young children 13 ANS + Programming may not be suitable for children under the age of 13 RESTRICTED: Children under 17 must be accompanied by a parent or adult. 16 ANS + Programming is not suitable for children under the age of 16 OVER AGE 17 ONLY: No one 17 and under admitted.
Display Features TV Status & Clock Display 1 DISPLAY Press DISPLAY to display or remove the overlay. 3 12:00PM 1 2 CH 08 4 STEREO SAP MONO RATING:PG-13 1 Receivable Broadcast Types (See page 18.) 2 Rating level 3 Current Time 4 Channel Channel Display When you change channels, channel number will be displayed. 08 Blue Screen Display When the selected channel has no broadcast signal with the Weak Signal Display Feature set to “OFF” (see page 17), the screen will turn solid blue.
Basic Disc Operation OPEN / CLOSE POWER DVD DISPLAY NUMBER keys SELECT ▲▼◄►/ SET MENU 10 PLAY SKIPΙ◄◄ STOP STILL SKIP+ ►►Ι SEARCH◄◄ / SLOW- TITLE SEARCH ►►/ SLOW+ SUB TITLE AUDIO ZOOM Insert disc Press DVD to set remote to DVD mode. 3 Press OPEN/CLOSE. 4 5 • You may also close the tray by pressing OPEN/CLOSE. • Data reading time differs with each disc. 1 2 3 4 MAIN STORY SUBTITLE AUDIO SOUNDTRACK INFORMATION • SKIP function not available with all discs.
Auto-Power Off function Forward/Reverse Chapter/Track Skip DVD-V DVD-V CD VCD RAM Power turns off after unit is in stop mode with wallpaper displayed for about 5 minutes. 1 CD VCD VCD RAM When a NUMBER key is used in disc mode, it performs a different operation from TV mode. Press SKIP+ ►►Ι or SKIP- Ι◄◄during play. Chapter/Track Chapter/Track Example 1: To select 12, first press the 10 key, then 1, then 2. Example 2: To select 2, press the 2 key.
• When appears on the screen while a button is being pressed, it means that the corresponding operation is prohibited by the unit or the disc. RESUME Function Audio Soundtrack Language DVD-V DVD-V CD RAM The unit memorizes the point where STOP is pressed (STOP ► display on screen). Press PLAY to resume play from this point. Pressing STOP again in DVD mode or opening the tray cancels RESUME. However, RESUME is not canceled when power is turned off and on.
• When appears on the screen while a button is being pressed, it means that the corresponding operation is prohibited by the unit or the disc. Vocal selection for Karaoke discs Information Display DVD-V DVD-V 1 2 3 VCD Press AUDIO in Play mode to display the audio screen. Yeah ! Yeah ! DVD Karaoke (1 vocal) VOCAL ON VOCAL OFF :AUDIO/◄ ► Selected disc information DVD Karaoke (2 vocals) VOCAL V1 VOCAL V2 VOCAL OFF Video CD LR Press DISPLAY in Play or Stop mode to display “OnScreen Display.
DVD-RAM Operation OPEN / CLOSE POWER 6 DVD Press PLAYLIST or D.NAVI to display Play List or Direct Navigator menu for easy title or scene selection. Example: Play List menu NUMBER keys SELECT ▲▼◄►/ SET Play List No. Page No. PLAYLIST Play List No. 10 Recorded time length PLAY STOP D.
• When appears on the screen while a button is being pressed, it means that the corresponding operation is prohibited by the unit or the disc. Play List Direct Navigator RAM RAM If the DVD-RAM features a Play List, your preselected list of favorite scenes is displayed for easy access. (Operation can vary according to how you edited the DVD-RAM.) If the DVD-RAM features Direct Navigator, a list of recorded titles is displayed. Simply select a title number and start playback.
Disc Operation -Using Information Screenc.Disc currently being played: The type of disc currently inserted is displayed. d.Elapsed playing time: Go to a different scene by entering an elapsed playing time, then SET. DISPLAY NUMBER keys • This function does not work with some discs. • If SET is pressed while making entries, unit returns to the condition before entries were made.
Disc information screen 2 Disc information screen 3 CD 1 VCD Press DISPLAY in Play or Stop mode to display “OnScreen Display.” 1 TRACK:12 TIME :00:00:23 a Press DISPLAY in Play or Stop mode to display “OnScreen Display.” TRACK:12 TIME :00:35:12 PBC OFF a PROGRAM PLAY PROGRAM PLAY NEXT:DISPLAY NEXT:DISPLAY 2 Press SET to enter selected item. Change the item by pressing ▲▼ or the NUMBER keys, and press SET.
• When appears on the screen while a button is being pressed, it means that the corresponding operation is prohibited by the unit or the disc. Disc information screen 4 Unit information screen 4 RAM RAM 1 2 Press DISPLAY in Play or Stop mode to display “OnScreen Display.” 1 Press ▲▼ to select an item. 2 PROGRAM: 2 TIME : 01:12:55 Press DISPLAY twice in Play or Stop mode to display “On-Screen Display.” Press SET to enter. Cursor moves to the right. Change the item by pressing ▲▼ and press SET.
Special Disc Operation 6 7 Press ▲▼ to select “PROGRAM PLAY.” Press SET to display screen. PLAY MODE PROGRAM PLAY RANDOM PLAY NUMBER keys CLEAR SELECT SET END ACTION SELECT ▲▼◄►/ SET 8 :▲ ▼ :SET :ACTION Press ▲▼◄► to select a track number. (Track numbers on disc are displayed.) 9 Press SET to set. • Repeat steps 8-9 to select another track. • The selected track is added on the right side.
• When appears on the screen while a button is being pressed, it means that the corresponding operation is prohibited by the unit or the disc. Program Repeat Play CD 1 2 Random Play VCD CD VCD Tracks are played in random order. Do steps 1-11 on page 38. Press DISPLAY to display Disc Information screen. (Disc Information Screen) TRACK:12 TIME :00:00:23 1 2 3 Press ACTION in Stop mode to display MAIN MENU. Press ▲▼◄► to select “DVD.” Press SET to display DVD MAIN MENU.
• When appears on the screen while a button is being pressed, it means that the corresponding operation is prohibited by the unit or the disc. DVD Volume Adjust V.S.S. (Virtual Surround Sound) DVD-V DVD-V Some DVDs are recorded at lower than average volume levels. For these DVDs, this unit can be set so that the average volume is increased automatically. 1 2 3 Press ACTION to display MAIN MENU. Press ▲▼◄► to select “TV.” Press SET to display SET UP TV screen.
Settings for DVD Operation 6 7 Press ▲▼ to select an item. Press SET repeatedly for desired language. DISC LANGUAGES AUDIO SUBTITLE MENUS NUMBER keys SELECT SET END ACTION SELECT ▲▼◄►/ SET :English :AUTO :English :▲ ▼ :SET :ACTION AUDIO To select the audio soundtrack language. (Factory preset: English) English/Spanish/French/Japanese Original: Original disc language :Other language selection*1 Other SUBTITLE To select the subtitle language.
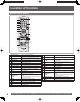
Language Code List Language 42 Code Language Code Language Code Abkhazian 6566 Hindi 7273 Scots Gaelic 7168 Afar 6565 Hungarian 7285 Serbian 8382 Afrikaans 6570 Icelandic 7383 Serbo-Croatian 8372 Albanian 8381 Indonesian 7378 Shona 8378 Ameharic 6577 Interlingua 7365 Sindhi 8368 Arabic 6582 Irish 7165 Singhalese 8373 Armenian 7289 Italian 7384 Slovak 8375 Assamese 6583 Japanese 7465 Slovenian 8376 Aymara 6588 Javanese 7487 Somali 8379 Azerbaijani
• When appears on the screen while a button is being pressed, it means that the corresponding operation is prohibited by the unit or the disc. Selecting AUDIO OUTPUT DRC (Dynamic Range Compression) DVD-V OFF: Normal audio range is selected. (Factory preset) ON: For dynamic sound even at low volume. This is useful for latenight listening. [Dolby Digital DVDs only]. Select the digital output to be output from the optical digital audio output connector of the unit.
• When appears on the screen while a button is being pressed, it means that the corresponding operation is prohibited by the unit or the disc. Selecting STILL MODE Selecting TV MODE DVD-V DVD-V Set to reduce jitter in a displayed still picture or a motion picture. Set the screen display style for widescreen video material playback. 1 1 2 3 Press ACTION in Stop mode to display MAIN MENU. 2 3 Press ▲▼◄► to select “DVD.” Press SET to display DVD MAIN MENU.
Warning and Instruction Displays These displays will alert you to a missed operation or provide further instructions. OSD CAUTION Page PLEASE SET CLOCK BY PRESSING ACTION KEY If you attempt to set or review a Timer Recording or set the On-Timer and the Clock is not set... 14 PLEASE CHECK THE DISC, AND FOR STAINS OR SCRATCHES ON DISC If you press PLAY, or the unit reads data from a stained or scratched disc in DVD mode. Also, if the type of disc is other than DVD, CD or Video CD...
Before Requesting Service Check the following points once again if you are having trouble with your unit. PROBLEM CORRECTION Page Power No power… Completely insert Power Plug into an AC outlet. Set POWER button to ON. Power turns itself off... Auto power-off (shut off) occurs after about 5 min. in DVD mode with no operation, or if 28, 30 there is no broadcast signal in TV or Playback mode. Turn the power back on. No picture or sound... Monitor Poor picture with normal sound...
Guía rápida de uso en español IMPORTANTES PRECAUCIONES DE SEGURIDAD ADVERTENCIA PARA REDUCIR EL RIESGO DE GOLPES ELÉCTRICOS, INCENDIOS, HERIDAS O DAÑOS A ESTE PRODUCTO, LEA Y GUARDE TODAS LAS INSTRUCCIONES DE SEGURIDAD Y FUNCIONAMIENTO. TENGA EN CUENTA TODAS LAS ADVERTENCIAS INDICADAS EN EL MANUAL Y EN EL PRODUCTO. Instalación 1 Precauciones para los recursos de energía Opérelo solamente usando la fuente de energía indicada en el aparato o en este manual.
Conexión Notas sobre las conexiones • Desconecte la alimentación de todos los componentes antes de realizar cualquier conexión. • Si los cables necesarios para conectar un componente al sistema no están incluidos con el componente o disponibles opcionalmente, quizás deba adoptar un cable para que se adecue al componente involucrado. • Consulte cuidadosamente el manual de instrucciones de cada componente del sistema antes de conectarlo.
Selección del modo de entrada Uso del botón CH/VOL Seleccione el canal deseado: Presione CH ▲▼ o las teclas NUMBER. Método 1: Presione CH ▲▼. La exhibición cambiará de la siguiente manera. LINEA2 (TV) CH2 (CABLE) CH1 Uso de la tecla Number y 100 Cuando esté seleccionando canales de CABLE del 100 al 125 con las teclas NUMBER, primero presione la tecla 100, y luego ingrese los dos dígitos restantes. (TV) CH69 (CABLE) CH125 LINEA1 Método 2: Presione INPUT.
Funcionamiento del disco DVD-V Reproducir disco 1 Presione POWER en el control remoto o en la unidad. 2 Presione DVD para ajustar el modo remoto a DVD. 3 Presione OPEN/CLOSE. • Si ya está insertado un disco, vaya al paso 5. (Dependiendo del disco, la reproducción puede comenzar automáticamente.) 4 Coloque un disco en la bandeja de discos. • Sujete el disco por sus bordes solamente con el lado impreso hacia arriba y use las guías para colocarlo en la bandeja. Use un disco de 1 3″(8 cm) o 2 5″ (12 cm).
Idioma de la banda sonora Lista de reproducción Navegador directo DVD-V RAM RAM Puede cambiar el idioma de la banda sonora, seleccionado en los ajustes de funcionamiento del DVD, a un idioma diferente, si está disponible. 1 Presione AUDIO en el modo de reproducción para exhibir la selección de audio en la pantalla. • La exhibición desaparece después de cinco segundos. SONIDO:1 ENG Dolby Digital 3/2.
Limited Warranty PANASONIC CONSUMER ELECTRONICS COMPANY, DIVISION OF PANASONIC CORPORATION OF NORTH AMERICA One Panasonic Way Secaucus, New Jersey 07094 PANASONIC SALES COMPANY, DIVISION OF PANASONIC PUERTO RICO, INC., AVE. 65 de Infantería, Km. 9.
THERE ARE NO EXPRESS WARRANTIES EXCEPT AS LISTED UNDER “LIMITED WARRANTY COVERAGE”. THE WARRANTOR IS NOT LIABLE FOR INCIDENTAL OR CONSEQUENTIAL DAMAGES RESULTING FROM THE USE OF THIS PRODUCT, OR ARISING OUT OF ANY BREACH OF THIS WARRANTY. (As examples, this excludes damages for lost time, cost of having someone remove or reinstall an installed unit if applicable, or travel to and from the servicer, loss of media or images, data or other memory or recorded content.
Specifications Display 20 inch, measured diagonally pure flat Picture Tube (PV-20DF25) 27 inch, measured diagonally pure flat Picture Tube (PV-27DF25) Picture Tube Tuner Broadcast Channels VHF 2 ~ 13, UHF 14 ~ 69 CABLE Channels Midband A through I (14 ~ 22) Superband J through W (23 ~ 36) Hyperband AA ~ EEE (37 ~ 64) Lowband A-5 ~ A-1 (95 ~ 99) Special CABLE channel 5A (01) Ultraband 65 ~ 94, 100 ~ 125 General Power Source Power Consumption Power On Power Off Television System Speaker Op erating Tem
Index A Accessories ............................................. 2 ACTION button ........................................ 8 AC Power Plug ........................................ 9 ADD/DELETE/CLEAR button ................. 8 Add or Delete a Channel ........................14 ANGLE button ......................................... 8 Audio Adjustment .................................. 23 AUDIO button .......................................... 8 Audio Input Connector 1 .........................
LSQT0906 A Panasonic Consumer Electronics Company, Division of Panasonic Corporation of North America One Panasonic Way Secaucus, New Jersey 07094 Panasonic Sales Company (“PSC”), Division of Panasonic Puerto Rico, Inc. Ave. 65 de Infantería, Km. 9.