English Deutsch Français Italiano Español Português Svenska Dansk Norsk Suomi Polski Česky Microwave Oven/Grill Oven Mikrowellengerät mit Grill Magnetron/Grill Oven Four à Micro-ondes-Gril Forno a Microonde e Grill Horno Microondas/Grill Forno Micro-Ondas/Grelhador Kombinationsugn med Mikrovågor/Grill Mikrobølgeovn/Grill Mikrobølge/Grill Ovn Mikroaaltouuni/Grilli Kuchenka Mikrofalowa z Grillem Mikrovlnná / trouba/ Gril Grillezös/mikrohullámú sütö Nederlands Operating Instructions Bedienungsanleitung G
IMPORTANT SAFETY INSTRUCTIONS. Before operating this oven, please read these instructions carefully and keep for future reference. WICHTIGE SICHERHEITSANWEISUNGEN. Vor Gebrauch des Mikrowellengerätes bitte diese Bedienungsanleitung sorgfältig durchlesen und aufbewahren. BELANGRIJKE VEILIGHEIDSINSTRUCTIES. Alvorens u deze microgolfoven gebruikt, raden wij u ten zeerste aan deze gebruiksaanwijzing door te lezen en bij te houden voor eventueel toekomstig gebruik. INSTRUCTIONS DE SÛRETÉ IMPORTANTES.
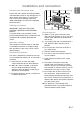
English Installation and connection Examine your microwave oven Unpack the oven, remove all packing material, and examine the oven for any damage such as dents, broken door latches or cracks in the door. If you find any damage, notify your dealer immediately. Do not install a damaged microwave oven. Earthing instructions IMPORTANT: THIS UNIT HAS TO BE PROPERLY EARTHED FOR PERSONAL SAFETY.
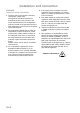
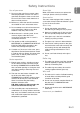
Installation and connection WARNING Important safety instructions 1. The door seals and seal areas should be cleaned with a damp cloth. The appliance should be inspected for damage to the door seals and door seal areas and if these areas are damaged the appliance should not be operated until it has been repaired by a service technician trained by the manufacturer. 2.
Use of your oven Oven light 1. Do not use the oven for any reason other than the preparation of food. This oven is specifically designed to heat or cook food. Do not use this oven to heat chemicals or other non-food products. When it becomes necessary to replace the oven light, please consult your dealer. 2. Before use, check that utensils/containers are suitable for use in microwave ovens. 3. Do not attempt to use this microwave oven to dry newspaper, clothing or any other materials.
Important Information 1) Cooking times • • To prevent this possibility the followingsteps should be taken: a) Avoid using straight-sided containers with narrow necks. b) Do not overheat. c) Stir the liquid before placing the container in the oven and again halfway through the cooking time. d) After heating, allow it to stand in the oven for a short time, stir again before carefully removing the container. The cooking time depends on the condition, temperature, amount of food and on the type of cookware.
English Outline diagram [8] [13] [6] [4] [2] [12] [5] [1] [7] [9] [3] [10] [11] 1. Door release button Press to open the door. When you open the oven door during cooking, the cooking is stopped temporarily without clearing earlier made settings. The cooking is resumed as soon as the door is closed and Start Pad pressed. 2. Oven window 3. Door safety lock system 4. Oven air vent 5. Control panel 6. Glass tray 7. Roller ring 8. External oven air vents 9. Wire rack 10. Panacrunch pan 11.
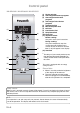
Control panel NN-GD359W / NN-GD369M / NN-GD379S* (1) (3) (2) (4) (5) (7) (6) (8) (9) (10) (11) (12) (1) Display window (2) Auto weight Microwave programs (3) Auto weight Combination programs (4) Auto weight Turbo Defrost programs (5) Time/weight Dial (6) Microwave power Pad (7) Grill Pad (8) Combination Pad (9) Delay/Stand Pad (10) Clock Pad (11) Stop/Cancel Pad: Before cooking: One press clears your instructions. During cooking: One press temporarily stops the cooking program.
English Setting the clock When the oven is first plugged in “88:88” appears in display window. • Press Clock Pad once. The colon starts to blink. • Enter the time by turning the • Press Clock Pad once. Time/Weight Dial. The time appears in the display and the colon blinks. The colon stops blinking and the time of day is entered. N.B. 1. To reset time of day, repeat step 1 through to step 3. 2. The Clock will keep the time of day as long as the oven is plugged in and electricity is supplied. 3.
Microwave cooking and defrosting The glass tray must always be in position when using the oven. Wattage Max 1 Press 850 Watts 2 Presses Defrost 270 Watts 3 Presses Medium 600 Watts 4 Presses Low 440 Watts 5 Presses Simmer 250 Watts 6 Presses 100 Watts Warm • Press the Microwave Power Pad. • Set the cooking time using Select desired power level - The microwave indicator lights and the wattage appears in the display.
Delay start cooking English By using Delay/Stand Pad, you are able to program Delay Start cooking. e.g. • Press Delay/ Stand Pad. NOTE: • Set the delay time by turning the Time/ Weight Dial (up to 9 hours). • Set the desired cooking program and cooking time. • Press Start Pad. 1. Three stage cooking can be programmed including Delay Start cooking. e.g. Delay Start: 1 hour Max Power: 10 min. Once Simmer Power: 20 min. 5 times 2.
Defrosting guidelines Tips for defrosting Check the defrosting several times, even if you use the auto programs. Observe the standing times. Minced meat or cubes of meat and seafood Standing times Individual portions of food may be cooked almost immediately after defrosting. It is normal for large portions of food to be frozen in the centre. Before cooking, allow to stand for a minimum of one hour.
Grilling English • Press Grill Pad to select level 1 press grill 1 (high) 2 presses grill 2 (medium) 3 presses grill 3 (low) The grill indicator lights and grill level (1, 2 or 3) appears in the display. N.B. • Set the cooking time using the Time/Weight Dial (up to 90 minutes). • Press Start Pad The time counts down in the display. ® 1. Place food on wire rack on turntable. Place a heatproof plate (Pyrex ) underneath to catch fat and drips. 2. Never cover foods when grilling. 3.
Combination cooking • Press Combination Pad to select level The combination indicator lights and combination level (1, 2 or 3) appears in the display. Press 1 press 2 presses 3 presses • Set the cooking time using the Time/Weight Dial (up to 90 minutes). • Press Start Pad The time counts down in the display. Level MW Grill combi 1 440W 1100W combi 2 250W 1100W combi 3 440W 950W When cooking by combination, the microwave power cooks food quickly whilst the grill gives traditional browning and crisping.
English Auto weight defrost With this feature you can defrost frozen food according to the weight. • Select the desired Auto Defrost Program 1 Press small pieces 2 Presses big piece Auto Program number appears in the display. The auto and defrost indicators light. • Set the weight of the frozen • Press Start Pad. food by using the Remember to stir or Time/Weight Dial. turn the food during Turning the dial slowly will count defrosting. up in 10g steps. Turning the dial quickly will count up in 100g steps.
Auto weight microwave programs Program Recommended Weight 150 - 1200g 1 Press FRESH MEAL 2 Presses 200 - 1100g To cook fresh vegetables. Place prepared vegetables into a suitable sized container. Sprinkle with 1 tbsp water per 100g vegetables. Cover with pierced cling film or a lid. Select program fresh vegetables (3 presses of auto microwave program pad). Turn / stir at beeps. FRESH VEGETABLES 200 - 900g En-14 To reheat a fresh plated meal or casserole. All foods must be pre-cooked.
English Auto weight combination programs Panacrunch programs 1. Select the desired program and place the Panacrunch Pan in the oven directly on the glass tray. Program 2. Press the start Pad to preheat the Panacrunch Pan. Recommended Weight 3. After pre-heating beeps sound. Place the food in the pan, set weight. Accessories 4. Press Start Pad. Instructions 150 - 480g 1 Press FROZEN PIZZA For reheating, crisping the base and browning the top of frozen pre-cooked pizza.
Auto weight combination programs With this feature food can be cooked or reheated according to the weight. The weight has to be entered in grams. e.g. • Select desired category. The auto indicator light and the program number appears in the display. Program Recommended Weight En-16 Instructions 300 - 1000g 150 - 1000g For cooking fresh chicken pieces. e.g. breasts, thighs, drumsticks and quarters. Place in a heatproof dish on wire rack on Glass Tray.
Panacrunch pan Notes: Some foods cooked by microwave can have soft and soggy crusts. Your Panacrunch Pan accessory will brown and crisp pizzas, quiches, pies, breaded products just as a conventional oven. Your Panasonic Panacrunch Pan works in three ways: heating the pan by absorbing microwaves, heating the food directly by microwaves and heating the food by the grill. The base of the pan absorbs the microwaves and transfers them into heat. Then the heat is conducted through the pan to the food.
Questions and answers Q: Why wonʼt my oven turn on? A: When the oven does not turn on, check the following: 1. Is the oven plugged in securely? Remove the plug from the outlet, wait 10 seconds and reinsert. 2. Check the circuit breaker and the fuse. Reset the circuit breaker or replace the fuse if it is tripped or blown. 3. If the circuit breaker or fuse is all right, plug another appliance into the outlet. If the other appliance works, there probably is a problem with the oven.
Care of your oven 3. Do not use harsh, abrasive cleaners or sharp metal scrapers to clean the oven door glass since they can scratch the surface, which may result in shattering the glass. 9. When using the GRILL or COMBINATION mode, some foods may inevitably splatter grease on to the oven walls. If the oven is not cleaned occasionally, it may start to “smoke” during use. 4. The outside oven surface should be cleaned with a damp cloth.
Technical specifications Power Source: Power Consumption: Output: Outside Dimensions: Oven Cavity Dimensions: Uncrated Weight: Noise: 230 V, 50 Hz Maximum; 1800 W Microwave; 1125 W Grill; 1100 W Microwave; 850 W (IEC-60705) Grill Heater;1100 W 482 (W) x 364 (D) x 284 (H) mm (NN-GD379S) 482 (W) x 368 (D) x 284 (H) mm (NN-GD359W / NN-GD369M) 325 (W) x 330 (D) x 191 (H) mm 9.5 kg (NN-GD359W / NN-GD369M) 10.0 kg (NN-GD379S) 58.8 dB (EN60704) Specifications subject to change without notice.