Quick Start Model No. KX-FT33HK KX-FT34HK To get started, please read the Quick Start section. Initial Preparation Personal Facsimile Telephone Fax/Copy OPERATING INSTRUCTIONS Help General Information Please read these Operating Instructions before using the unit and save for future reference.
Thank you for purchasing a Panasonic Facsimile. Welcome to the world of Panasonic facsimiles. This product combines the facsimile, telephone and copier features, to provide you with more efficient office or home use. By utilizing these convenient features, you can maximize the effectiveness of this unit.
Important safety instructions When using this unit, basic safety precautions should always be followed to reduce the risk of fire, electric shock, or personal injury. 1. Read and understand all instructions. 2. Follow all warnings and instructions marked on this unit. 3. Unplug this unit from AC outlets before cleaning. Do not use liquid or aerosol cleaners. Use a damp cloth for cleaning. 4. Do not use this unit near water, for example, near a bath tub, wash bowl, kitchen sink, or the like. 5.
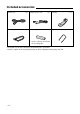
Included accessories Power cord . . . . . . . . . . . . . . . . 1 pc. Telephone line cord . . . . . . . . 1 pc. Handset . . . . . . . . . . . . . . . . . . 1 pc. Handset cord . . . . . . . . . . . . . . 1 pc. Recording paper . . . . . . . . . . 1 pc. Paper stacker. . . . . . . . . . . . . . 1 pc. — See the next page for ordering the recording paper. ● ● If any items are missing or damaged, check with the place of purchase.
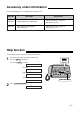
Accessory order information Use the following types of recording paper for replacement. Model No. Description Specifications KX-A106 Standard thermal recording paper 216 mm x 30 m (8 1/2" x 98') roll, with 25 mm (1") core KX-A125 Super thermal recording paper (Like plain paper) 216 mm x 30 m (8 1/2" x 98') roll, with 25 mm (1") core Help function You can print a quick reference for assistance as follows. 1 Select which operation you want to print out by pressing HELP repeatedly.
Table of Contents Quick Start Initial Preparation Telephone Fax/Copy To install the recording paper . . . . . . . . . . . . . . . . . . . . . . . . . . . . . 8 To connect the unit . . . . . . . . . . . . . . . . . . . . . . . . . . . . . . . . . . . . . 9 To make a voice call . . . . . . . . . . . . . . . . . . . . . . . . . . . . . . . . . . . . 10 To answer a voice call . . . . . . . . . . . . . . . . . . . . . . . . . . . . . . . . . . . 10 To send faxes . . . . . . . . . . . . . . . . . . . . . . .
Quick Start Error messages on printed reports . . . . . . . . . . . . . . . . . . 57 Error messages on the LCD display . . . . . . . . . . . . . . . . . 58 Operations When a function does not work, check here before requesting help . . . . . . . . . . . . . . . . . . . . . . . . . . . . . . . 59 If a power failure occurs . . . . . . . . . . . . . . . . . . . . . . . . . . 61 Jams Clearing a recording paper jam . . . . . . . . . . . . . . . . . . . . . 62 When a document you are sending jams . . . . . .
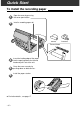
Quick Start To install the recording paper 1 Open the cover by pressing the cover open button. 2 Install a recording paper roll. correct Thermal head 3 Insert the leading edge of the paper into the opening above the thermal head and pull it out of the unit. 4 Close the cover securely by pushing down on both corners. 5 ● Install the paper stacker. For further details, see page 17.
Quick Start To connect the unit Dialing mode switch: DIALING MODE Set to TONE. TONE PULSE ● If you cannot dial, set to PULSE. 1 Connect the handset. To the single telephone line 2 Connect the telephone line cord. To the power outlet (220-240 V) 3 ● ● Connect the power cord. For further details, see page 18. You can print a quick reference for assistance (see the “Help function” on page 5).
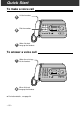
Quick Start To make a voice call 1 Lift the handset. 2 Dial the number. 3 When finished, hang up the handset. To answer a voice call ● 1 When the unit rings, lift the handset. 2 When finished, hang up the handset. For further details, see page 24.
Quick Start To send faxes ● 1 Open the document feeder tray. 2 Adjust the width of the document guides to the size of the document. 3 Insert the document until a beep tone is heard. 4 Press MONITOR . 5 Dial the fax number. 6 When a fax tone is heard, press START/COPY/SET . FACE DOWN (up to 10 sheets) For further details, see page 31.
Quick Start To receive faxes ● ● 1 When the unit rings, lift the handset. 2 When: —document reception is required, —a fax calling tone (slow beep) is heard, or —no sound is heard, press START/COPY/SET . 3 Hang up the handset. For further details, see page 40. You can select the desired receive mode according to your needs. See pages 38 and 39.
Quick Start To make a copy 1 Open the document feeder tray. 2 Adjust the width of the document guides to the size of the document. 3 Insert the document until a beep tone is heard. FACE DOWN (up to 10 sheets) 4 ● Press START/COPY/SET . For further details, see page 56.
Finding the Controls Location ● ● ● Used to change from pulse to tone during dialing (p. 25). ● ● Used to select a resolution (p. 31). Used as a secret key (p. 26). Used to turn on/off the auto receive mode (p. 38, 39). Used as an insert key (p. 21, 27).
Finding the Controls ● ● Initial Preparation ● Used to print a quick reference (p. 5). Used to confirm a stored telephone number (p. 29). Used to initiate or exit programming. HELP ● ● NAME/TEL NO. MENU ● Used to search for a stored name (p. 29, 32). Used to select characters during programming (p. 21, 27). Used to select the basic features during programming (p. 70). DIRECTORY EDIT SEARCH STOP START/ COPY/ SET ● ● ● ● Used to initiate transmission, reception or copying.
Finding the Controls Overview Document entrance Paper stacker Document guide(s) Document feeder tray Document exit – 16 – Cover open button
Setup Installing the recording paper Initial Preparation 1 Open the cover by pressing the cover open button and install the recording paper roll. correct ● incorrect If the paper is secured with glue or tape, cut approximately 15 cm (6 inches) from the beginning of the roll. 2 Insert the leading edge of the paper into the opening above the thermal head and pull it out of the unit. ● Make sure that there is no slack in the paper roll. 3 Close the cover securely by pushing down on both corners.
Setup Connections 1 2 3 Connect the handset cord. Connect the telephone line cord. Connect the power cord. Dialing mode switch: Set to TONE. ● If you cannot dial, set to PULSE. DIALING MODE TONE PULSE Handset cord Connect to “LINE”. Telephone line cord To the single telephone line Power cord To the power outlet (220-240 V) Note: ● When you operate this product, the power outlet should be near the product and easily accessible.
Setup You can program the date and time, your logo and facsimile telephone number and this information will be printed on each page transmitted from your unit. Your logo Example: Your facsimile telephone number FROM : Panasonic Fax PHONE NO. : 1234567 Date and time FEB. 26 1998 04:02PM P1 Fax Correspondence Setting the date and time 1 Press MENU . 2 Press 3 Display: Dial keypad MENU 1.SYSTEM SET UP , then 0 1 . 1 2 3 4 5 6 7 8 9 SET DATE & TIME Press START/COPY/SET .
Setup Setting your logo The logo can be your company, division or personal name. 1 Press MENU . Display: AUTO RECEIVE 1.SYSTEM SET UP 2 Press 3 Press START/COPY/SET . , then 0 2 . YOUR LOGO Dial keypad 1 2 3 4 5 6 7 8 9 MENU 0 LOGO= 4 Enter your logo, up to 30 characters, by following the instructions on the next page. START/COPY/SET Example (using the dial keypad): Bill 1. Press 2 twice. STOP LOGO=B Cursor 2. Press 4 six times. LOGO=Bi 3. Press 5 six times. LOGO=Bil 4.
Setup Selecting characters with the dial keypad Keys Characters 1 1 [ ] { } + – 2 A B C a b c 2 3 D E F d e f 3 4 G H I g h i 4 5 J K L j k l 5 6 M N O m n o 6 7 P Q R S p q r 8 T U V t u v 8 9 W X Y Z w x 0 0 ( ) ! AUTO RECEIVE = s 7 y z 9 " # $ , . _ % & ¥ ‚ : ; ? | @ ^ ’ → Insert key (Used to insert a space.) key (Used to move the cursor to the left.
Setup Setting your facsimile telephone number 1 Press MENU . 2 Press 3 Press START/COPY/SET . 4 Enter your facsimile telephone number up to 20 digits. NO.=1234567 Example: 5 Press START/COPY/SET . 6 Press MENU . Display: Dial keypad MENU 1.SYSTEM SET UP , then 0 3 . YOUR TEL NO. 1 2 3 4 5 6 7 8 9 0 NO.= STOP START/COPY/SET SETUP ITEM [ Note: ● The button inserts a space and the “+”. Example: +234 5678 2 3 4 5 6 7 8 .
Volumes Adjusting volumes Initial Preparation Ringer volume 4 levels (high/middle/low/off) are available. Press or while the unit is idle. 1 2 3 4 5 6 ■ To turn the ringer off: 7 8 9 1. Press repeatedly until the following message is displayed. Display: 0 RINGER OFF=OK? YES: PRESS SET START/COPY/SET 2. Press START/COPY/SET . ● To turn the ringer back on, press . ■ While the ringer volume is set to off: The display will show the following message.
Making and Answering Calls Making a voice call manually 1 Press MONITOR or lift the handset. 2 Dial the telephone number. Display: Example: ● Handset Dial keypad TEL= TEL=2345678 If you misdial, hang up and dial again. 3 When the other party answers, talk using the handset. 4 When finished, hang up the handset. MONITOR HANDSET MUTE REDIAL/PAUSE To redial the last number Muting your voice to the other party 1. Press MONITOR or lift the handset. 1.
Making and Answering Calls TONE, FLASH and PAUSE buttons TONE button TONE The TONE ( ) button is used for rotary pulse dial services and allows you to temporarily change from the pulse to tone mode during a dialing operation. When you hang up, the unit will automatically return to the pulse mode. 1 2 3 4 5 6 7 8 9 0 Telephone FLASH button REDIAL/PAUSE The FLASH button functions as the hookswitch on a regular telephone. If you misdial a telephone number, press the FLASH button firmly.
EASY DIAL Storing names and telephone numbers in the EASY DIAL directory You can store up to 100 names and telephone numbers for rapid access to frequently dialed numbers. 1 Press DIRECTORY EDIT . The number of entries available in the directory Display: DIRECTORY EDIT Dial keypad RESOLUTION AUTO RECEIVE SPACE=100 DIRS. NAME= 2 Enter the name, up to 10 characters, by following the instructions on the next page. Example: NAME=Alice 3 Press START/COPY/SET .
EASY DIAL Selecting characters with the dial keypad Pressing the dial keys will select a character as shown below. Keys Characters 1 [ ] { } + – 2 A B C a b c 2 3 D E F d e f 3 4 G H I g h i 4 5 J K L j k l 5 6 M N O m n o 6 7 P Q R S p q r 8 T U V t u v 8 9 W X Y Z w x 0 0 ( ) ! / = s 7 y z 9 " # $ , . _ % & ¥ ‚ AUTO RECEIVE Insert key (Used to insert a space.
EASY DIAL Editing a stored name and number 1 Rotate EASY DIAL until the desired name is displayed. margot Example: 2 Press DIRECTORY EDIT . 3 Press DELETE=# to select “EDIT”. NAME=margot If you do not need to edit the name, skip to step 5. Edit the name by following the instructions on page 27. START/COPY/SET Press START/COPY/SET . Example: ● 6 7 DIRECTORY EDIT Dial keypad EDIT= ● 4 5 EASY DIAL NO.=0123456 If you do not need to edit the telephone number, skip to step 7.
EASY DIAL Making a voice call using the EASY DIAL directory 1 Rotate EASY DIAL until the desired name is displayed. Lisa Example: 2 Press MONITOR or lift the handset. ● EASY DIAL Handset HELP The unit will start dialing automatically. DIALING When the other party answers, talk using the handset. TEL=3456789 4 When finished, hang up the handset. MONITOR Telephone 3 STOP Note: ● If the desired name has not been stored, press STOP and dial the number manually.
Voice Contact Talking to the caller after fax transmission or reception You can have a conversation with the same call after a fax message is completed. This will save the added expense and time of making another call. This feature only works when the other party’s unit is equipped with a voice contact feature. Initiating voice contact 1 Press MONITOR while transmitting or receiving documents. Display: Handset FACE DOWN VOICE STANDBY Your unit will call the other party with a distinctive ring.
Sending Faxes Sending faxes manually 1 2 3 Document feeder tray Open the document feeder tray. Adjust the width of the document guides to the size of the document. Dial keypad FACE DOWN Insert the document FACE DOWN (up to 10 sheets) until a beep tone is heard. Display: Document guide(s) STANDARD 4 Press RESOLUTION repeatedly to select the desired setting, if necessary (see the bottom of this page). 5 Press MONITOR or lift the handset. STOP REDIAL/PAUSE TEL= MONITOR Dial the fax number.
Sending Faxes Sending faxes using the EASY DIAL directory Before using this feature, program the desired names and telephone numbers into the directory (see page 26). To confirm the items stored in the directory, print a telephone number list (see page 65). 1 2 Open the document feeder tray. 3 Insert the document FACE DOWN (up to 10 sheets) until a beep tone is heard. Document guide(s) Adjust the width of the document guides to the size of the document.
Sending Faxes Documents you can send Maximum size Effective scanning area Scanned area 600 mm (235/8") 128 mm (5") Minimum size Single sheet: 45 to 90 g/m2 (12 to 24 lb.) Multiple sheets: 60 to 75 g/m2 (16 to 20 lb.) 4 mm 128 mm (5") Document weight 208 mm (83/16") 216 mm (81/2") Paper width 216 mm (81/2") Fax/Copy Note: ● Remove clips, staples or other similar fastening objects. ● Check that ink, paste or correction fluid has dried. ● Do not send the following types of documents.
Sending Faxes Printing the transmission report The transmission report will provide you with a printed record of the fax transmission result. One of the following choices is available. ERROR: The transmission report will print out only when fax transmission fails (pre-selected setting). ON: The transmission report will always print out, indicating whether fax transmission is successful or not. OFF: The transmission report will not print. 1 2 Press MENU . Dial keypad Display: Press 1.
Sending Faxes Setting the journal report to print automatically This feature prints a journal report automatically after every 35 new fax communications. After printing, only the oldest communication result will be erased when a new communication occurs. When this feature is deactivated, the unit will store the records of the fax communications, but will not print the journal report automatically. 1 2 Press MENU . Dial keypad Display: Press 1.SYSTEM SET UP , then 2 2 .
Sending Faxes Delayed transmission (sending a fax at a specific time) Using a built-in clock, this unit can send documents automatically at a specific time. This allows you to take advantage of low-cost calling hours offered by your telephone company. The delayed transmission can be reserved to take place up to 24 hours in advance. 1 Insert the document FACE DOWN. 2 Press MENU . 3 Press 4 Press START/COPY/SET . 5 Press Dial keypad Display: STANDARD FACE DOWN 1.SYSTEM SET UP , then 2 5 .
Sending Faxes Sending documents overseas You may experience difficulty when transmitting documents overseas. This feature makes sending documents easier as the transmission speed is slowed down. Before starting transmission, follow the steps below. Dial keypad 1 2 Press MENU . 3 Press START/COPY/SET . 4 Press Display: Press OVERSEAS MODE 1 2 3 4 5 6 7 8 9 0 MODE=OFF ▼▲ to select “ON”. MODE=ON ● If ▼▲ START/COPY/SET this feature is not required, select “OFF”. Press START/COPY/SET .
Receiving Faxes Selecting the way to receive calls This unit has four types of receive modes. Select one of these modes according to your needs. ● Regardless of the mode you select, you can always place calls and send faxes. MANUAL RECEIVE How you want to use the unit You want to answer all voice and fax calls manually. (When a voice call is received, the unit will ring.) R R R R R R Voice/Fax call Receive mode (See page 40.) (See page 42.
Receiving Faxes AUTO RECEIVE You want to receive fax documents only. You want to record voice messages and receive fax documents. External telephone answering machine (EXT.TAM) Voice/Fax call FAX ONLY mode EXT.TAM mode (See page 41.) (See page 45.) PRE-SELECTED SETTING AUTO RECEIVE FAX ON The unit will automatically answer all calls and only receive fax documents. Fax/Copy Fax call only Change the setting from FAX ONLY mode to EXT.TAM mode (see page 46).
Receiving Faxes TEL mode (answering all calls manually) 1 When the unit rings, lift the handset to answer the call. 2 When: —document reception is required, —a fax calling tone (slow beep) is heard, or —no sound is heard, Handset press START/COPY/SET . Display: 3 CONNECTING Hang up the handset. ● The unit will start reception. Note: ● If you do not answer the call by 15 rings, the unit will temporarily switch to the fax and the caller can send documents.
Receiving Faxes FAX ONLY mode (all calls are received as faxes) Activating the FAX ONLY mode Turn on the AUTO RECEIVE mode by pressing AUTO RECEIVE until the FAX indicator light turns on. ● The display will show the following. Display: FAX ONLY MODE ● If the AUTO RECEIVE setting is set to the EXT.TAM mode, reset it to the FAX ONLY mode (see page 46). ● The unit will automatically answer all calls and only receive fax documents.
Receiving Faxes TEL/FAX mode (receiving voice calls with rings and fax calls without rings) Use this mode when you wish to receive voice calls with rings, but do not want the unit to ring when faxes are received. When a call is received, the unit will work as follows. A call is received. The unit will automatically answer the call without ringing. (A telephone fee will be charged to the caller.) If an extension telephone is connected, it will only ring before the call is answered.
Receiving Faxes Ring pattern when an extension telephone is connected When an extension telephone is connected to the unit, it will ring as follows. The extension telephone will ring once. RR R The unit will ring up to 3 times. RRR R RR R RR 5 seconds A call is received. TEL/FAX mode ring count Silent fax recognition ring count If a fax calling tone is detected, the unit will automatically receive documents without ringing. The unit will automatically activate the fax function.
Receiving Faxes Setting the TEL/FAX mode ring count This setting determines the number of the extension telephone rings in the TEL/FAX mode. You can choose from 1 to 4 rings. When an extension telephone is not connected, changing this setting is not necessary. 1 2 Dial keypad Press MENU . Display: Press 1.SYSTEM SET UP , then 0 9 . TEL/FAX RING 3 Press START/COPY/SET . 4 5 Press 6 Press MENU . RING=1 or MENU 1 2 3 4 5 6 7 8 9 0 ▼▲ to select the desired number.
Receiving Faxes EXT.TAM mode (using with an external telephone answering machine) You can connect an external telephone answering machine (EXT.TAM). When the EXT.TAM mode is set, the unit and answering machine will work as follows. ■Receiving voice calls The external telephone answering machine will record voice messages automatically. ■Receiving fax calls The unit will receive documents automatically.
Receiving Faxes Changing the FAX ONLY mode to the EXT.TAM mode Change the AUTO RECEIVE setting from the FAX ONLY mode to the EXT.TAM mode. 1 Press MENU . 2 Press Dial keypad Display: 1.SYSTEM SET UP , then 0 5 . AUTO RECEIVE 3 Press START/COPY/SET . 4 Press 5 6 MENU 1 2 3 4 5 6 7 8 9 0 MODE=FAX ONLY▼ ▲ or to select “EXT.TAM”. MODE=EXT.TAM ▼ ▲ START/COPY/SET Press START/COPY/SET . SETUP ITEM [ ] Press MENU . Note: ● To return to the FAX ONLY mode, select “FAX ONLY” in step 4.
Receiving Faxes Securing the remote operation for the external telephone answering machine (remote activation ID) Depending on your external telephone answering machine, you can retrieve recorded voice messages from a remote location. Set the remote activation ID code for the answering machine. Important: ● This ID should be different from the fax activation code (see page 51). 1 Press MENU . 2 Press Dial keypad Display: 1.SYSTEM SET UP , then 1 2 . REMOTE TAM ACT. 3 Press START/COPY/SET .
Receiving Faxes Receiving with a duplex ring service This feature can only be used when you subscribe to a duplex ring service from your telephone company. For more information on the availability of this service, contact your telephone company before setting this feature to ON. What is a duplex ring service? A duplex ring service will give you an additional telephone number on a single telephone line, having a different ringing pattern (single bell).
Receiving Faxes Setting the ring pattern detection 1 2 Press MENU . 3 Press START/COPY/SET . 4 Press Display: Press , then 3 1 . 1 2 3 4 5 6 7 8 9 0 MODE=OFF or ▼▲ to select “ON”. MODE=ON ▼▲ START/COPY/SET If this feature is not required, select “OFF”. Press START/COPY/SET . PRINTING ● The unit will print an information list. Fax/Copy SETUP ITEM [ 6 MENU 1.SYSTEM SET UP RING DETECTION ● 5 Dial keypad ] Press MENU .
Receiving Faxes Receiving faxes using an extension telephone When you connect an extension telephone to your unit or on the same line, you can receive fax documents using the extension telephone. You do not have to go to the unit and press START/COPY/SET . Important: ● Use a touch tone telephone as the extension telephone and enter the fax activation code firmly. 1 When the extension telephone rings, lift the handset of the extension telephone.
Receiving Faxes Changing the fax activation code The fax activation code is used in the following cases; — when receiving faxes using an extension telephone (see page 50). — when receiving a voice message and fax document in one call (see page 47). Important: ● This code should be different from the remote activation ID (see page 47). 1 2 Dial keypad Press MENU . Display: Press 1.SYSTEM SET UP , then 4 1 . FAX ACTIVATION 3 Press START/COPY/SET . 4 Press 5 Press START/COPY/SET .
Receiving Faxes Receive polling (retrieving faxes placed on another party’s machine) This feature allows you to retrieve a document from another compatible machine. Therefore, you pay for the call, saving the sending party the call charges. Make sure that no documents are fed into your unit and that the other party’s machine is ready for your call. 1 Press MENU three times. Display: Dial keypad MENU 3.POLLING YES: PRESS SET 2 Press START/COPY/SET . 3 Dial the fax number.
Receiving Faxes Setting the silent detection (receiving faxes from older model facsimiles) This feature allows the unit to activate the fax function automatically when a silent pause longer than 4 seconds is detected in the EXT.TAM mode. Helpful hints: ● If you wish to receive documents from machines that do not send a fax calling tone, activate this feature.
Receiving Faxes Setting the friendly reception The friendly reception feature allows you to receive fax documents automatically without pressing START/COPY/SET (see page 40). When this feature is deactivated, you will have to press START/COPY/SET to receive fax documents each time you answer a fax call. 1 2 Dial keypad Press MENU . Display: Press 1.SYSTEM SET UP , then 4 6 . FRIENDLY RCV 3 Press START/COPY/SET .
Receiving Faxes Signaling your pager when your unit receives a fax This feature allows your unit to call your pager when your unit receives a fax document. 1 2 Press MENU . 3 Press START/COPY/SET . 4 Press Dial keypad Display: Press MENU 1.SYSTEM SET UP , then 7 0 . FAX PAGER 1 2 3 4 5 6 7 8 9 0 MODE=OFF or ▼▲ to select “ON”. MODE=ON ▼▲ REDIAL/PAUSE START/COPY/SET this feature is not required, select “OFF”. Fax/Copy ● If 5 Press START/COPY/SET . 6 Enter your pager number.
Copying Making a copy Any transmittable document (see page 33) can be copied. 1 2 Document feeder tray Open the document feeder tray. Document guide(s) Adjust the width of the document guides to the size of the document. FACE DOWN 3 Insert the document (up to 10 sheets) FACE DOWN until a beep tone is heard. Display: 4 STANDARD Press RESOLUTION repeatedly to select the desired setting, if necessary (see the bottom of page 31). STOP 5 Press START/COPY/SET .
Error Messages Error messages on printed reports When a problem has occurred, one of the following messages will be printed on the transmission and journal reports (see pages 34 and 35). Communication message Error code Cause & Remedy 41–72 FF ● A transmission or reception error occurred. Try again or check with the other party. — ● The document is jammed. Remove the jammed document (p. 63).
Error Messages Error messages on the LCD display If the unit detects a problem, one or more of the following messages will appear on the display. Display message CALL SERVICE CHECK COVER CHECK DOCUMENT Cause & Remedy ● There is something wrong with the unit. Contact your service personnel. ● The cover is open. Close it. The document is not fed into the unit properly. Reinsert the document and try again. If misfeeding occurs frequently, clean the document feeder rollers (p. 64).
Operations When a function does not work, check here before requesting help General Problem Cause & Remedy I cannot make and receive calls. ● The power cord or telephone line cord is not connected. Check the connections (p. 18). I cannot make calls. ● The dialing mode setting is wrong. Change to TONE or PULSE (p. 18). The unit does not work. ● Disconnect the unit from the telephone line and connect the line to a known working telephone.
Operations Fax transmission Problem Cause & Remedy I cannot send documents. ● The other party complains that letters on their received document are distorted. ● The other party complains that dirty patterns or black lines appear on their received documents. ● The glass or rollers are dirty. Clean them (p. 64). I cannot make an international fax call. ● Use the overseas transmission mode (p. 37). Add two pauses at the end of the telephone number (p. 25).
Operations Using an external telephone answering machine in the EXT.TAM mode Problem Cause & Remedy I cannot receive documents automatically. ● I cannot receive voice messages. ● I cannot retrieve recorded voice messages on the answering machine from a remote location. ● The greeting message on your answering machine is interrupted halfway and the caller cannot leave a voice message. ● The greeting message has a silent pause longer than 4 seconds. Re-record the greeting message.
Jams Clearing a recording paper jam If the unit does not eject any recording paper during reception or copying, the recording paper has jammed. Remove the jammed paper as shown below. 1 Open the cover by pressing the cover open button. Then press the blue lever to release the paper cutter and remove the recording paper roll. 2 Cut off the wrinkled portion, and replace the recording paper roll in the proper direction.
Jams When a document you are sending jams If the unit does not release the document during feeding, remove the document as follows. 1 2 3 Open the cover by pressing the cover open button. Remove the jammed document carefully. Close the cover securely by pushing down on both corners. Note: ● Before opening the cover, do not pull out the jammed paper forcibly. Cover open button When documents you send do not feed, or multi-feed 1 2 Open the cover by pressing the cover open button.
Cleaning Cleaning the document feeder If misfeeding occurs frequently or if dirty patterns or black bands appear on a copied or transmitted document, clean the document feeder. 1 2 3 Disconnect the power cord and the telephone line cord. 4 Clean the white plate and glass with a soft dry cloth. 5 Close the cover securely by pushing down on both corners. 6 Connect the power cord and the telephone line cord. Telephone line cord Open the cover by pressing the cover open button.
Print Reports Printing the feature settings, telephone numbers, and the journal You can print out the following documents. Basic feature list provides you with the current settings of the basic programming features (see page 70). Advanced feature list provides you with the current settings of the advanced programming features (see page 71). Telephone number list provides you with names and telephone numbers which are stored in the EASY DIAL directory. The telephone number codes are as shown below.
Print Reports Setting the caller list to print automatically (KX-FT34 only) This unit will automatically print a caller list after every 20 calls. After printing, the caller list will still remain in memory and the oldest communication will be erased when a new communication is received. 1 2 Dial keypad Press MENU . Display: Press 1.SYSTEM SET UP , then 2 6 . AUTO CALL. LIST 3 Press START/COPY/SET . 4 5 Press 6 Press MENU .
Display Contrast / Original Mode Changing the LCD display contrast Use this feature to adjust the display contrast. NORMAL: (Pre-selected setting) LIGHT: Used when the display contrast is too dark. DARKER: Used when the display contrast is too light. 1 2 Dial keypad Press MENU . Display: Press MENU 1.SYSTEM SET UP , then 3 9 . LCD CONTRAST 3 Press START/COPY/SET . 4 5 6 Press 1 2 3 4 5 6 7 8 9 0 MODE=NORMAL ▼ ▲ or to select the desired setting. START/COPY/SET Press START/COPY/SET .
Reset Resetting the advanced features Use this feature to return the advanced features (see page 71) to their pre-selected settings. 1 2 Press MENU . 3 Press START/COPY/SET . 4 Press 5 Press START/COPY/SET . Display: Press , then 8 0 . RESET=NO or RESET=YES 3 4 5 6 7 8 9 0 ▼▲ STOP START/COPY/SET If this feature is not required, press STOP . Press START/COPY/SET again for confirmation. RESET COMPLETED – 68 – 2 ▼▲ RESET OK? Press MENU . 1 to select “YES”.
Specifications Technical data about this product Applicable Lines: Document Size: Effective Scanning Width: Printing Paper Size: Effective Printing Width: Transmission Time *: Scanning Density: Halftone Level: Scanner Type: Printer Type: Data Compression System: Modem Speed: Operating Environment: Dimensions (H x W x D): Mass (Weight): Power Consumption: Power Supply: Public Switched Telephone Network Max. 216 mm (81/2") in width Max. 600 mm (235/8") in length 208 mm (83/16") 216 mm x max.
Features Summary Summary of user programmable features Basic features Feature & Display Code Available settings Meaning (2 digits for each entry) mm/dd/yy hh:mm Page Setting the date and time #01 SET DATE & TIME 19 Setting your logo #02 YOUR LOGO (Up to 30 characters) 20 (Up to 20 digits) 22 Setting your facsimile telephone number #03 YOUR TEL NO.
Features Summary Advanced features Code #22 Feature & Display Setting the journal report to print automatically Activate OFF Deactivate ON Activate OFF Deactivate ON Activate DELAYED SEND OFF Deactivate (KX-FT34 only) Setting the caller list to print automatically ON Activate OFF Deactivate 3, 4, 5, 6, 7, 8, 9 3 to 9 rings ON Activate OFF Deactivate NORMAL LIGHT DARKER Normal contrast Lighter contrast Darker contrast ON Activate OFF Deactivate Sending documents overseas OVERS
Index Index A Accessories . . . . . . . . . . . . . . . . . . . . . . . . . . . . . . 4 Advanced feature list . . . . . . . . . . . . . . . . . . . . 65 Advanced features . . . . . . . . . . . . . . . . . . . . . . 71 (Resetting) . . . . . . . . . . . . . . . . . . . . . . . . . 68 AUTO RECEIVE button . . . . . . . . . . . . . . 38, 39 AUTO RECEIVE mode . . . . . . . . . . . . . . . . . . 39 H HANDSET MUTE button . . . . . . . . . . . . . . . . . 24 HELP button . . . . . . . . . . . . . . . . . . . . .
Index T TEL mode. . . . . . . . . . . . . . . . . . . . . . . . . . . . 38, 40 TEL/FAX mode. . . . . . . . . . . . . . . . . . . . . . . 38, 42 TEL/FAX ring count . . . . . . . . . . . . . . . . . . . . . 44 Telephone number list . . . . . . . . . . . . . . . . . . . 65 TONE button . . . . . . . . . . . . . . . . . . . . . . . . . . . . 25 Transmission report . . . . . . . . . . . . . . . . . . . . . 34 Transmittable document. . . . . . . . . . . . . . . . . . 33 V Voice contact . . . . . . . . . . . .
Kyushu Matsushita Electric Co., Ltd.