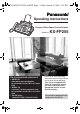
FP205-PFQX2559ZA-en.PDF Page 1 Friday, March 10, 2006 3:55 PM Operating Instructions Compact Plain Paper Fax and Copier Model No. FOR FAX ADVANTAGE ASSISTANCE: — REFER TO www.panasonic.com/helpfax for customers in the U.S.A. or Puerto Rico — E-MAIL TO consumer_fax@us.panasonic.com for customers in the U.S.A. or Puerto Rico — PHONE CALL 1-800-HELP-FAX (1-800-435-7329) KX-FP205 Please read these Operating Instructions before using the unit and save for future reference.
FP205-PFQX2559ZA-en.book Page 2 Friday, March 10, 2006 3:55 PM Thank you for purchasing a Panasonic fax machine. Things you should keep a record of Attach your sales receipt here.
FP205-PFQX2559ZA-en.book Page 3 Friday, March 10, 2006 3:55 PM Important Information Important Safety 1For assistance, Instructions Information please visit http://www.panasonic.com/consumersupport Important safety instructions When using this unit, basic safety precautions should always be followed to reduce the risk of fire, electric shock, or personal injury. 1. Read and understand all instructions. 2. Follow all warnings and instructions marked on this unit. 3.
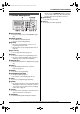
FP205-PFQX2559ZA-en.book Page 4 Friday, March 10, 2006 3:55 PM Table of Contents 1. Introduction and Installation 1. Table of Contents Accessories 1.1 1.2 Included accessories..................................... 6 Accessory information ................................... 6 4.7 4.8 4.9 Finding the Controls 1.3 1.4 Button descriptions........................................ 7 Overview ....................................................... 8 Installation 1.5 1.6 1.7 1.8 1.9 Ink film ................
FP205-PFQX2559ZA-en.book Page 5 Friday, March 10, 2006 3:55 PM Table of Contents 11. Index 11.1 Index...........................................................
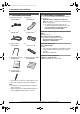
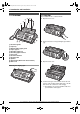
FP205-PFQX2559ZA-en.book Page 6 Friday, March 10, 2006 3:55 PM 1. Introduction and Installation 1 Introduction 1For Accessories assistance, andplease Installation visit http://www.panasonic.com/consumersupport 1.1 Included accessories 1.2 Accessory information 1 Telephone line cord (PFJA02B002Y)*1 2 Handset (PFJXN0341Z)*1 Accessories for this unit can be ordered online, by fax, or by telephone. – Replacement film*1 (Model No./Part No.
FP205-PFQX2559ZA-en.book Page 7 Friday, March 10, 2006 3:55 PM 1. Introduction and Installation Finding the Controls 1.3 Button descriptions A B CD E When you press {MONITOR} during receiving a call, you will be able to hear the other party, but the other party will not be able to hear you. N {FAX START} L To send or receive a fax. O {COPY} L To copy a document (page 28). IJ K FGH LM N O A {AUTO ANSWER} L To turn the auto answer setting ON/OFF (page 24).
FP205-PFQX2559ZA-en.book Page 8 Friday, March 10, 2006 3:55 PM 1. Introduction and Installation Installation 1.4 Overview 1.5 Ink film 3 The included film roll is a starter ink film. 4 5 6 1 Open the front cover.
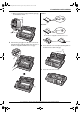
FP205-PFQX2559ZA-en.book Page 9 Friday, March 10, 2006 3:55 PM 1. Introduction and Installation L Make sure the blue gear (2) and white gear (3) are installed as shown. Correct 1 turn 3 Tight 6 Incorrect 2 No ink film is wrapped around the blue core. 5 Turn the blue gear (4) in the direction of the arrow until the ink film is tight (5) and at least one layer of ink film is wrapped around the blue core (6).
FP205-PFQX2559ZA-en.book Page 10 Friday, March 10, 2006 3:55 PM 1. Introduction and Installation To use A4 size paper 1.6 Handset cord Connect the handset cord (1). 1 1.7 Paper tray Pull up the metal recording paper guide (1), then install the paper tray (2). 2 Note: L When you use letter paper, you do not need to install the A4 paper guide. L Change the recording paper size to “A4” (feature #16 on page 31).
FP205-PFQX2559ZA-en.book Page 11 Friday, March 10, 2006 3:55 PM 1. Introduction and Installation 1.9 Recording paper The unit can hold up to 20 sheets of 60 g/m2 to 90 g/m2 (16 lb. to 24 lb.) paper. Please refer to page 48 for more information on recording paper. For superior results, we recommend Hammermill® Jet Print paper. Note: L Remove all of the installed paper before adding paper. 1 Fan the paper to prevent paper jams. 2 Insert the paper gently, print-side down (1).
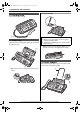
FP205-PFQX2559ZA-en.book Page 12 Friday, March 10, 2006 3:55 PM 2. Preparation provider. Please attach the filter (6) to the telephone line cord of the unit. 2 Preparation 2For Connections assistance, and please Setup visit http://www.panasonic.com/consumersupport 2.1 Connections Caution: L When you operate this product, the power outlet should be near the product and easily accessible. 1 Telephone line cord L Connect to a single telephone line jack (RJ11).
FP205-PFQX2559ZA-en.book Page 13 Friday, March 10, 2006 3:55 PM 2. Preparation Volume 2.2 Quick Setup 2.4 Adjusting volume You can print out the quick fax setup guide and select the desired receiving mode depending on your situation. {1} “FAX ONLY” (default): Use only as a fax (page 24). {2} “DIST. RING”: With the Distinctive Ring service (page 27). {3} “EXT. TAM”: With an external telephone answering machine (page 25). {4} “TEL ONLY”: Mostly phone calls (page 24).
FP205-PFQX2559ZA-en.book Page 14 Friday, March 10, 2006 3:55 PM 2. Preparation Initial Programming 2.5 Date and time 2.6 Your logo You can program your logo (name, company name, etc.) so that it appears on the top of each page sent. {SET} {SET} {MENU} {MUTE} {<}{>} 1 {MENU} i {#}{0}{1} i {SET} {MENU} M:| 01/D:01/Y:06 TIME: 12:00AM 2 Enter the current month/date/year/hour/minute by selecting 2 digits for each. Example: August 10, 2006 10:15 PM (12 hour clock format) 1.
FP205-PFQX2559ZA-en.book Page 15 Friday, March 10, 2006 3:55 PM 2. Preparation To enter your logo Example: “BILL” 2.7 Your fax number 1. Press {2} 5 times. You can program your fax number so that it appears on the top of each page sent. LOGO=| B {SET} 2. Press {4} 6 times. {FLASH} LOGO=B| I 3. Press {5} 6 times. LOGO=BI| L 4. Press {>} to move the cursor to the next space and press {5} 6 times. {MENU} LOGO=BIL| L {STOP} {<}{>} 1 {MENU} i {#}{0}{3} i {SET} NO.
FP205-PFQX2559ZA-en.book Page 16 Friday, March 10, 2006 3:55 PM 3. Telephone 2 Press {A} or {B} repeatedly to display the desired 3 Telephone Automatic Dialing 3.1 Storing names and telephone numbers into the phonebook The unit provides a phonebook (50 items). item. i {MENU} 3 {*} L If you do not need to edit the name, skip to step 5. 4 Edit the name. For further details, see the storing {SET} procedure on page 16. 5 {SET} L If you do not need to edit the telephone number, skip to step 7.
FP205-PFQX2559ZA-en.book Page 17 Friday, March 10, 2006 3:55 PM 3. Telephone Caller ID 3.5.2 Making a call using a one touch dial key 1 Press and hold the desired one touch dial key ({1} to {9}). L You can view other one touch dial assignments by pressing {A} or {B}. 2 Lift the handset. 3.6 Caller ID service This unit is compatible with the Caller ID service offered by your local telephone company. To use this unit’s Caller ID features, you must subscribe to a Caller ID service.
FP205-PFQX2559ZA-en.book Page 18 Friday, March 10, 2006 3:55 PM 3. Telephone 3.7 Viewing and calling back The display will show the number of new calls in standby mode. Example: 10 MISSED CALLS 10:59AM {CALLER ID} To edit a telephone number before calling back/storing While displaying a desired caller information, press {*} repeatedly.
FP205-PFQX2559ZA-en.book Page 19 Friday, March 10, 2006 3:55 PM 3. Telephone 3.9.2 Erasing specific caller information 1 {CALLER ID} 2 Press {A} or {B} repeatedly to display the desired item. i {<} i {SET} i {STOP} 3.10 Storing caller information into the phonebook 1 {CALLER ID} 2 Press {A} or {B} repeatedly to display the desired item. L If the number requires editing, see page 18.
FP205-PFQX2559ZA-en.book Page 20 Friday, March 10, 2006 3:55 PM 4. Fax 4 Fax Sending Faxes 4.1 Sending a fax manually L If the line is busy, the unit will automatically redial the number. L To cancel redialing, press {STOP}. To send more than 10 pages at a time Insert the first 10 pages of the document. Add the other pages (up to 10 at a time) on top of the previously inserted pages while the last page is being fed into the unit. 1 Pre-dialing a fax number 1. Enter the fax number. 2.
FP205-PFQX2559ZA-en.book Page 21 Friday, March 10, 2006 3:55 PM 4. Fax 4.2 Document requirements 128 mm (5") Minimum document size L Check that ink, paste or correction fluid has dried completely. L To send a document with a width of less than 210 mm (81/4"), we recommend using a copy machine to copy the original document onto A4 or letter-sized paper, then sending the copied document. 4.
FP205-PFQX2559ZA-en.book Page 22 Friday, March 10, 2006 3:55 PM 4. Fax 4.4 Broadcast transmission By storing the phonebook items (page 16) into the broadcast memory, you can send the same document to multiple parties (up to 20). Your programmed items will remain in the broadcast memory, allowing frequent reuse. Note: L If you select “FINE”, “SUPER FINE” or “PHOTO” resolution, the number of pages that the unit can send will decrease.
FP205-PFQX2559ZA-en.book Page 23 Friday, March 10, 2006 3:55 PM 4. Fax Receiving Faxes 4.5 Selecting the way to use your fax machine Depending on your situation, select the way you prefer to use your fax machine. – Use only as a fax (FAX ONLY mode) – Use mostly as a telephone (TEL mode) – Use with answering machine Note: L See page 13 for quick setup. 4.5.1 Use only as a fax (FAX ONLY mode) Your situation You have a separate telephone line just for faxes.
FP205-PFQX2559ZA-en.book Page 24 Friday, March 10, 2006 3:55 PM 4. Fax 4.6 Receiving a fax manually – Auto answer OFF Note: L By default, the unit reduces the size of the received document to 92 % when printing (See feature #36 on page 33 for details). 4.6.1 Activating TEL mode Set the fax machine to TEL mode by pressing {AUTO ANSWER} repeatedly to display “TEL MODE”. L The {AUTO ANSWER} indicator turns OFF.
FP205-PFQX2559ZA-en.book Page 25 Friday, March 10, 2006 3:55 PM 4. Fax Note: L If the call is a phone call, the answering machine will record voice messages. If a fax calling tone is detected, the fax machine will receive a fax automatically. 4.8 Using the unit with an answering machine 4.8.1 Setting up the unit and an answering machine 1 Connect the answering machine (1). L Answering machine is not included. L Remove the stopper (2) if attached.
FP205-PFQX2559ZA-en.book Page 26 Friday, March 10, 2006 3:55 PM 4. Fax 4.9 Junk fax prohibitor (preventing fax reception from undesired callers) If you subscribe to Caller ID service (page 17), this feature prevents fax reception from calls that do not show caller information. Additionally, the fax machine will not accept faxes originated from numbers that match the one on a programmable junk fax prohibitor list. Important: L This feature does not work when manual reception is performed. 4.9.
FP205-PFQX2559ZA-en.book Page 27 Friday, March 10, 2006 3:55 PM 5. Distinctive Ring 5 Distinctive Distinctive Ring Ring 5.1 Distinctive Ring service When a call is made to one of your phone numbers, the telephone company sends a ring pattern to your telephone line to indicate which number the call is intended for. By setting up this unit for Distinctive Ring, you can make the fax machine automatically start fax reception when a call comes to the fax number.
FP205-PFQX2559ZA-en.book Page 28 Friday, March 10, 2006 3:55 PM 6. Copy 6 Copy Copying To stop copying 6.1 Making a copy Press {STOP}. 6.1.1 More copying features 1 To enlarge a document 1. Insert the document. 2. {COPY} i {>} 3. Press {A} repeatedly to select “150%” or “200%”. i {START} L The unit will enlarge the center of the upper part of the document. To make an enlarged copy of the bottom of the document, turn the document around, and then make a copy.
FP205-PFQX2559ZA-en.book Page 29 Friday, March 10, 2006 3:55 PM 6. Copy 5. Press {A} or {B} repeatedly to display “COLLATE ON”. i {START} Example: Making 2 copies of a 4-page original document 4 3 1 2 1 1 2 2 3 4 3 3 4 2 1 Collated pages 4 Uncollated pages Note: L The unit will store the documents into memory while collating the copies. If memory becomes full while storing, the unit will only print out the stored pages.
FP205-PFQX2559ZA-en.book Page 30 Friday, March 10, 2006 3:55 PM 7. Programmable Features 7 Programmable Features Summary Features 7.1 Programming {MENU} {SET} 1 {MENU} 2 Press {#} and the 2-digit code. 3 Press the desired command to display the desired setting. L This step may be slightly different depending on the feature. 4 {SET} 5 To exit programming, press {MENU}.
FP205-PFQX2559ZA-en.book Page 31 Friday, March 10, 2006 3:55 PM 7. Programmable Features 7.2 Basic features Feature Feature code Selection Setting the quick setup {#}{0}{0} {1} “FAX ONLY” (default) {2} “DIST. RING” {3} “EXT. TAM” {4} “TEL ONLY” See page 13 for details. Setting the date and time {#}{0}{1} Enter the date and time using the dial keypad. See page 14 for details. Setting your logo {#}{0}{2} Enter your logo using the dial keypad. See page 14 for details.
FP205-PFQX2559ZA-en.book Page 32 Friday, March 10, 2006 3:55 PM 7. Programmable Features 7.3 Advanced features Feature Feature code Selection Setting the journal report to print automatically {#}{2}{2} {0} “OFF”: The unit will not print a journal report, but will keep a record of the last 30 fax transmissions and receptions. {1} “ON” (default): The unit will print a journal report automatically after every 30 new fax transmissions and receptions (page 20).
FP205-PFQX2559ZA-en.book Page 33 Friday, March 10, 2006 3:55 PM 7. Programmable Features Feature Feature code Selection Setting the time adjustment {#}{3}{3} Using this feature, the unit’s date and time setting will be automatically adjusted when caller information is received. {0} “MANUAL”: Deactivates this features. {1} “AUTO” (default): The date and time setting will be automatically adjusted.
FP205-PFQX2559ZA-en.book Page 34 Friday, March 10, 2006 3:55 PM 7. Programmable Features Feature Feature code Selection Changing the fax activation code {#}{4}{1} If you wish to use an extension telephone (page 24) to receive faxes, activate this feature and program the activation code. {0} “OFF” {1} “ON” (default) 1. {MENU} i {#}{4}{1} 2. Press {1} to select “ON”. i {SET} 3. Enter your code from 2 to 4 digits, using 0-9, {*} and {#}. L The default code is “;#9”. 4.
FP205-PFQX2559ZA-en.book Page 35 Friday, March 10, 2006 3:55 PM 7. Programmable Features Feature Feature code Selection Resetting advanced features to their default settings {#}{8}{0} {0} “NO” (default) {1} “YES” To reset the advanced features: 1. {MENU} i {#}{8}{0} 2. Press {1} to select “YES”.
FP205-PFQX2559ZA-en.book Page 36 Friday, March 10, 2006 3:55 PM 8. Help 8 Help 8.1 Error messages – Reports If a problem occurs during fax transmission or reception, one of the following messages will be printed on the confirmation and journal reports (page 20). Message Code COMMUNICATION ERROR 40-42 46-72 FF Cause & Solution L A transmission or reception error occurred. Try again or check with the other party. 43 44 L A line problem occurred.
FP205-PFQX2559ZA-en.book Page 37 Friday, March 10, 2006 3:55 PM 8. Help 8.2 Error messages – Display If the unit detects a problem, one or more of the following messages will appear on the display. Display Cause & Solution “BACK COVER OPEN” L The back cover is open. Close the back cover firmly. “CALL SERVICE” L There is something wrong with the unit. Contact our service personnel. “CHECK DOCUMENT” L The document was not fed into the unit properly. Re-insert the document.
FP205-PFQX2559ZA-en.book Page 38 Friday, March 10, 2006 3:55 PM 8. Help Display Cause & Solution “MODEM ERROR” L There is something wrong with the unit’s modem. Contact our service personnel. “NO FAX REPLY” L The other party’s fax machine is busy or has run out of recording paper. Try again. “OPEN CHECK “OPEN CHECK CABINET FILM SLACK” CABINET FILM TYPE” L Please use genuine Panasonic replacement film (page 6). L The ink film is slack. Tighten it (see step 5 on page 9).
FP205-PFQX2559ZA-en.book Page 39 Friday, March 10, 2006 3:55 PM 8. Help 8.3.2 General Problem Cause & Solution The unit displays “PAPER JAMMED” even though paper is installed. L You forced the recording paper into the paper tray too strongly. Remove all of the installed paper, and re-install it gently. The unit displays “CHECK PAPER” even though paper is inserted. L The paper is inserted halfway. Insert it correctly (page 44) and press {SET} to clear the message.
FP205-PFQX2559ZA-en.book Page 40 Friday, March 10, 2006 3:55 PM 8. Help 8.3.3 Fax – sending Problem Cause & Solution I cannot send documents. L The telephone line cord is connected to the [EXT] jack on the unit. Connect to the [LINE] jack (page 12). L The other party’s fax machine is busy or has run out of recording paper. Try again. L The other party’s machine is not a fax machine. Check with the other party. L The other party’s fax machine failed to answer the fax automatically.
FP205-PFQX2559ZA-en.book Page 41 Friday, March 10, 2006 3:55 PM 8. Help Problem Cause & Solution A blank sheet is ejected. L If a blank sheet is ejected after the received document is printed out, the size of the document sent by the other party is as large as, or larger than, the recording paper, and the receiving reduction rate is not programmed correctly. Program the proper rate in feature #36 (page 33). L The other party placed the document in their fax machine facing the wrong way.
FP205-PFQX2559ZA-en.book Page 42 Friday, March 10, 2006 3:55 PM 8. Help Problem Cause & Solution A black line, white line or smudge appears on the copied document. L The scanner glass or rollers are dirty with correction fluid, etc. Clean them (page 45). Please do not insert a document before correction fluid has dried completely. The copied image is distorted. L Adjust the width of the document guides to fit the actual size of the document. The printing quality is poor.
FP205-PFQX2559ZA-en.book Page 43 Friday, March 10, 2006 3:55 PM 9. Maintenance 3 Turn the blue gear (5) in the direction of the arrow 9 Maintenance Jams until the ink film is tight (6) and at least one layer of ink film is wrapped around the blue core (7). 9.1 Recording paper jams 9.1.1 When the recording paper has jammed in the unit The display will show the following. PAPER JAMMED Important: L Remove the recording paper, then remove the paper tray beforehand, otherwise the paper may misfeed or jam.
FP205-PFQX2559ZA-en.book Page 44 Friday, March 10, 2006 3:55 PM 9. Maintenance 4 Close the back cover securely by pushing down on the dotted area at both ends (8), then close the front cover securely (9). 8 9.2 Document jams 1 Open the front cover. Remove the jammed document carefully (1). 1 9 5 Install the paper tray (page 10), then insert the recording paper gently (page 11). 9.1.2 When the recording paper was not fed into the unit properly The display will show the following.
FP205-PFQX2559ZA-en.book Page 45 Friday, March 10, 2006 3:55 PM 9. Maintenance Cleaning 9.3 Document feeder/recording paper feeder/scanner glass cleaning Clean the document feeder/recording paper feeder/scanner glass when: – Documents or recording paper frequently misfeed. – Smudges or black/white lines appear on the original document when sending or copying. Important: L Remove the recording paper, then remove the paper tray beforehand, otherwise the paper may misfeed or jam.
FP205-PFQX2559ZA-en.book Page 46 Friday, March 10, 2006 3:55 PM 9. Maintenance 4 Clean the thermal head (5) with a cloth moistened 9.4 Thermal head cleaning If smudges or black/white lines appear on a copied/received document, check whether there is dust on the thermal head. Clean the thermal head to remove the dust. Important: L Remove the recording paper, then remove the paper tray beforehand, otherwise the paper may misfeed or jam. with isopropyl rubbing alcohol, and let it dry thoroughly.
FP205-PFQX2559ZA-en.book Page 47 Friday, March 10, 2006 3:55 PM 10. General Information 10 General Printed Repor Information ts Specifications 10.1 Reference lists and reports 10.2 Specifications You can print out the following lists and reports for your reference: – “SETUP LIST” – “PHONEBOOK LIST” – “JOURNAL REPORT” – “PRINTER TEST” L If the test print has a smudges, blurred points or lines, clean the thermal head (page 46).
FP205-PFQX2559ZA-en.book Page 48 Friday, March 10, 2006 3:55 PM 10. General Information (Based on the ITU-T No. 1 Test Chart in standard resolution.) *1 Transmission speed depends on the contents of the pages, resolution, telephone line conditions and capability of the other party’s machine. *2 Transmission speed is based on the ITU-T No. 1 Test Chart with original mode. If the capability of the other party’s machine is inferior to your unit, the transmission time may be longer.
FP205-PFQX2559ZA-en.book Page 49 Friday, March 10, 2006 3:55 PM 10. General Information FCC and Other Information 10.3 FCC and Other Information This equipment complies with Part 68 of the FCC rules and the requirements adopted by the ACTA. On the rear of this equipment is a label that contains, among other information, a product identifier in the format US:ACJ----------. If requested, this number must be provided to the telephone company. • Registration No .....
FP205-PFQX2559ZA-en.book Page 50 Friday, March 10, 2006 3:55 PM 10. General Information NOTE: This equipment has been tested and found to comply with the limits for a Class B digital device, pursuant to Part 15 of the FCC Rules. These limits are designed to provide reasonable protection against harmful interference in a residential installation.
FP205-PFQX2559ZA-en.book Page 51 Friday, March 10, 2006 3:55 PM 10. General Information Limited Warranty 10.4 Limited Warranty PANASONIC CONSUMER ELECTRONICS COMPANY, DIVISION OF PANASONIC CORPORATION OF NORTH AMERICA One Panasonic Way, Secaucus, New Jersey 07094 PANASONIC PUERTO RICO, INC. San Gabriel Industrial Park, Ave. 65 de Infantería, Km. 9.
FP205-PFQX2559ZA-en.book Page 52 Friday, March 10, 2006 3:55 PM 10. General Information Some states do not allow the exclusion or limitation of incidental or consequential damages, or limitations on how long an implied Limited Warranty lasts, so the exclusions may not apply to you. This Limited Warranty gives you specific legal rights and you may also have other rights which vary from state to state.
FP205-PFQX2559ZA-en.book Page 53 Friday, March 10, 2006 3:55 PM 10. General Information Customer Services 10.5 Customer Services directory Customer Services Directory Obtain Product Information and Operating Assistance; locate your nearest Dealer or Servicenter; purchase Parts and Accessories; or make Customer Service and Literature requests by visiting our Web Site at: http://www.panasonic.com/consumersupport or E-mail us via: consumer_fax@us.panasonic.
FP205-PFQX2559ZA-en.book Page 54 Friday, March 10, 2006 3:55 PM 11. Index Document size: 21 11. Index 11.
FP205-PFQX2559ZA-en.book Page 55 Friday, March 10, 2006 3:55 PM 11.
FP205-PFQX2559ZA-en.book Page 56 Friday, March 10, 2006 3:55 PM KX-FP205 Proof of Purchase Panasonic FAX ADVANTAGE PROGRAM Free peace of mind, direct from Panasonic NO EXTRA COST FAX ADVANTAGE PROGRA RAM ■ ■ 6-month limited warranty 1: parts, labor, and toll-free help line 2 Free replacement 3 and repair program The Panasonic Fax Advantage Consumer Service Program. Panasonic knows that if your fax machine is not up and running, neither is your business.