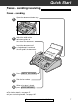
Quick Start Model No. To get started, please read the Quick Start section (p. 4 – 11). KX-FP121 Telephone Fax/Copy OPERATING INSTRUCTIONS Initial Preparation Compact Plain Paper FAX Help FOR OPERATION ASSISTANCE, CALL 1-800-HELP-FAX (1-800-435-7329) OR SEND A FAX TO 1-215-741-6376. Comienzo rápido (p. 124) Comienzo rápido en español (p. 124) Please read these Operating Instructions before using the unit and save for future reference.
Thank you for purchasing a Panasonic facsimile. Welcome to the world of Panasonic facsimiles. This product combines the facsimile, telephone, telephone answering device and copier features to provide you with more efficient office or home use. By utilizing these convenient features, you can maximize the effectiveness of this unit.
Important safety instructions When using this unit, basic safety precautions should always be followed to reduce the risk of fire, electric shock, or personal injury. 1. Read and understand all instructions. 2. Follow all warnings and instructions marked on this unit. 3. Unplug this unit from AC outlets before cleaning. Do not use liquid or aerosol cleaners. Use a damp cloth for cleaning. 4. Do not use this unit near water, for example near a bath tub, wash bowl, kitchen sink, or the like. 5.
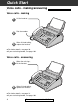
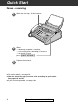
Quick Start Installation Remove the shipping tape first. 1 Paper tray (p. 21) Insert the two tabs on the paper tray into the slots on the back of the unit. Shipping tape Slot Tab Cassette open lever 2 Recording paper (p. 22, 23) A. Fan the stack of paper to prevent a paper jam. B. Pull the cassette open lever forward and insert the paper into the cassette. 4 For assistance, call 1-800-435-7329.
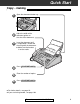
Quick Start Connections 1 Handset cord 2 Telephone line cord A. Connect to the unit. B. Connect to the handset. A. Connect to “LINE” on the unit. B. Connect to a single telephone line jack. RJ11C ( 3 Line surge protector ) Power cord A. Connect to the unit. B. Connect to a power outlet. 120 V, 60 Hz surge ( Power ) protector ● For further details, see page 24. For assistance, call 1-800-435-7329.
Quick Start Voice calls - making/answering Voice calls - making ● ● 1 Lift the handset. 2 Dial the number. 3 When finished talking, replace the handset. For further details, see page 30. If you are having trouble, see page 106. Voice calls - answering ● ● 6 1 When the unit rings, lift the handset. 2 When finished talking, replace the handset. For further details, see page 31. If you are having trouble, see page 106. For assistance, call 1-800-435-7329.
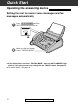
Quick Start Faxes - sending/receiving Faxes - sending ● ● 1 Open the document feeder tray. 2 Adjust the width of the document guides to the size of the document. 3 Insert the document until a single beep is heard and the unit grabs the document. 4 Press DIGITAL SP-PHONE . 5 Dial the fax number. 6 When a fax tone is heard, press START/SET/COPY . FA (up t CE DOW o 15 N page s) For further details, see page 47. If you are having trouble, see page 107. For assistance, call 1-800-435-7329.
Quick Start Faxes - receiving ● ● ● 8 1 When the unit rings, lift the handset. 2 When: — document reception is required, — a fax calling tone (slow beep) is heard, or — no sound is heard, press START/SET/COPY . 3 Replace the handset. For further details, see page 66. You can select the way to receive calls according to your needs. See pages 64 and 65. If you are having trouble, see page 108. For assistance, call 1-800-435-7329.
Quick Start Copy - making 1 Open the document feeder tray. 2 Adjust the width of the document guides to the size of the document. 3 ● ● Insert the document until a single beep is heard and the unit grabs the document. ● Make sure the handset is on the cradle. 4 Press START/SET/COPY . 5 Enter the number of copies. 6 Press START/SET/COPY . FA (up t CE DOW o 15 N page s) For further details, see page 82. If you are having trouble, see page 108. For assistance, call 1-800-435-7329.
Quick Start Operating the answering device Setting the unit to receive voice messages and fax messages automatically 1 Press AUTO ANSWER until the AUTO RECEIVE light turns on. AUTO ANSWER TAD/FAX ON ON 2 ● ● Make sure that the display shows “TAD/FAX MODE”. If the display does not show “TAD/FAX MODE” when the AUTO ANSWER light turns on, the setting needs to be changed to the TAD/FAX mode. See page 67. For further details, see page 84. 10 For assistance, call 1-800-435-7329.
Quick Start Listening to recorded messages ■ When the PLAY MESSAGES indicator flashes Press PLAY MESSAGES . ● The new recorded messages will be played. ■ When the PLAY MESSAGES indicator lights Press PLAY MESSAGES . ● All messages will be played. PLAY MESSAGES FLASH/LIGHT ● For further details, see page 89. Erasing recorded messages ■ Erasing a specific message Press ERASE while listening to the message you want to erase.
Table of Contents Initial Preparation Telephone Fax/Copy 12 Accessories Included accessories . . . . . . . . . . . . . . . . . . . . . . . . . . . 15 Accessory order information . . . . . . . . . . . . . . . . . . . . . . 16 Help Button Help function . . . . . . . . . . . . . . . . . . . . . . . . . . . . . . . . . 17 Finding the Controls Location . . . . . . . . . . . . . . . . . . . . . . . . . . . . . . . . . . . . . 18 Overview . . . . . . . . . . . . . . . . . . . . . . . . . . . . . . . . . .
Answering Device Greeting Pre-recorded greeting messages . . . . . . . . . . . . . . . . . . .85 Recording your own greeting messages . . . . . . . . . . . . . 86 Erasing your own recorded greeting messages . . . . . . . . 87 Recording time for the TAD/FAX greeting message . . . . . 88 Playing Messages Listening to recorded messages . . . . . . . . . . . . . . . . . . . 89 Erasing recorded messages . . . . . . . . . . . . . . . . . . . . . .
Error Messages Reports . . . . . . . . . . . . . . . . . . . . . . . . . . . . . . . . . . . . 104 LCD display . . . . . . . . . . . . . . . . . . . . . . . . . . . . . . . . . 105 Operations When a function does not work, check here before requesting help . . . . . . . . . . . . . . . . . . . . . . . . . . . . .106 If a power failure occurs . . . . . . . . . . . . . . . . . . . . . . . . 109 Jams Recording paper jam . . . . . . . . . . . . . . . . . . . . . . . . . . 110 Sending document jams . . . .
Accessories Initial Preparation Included accessories Power cord . . . . . . . . . . 1 pc. Telephone line cord . . . . 1 pc. Handset . . . . . . . . . . . . . 1 pc. Part No. PQJA200Z Part No. PQJA59V Part No. PFJXE0105Z Handset cord . . . . . . . . . 1 pc. Paper tray . . . . . . . . . . . 1 pc. Film cartridge. . . . . . . . . 1 pc. (with free starter film) Part No. PQJA212M Part No. PFKS1030Z1 — The film cartridge is pre-installed.
Accessories Accessory order information The free starter film cartridge is only 20 meters (65') long. We recommend that you buy regular film cartridge [100 m (328')] for continuous use of your unit. For best results, use Panasonic replacement film cartridge, KX-FA65. To stack printed paper, use a paper stacker, PFZXFP101M. To order, call toll free 1-800-332-5368 or see the fax order instructions below. Fax order: Please send a fax to 1-800-237-9080.
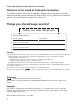
Help Button Initial Preparation Help function You can print a quick reference for assistance as follows. 1 Press HELP . 2 Press or until the desired item is displayed. The following items are available. Display: PRESS[▼▲]&[SET] HELP / 1. How to send faxes with the voice guide 1.SEND GUIDE 2. How to program your unit 2.HOW TO SET UP 3. How to store names in the JOG DIAL directory and how to dial them START/SET/COPY 3.JOG/AUTO DIAL 4. Help with problems operating answering device 4.
Finding the Controls Location ● Used to adjust volumes (p. 29). ● Used to select feature settings during programming. ● ● Used to scan and store a document into memory, and then transmit or copy the stored document (p. 58, 82). ● ● Used to print a quick reference (p. 17). Used for the Caller ID service (p. 39–45). ● ● Dial keypad Used to select a resolution (p. 47). Used for voice muting (p. 30). Used to send faxes using the IQ-FAX function (p. 52).
Finding the Controls ● Initial Preparation ● Used to record greeting messages (p. 86). Used to record memo messages and a telephone conversation (p. 92). ● ● Used to erase recorded messages (p. 90). Used to erase your own recorded greeting messages (p. 87). ● Used to play recorded messages (p. 89). Used for transmission to multiple stations (p. 59–61). Used for the One-Touch Dial (p. 34, 35, 48). ● Used as command keys (p. 27). ● ● AUTO ANSWER ● Used to turn on/off the auto answer mode (p. 64).
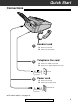
Finding the Controls Overview Paper tray Document guides Recording paper entrance Document entrance Speaker Document feeder tray Cover open button Cover Document exit Recording paper exit Microphone ● Used to talk with the other party when using the speakerphone. ● Used to record greeting messages and memo messages.
Setup 1 Initial Preparation Paper tray Remove the shipping tape from the unit. Shipping tape 2 Insert the two tabs on the paper tray into the slots on the back of the unit. ● Do not place the unit in areas where the paper tray may be obstructed by a wall, etc. Paper tray Tabs Slots Paper stacker (purchasable accessory) To stack printed paper, a paper stacker is available as an accessory. To order, see page 16. 1 Remove the shipping tape from the paper stacker.
Setup 4 Slide the paper stacker until it stops. Paper stacker Using legal size paper 1 Press the dotted area on the paper stacker extender. Dotted area Paper stacker extender 2 Open the paper stacker extender. Paper stacker extender Recording paper Letter or legal size recording paper can be loaded. The paper tray can hold up to 150 sheets of 75 g/m2 (20 lb.) paper. You may use 60 g/m2 to 90 g/m2 (16 lb. to 24 lb.) paper. For best results, only use inkjet paper like Hammermill Jet Print.
Setup Pull the cassette open lever forward and insert the paper into the cassette completely. ● The height of the stack of the paper should not exceed the upper limit on the paper tray, otherwise the paper may jam or multi-feed. ● The paper should not be over the tab. ● If the paper is not inserted correctly, readjust the paper or the paper may jam.
Setup Connections 1 2 3 Connect the handset cord. Connect the telephone line cord. Connect the power cord. ● The unit will automatically start to detect the dialing mode of your telephone line (see below). ● When the power is turned on for the first time, the unit will print some basic information. Power cord 120 V, 60 Hz surge ( Power ) protector RJ11C ( Line surge protector ) Telephone line cord Handset cord Connect to “LINE”.
Setup You should program the date and time, your logo and facsimile telephone number. This information will be printed on each page transmitted from your unit, fulfilling the requirements of the Telephone Protection Act of 1991. Your logo Example: Your facsimile telephone number FROM : Panasonic Fax FAX NO. : 1234567 Date and time Feb. 26 1999 04:02PM P1 Fax Correspondence Setting the date and time 1 Press MENU . 2 Press 3 Press START/SET/COPY . Display: Press START/SET/COPY . 1.
Setup Setting your logo The logo can be your company, division or name. 1 Press MENU . 2 Press 3 Press START/SET/COPY . Display: / INSERT MENU 1.SYSTEM SET UP , then 0 2 . YOUR LOGO LOGO= 1 2 3 4 5 6 7 8 9 0 4 Enter your logo, up to 30 characters, by using the dial keypad. START/SET/COPY Example: Bill 1. Press 2 twice. STOP JOG DIAL LOGO=B Cursor 2. Press 4 six times. LOGO=Bi 3. Press 5 six times. LOGO=Bil 4. Press to move the cursor to the next space and press 5 six times.
Setup Initial Preparation To select characters with the dial keypad Pressing the dial keys will select a character as shown below. Keys Characters Dial keys One-Touch Dial keys 1 1 [ ] { } + – 2 A B C a b c 2 3 D E F d e f 3 4 G H I g h i 4 5 J K L j k l 5 6 M N O m n o 6 7 P Q R S p q r 8 T U V t u v 8 9 W X Y Z w x 0 0 ) ! ( / = s 7 y z 9 " # $ , . _ % & ¥ 1 HYPHEN key (Used to insert a hyphen.
Setup Setting your facsimile telephone number 1 Press MENU . 2 Press 3 Press START/SET/COPY . Display: / MENU 1.SYSTEM SET UP , then 0 3 . YOUR FAX NO. NO.= 1 2 3 4 5 6 7 8 9 0 4 Enter your facsimile telephone number up to 20 digits using the dial keypad. Example: STOP START/SET/COPY NO.=1234567 JOG DIAL 5 Press START/SET/COPY . 6 Press MENU . SETUP ITEM [ ] Note: ● You can enter your facsimile telephone number by rotating JOG DIAL .
Volumes Initial Preparation Adjusting volumes Ringer volume / 4 levels (high/middle/low/off) are available. While the unit is idle, press or . To turn the ringer off: 1. Press repeatedly until the following message is displayed. Display: RINGER OFF= OK? 1 2 3 4 5 6 7 8 9 0 YES: PRESS SET START/SET/COPY 2. Press START/SET/COPY . ● To turn the ringer back on, press . While the ringer volume is set to off: The display will show the following message.
Making and Answering Calls Voice calls - making 1 Press DIGITAL SP-PHONE or lift the handset. 2 Dial the telephone number. Display: TEL= / Handset Example: ● 3 TEL=2345678 If you misdial, hang up and dial again. When the other party answers, talk into the microphone or handset. Microphone 4 When finished talking, press DIGITAL SP-PHONE or replace the handset. 1. Press DIGITAL SP-PHONE or lift the handset. 2. Press REDIAL/PAUSE .
Making and Answering Calls Voice calls - answering 1 When the unit rings, press DIGITAL SP-PHONE or lift the handset. 2 When finished talking, press DIGITAL SP-PHONE or replace the handset.
Making and Answering Calls TONE and PAUSE buttons TONE button The TONE ( ) button is used for rotary pulse dial services and allows you to temporarily change from the pulse to tone mode during a dialing operation. When you hang up, the unit will automatically return to the pulse mode. 1 2 3 4 5 6 7 8 9 0 Entering pauses TONE When the REDIAL/PAUSE button is pressed during dialing, a pause will be inserted. Pressing REDIAL/PAUSE once creates a 5 second pause.
Making and Answering Calls Dialing mode (touch tone or pulse) When the unit is turned on, the unit will automatically set the dialing mode if this feature is set to “AUTO”. If you cannot dial, change the dialing mode setting to “TONE” or “PULSE” by following the instructions below. 1 Press MENU . 2 Press 3 Press START/SET/COPY . Display: / MENU 1.SYSTEM SET UP , then 1 3 . Telephone DIALING MODE MODE=AUTO ▼▲ 1 2 3 4 5 6 7 8 9 0 4 5 Press 6 Press MENU .
One-Touch Dial Storing names and telephone numbers in One-Touch Dial keys The unit’s memory allows you to use a One-Touch Dial for rapid access to your most frequently dialed numbers. 6 stations are available. ● One-Touch Dial keys 1, 2 or 3 can be used as One-Touch Dial keys (DIAL MODE) or as broadcast keys (BROADCAST). Both functions cannot be used at the same time. For the broadcast function, see pages 59 to 61. 1 HYPHEN Press DIRECTORY PROGRAM .
One-Touch Dial Making a voice call using a One-Touch Dial key Before using this feature, program the desired names and telephone numbers into a One-Touch Dial key (p. 34). 1 Press DIGITAL SP-PHONE or lift the handset. Display: TEL= Handset ● Telephone 2 Confirm that there are no documents in the document feeder tray. For stations 1–3 Press the desired One-Touch Dial key. For stations 4–6 Press LOWER , then press the desired One-Touch Dial key.
JOG DIAL Storing names and telephone numbers in the JOG DIAL directory For rapid access to frequently dialed numbers, the unit also provides a JOG DIAL directory (100 stations) in addition to One-Touch Dial keys. For your convenience, the following 2 stations have been preprogrammed in the JOG DIAL directory. HELP-FAX (1-800-435-7329): If you cannot correct a problem after trying the help function (p. 17), call using this station (p. 38).
JOG DIAL Editing a stored name and number 1 Rotate JOG DIAL until the desired name is displayed. Example: 7 Press START/SET/COPY . 3 Press EDIT= REGISTERED DELETE=# Telephone Press DIRECTORY PROGRAM . to select “EDIT”. NAME=Mary ● 5 Edit the telephone number. For further details, see page 36. Mary 2 4 6 If you do not need to edit the name, skip to step 5. Edit the name by following the instructions on page 27. 1 2 3 4 5 6 7 8 9 0 Press START/SET/COPY . Example: ● NO.
JOG DIAL Making a voice call using the JOG DIAL directory Before using this feature, program the desired names and telephone numbers into the directory (p. 36). 1 Rotate JOG DIAL until the desired name is displayed. Example: 2 Handset Lisa Press DIGITAL SP-PHONE or lift the handset. ● The unit will start dialing automatically. DIALING 3 When the other party answers, talk into the microphone or the handset.
Caller ID Caller ID service from the phone company This unit is compatible with a Caller ID service offered by your local telephone company. To use this feature, you must subscribe to a Caller ID service. Caller ID and its capabilities Caller ID allows you to view the name or telephone number of the caller before you answer the call. The calling party information (name has priority) will be displayed after the first ring.
Caller ID Viewing the Caller ID list on the display The unit stores the caller’s information and makes a list of up to 35 callers in chronological order. When the memory is full and the unit receives a new call, the oldest data will be automatically erased. With the Caller ID list, the following convenient features are available. — Viewing who has called you on the display (See below.) — Dialing a telephone number from the list (p. 41) — Storing a telephone number for automatic dialing from the list (p.
Caller ID Calling back from the Caller ID list You can easily call back a telephone number recorded in the Caller ID list. Important: ● This feature is not available in the following cases. — The telephone number includes data other than numbers (ie., — The telephone number information was not received. Press CALLER ID SEARCH . Example: Display: 2 USE JOG-DIAL CALLER ID SEARCH Handset Rotate JOG DIAL until the desired name or telephone number is displayed.
Caller ID Storing a telephone number in the One-Touch Dial and JOG DIAL directory from the Caller ID list You can store a name and telephone number in the One-Touch Dial and JOG DIAL directory from the Caller ID list. Important: ● This feature is not available in the following cases. — The telephone number includes data other than numbers (ie., — The telephone number information was not received. 1 or #). Press CALLER ID SEARCH . Example: b: To store in the JOG DIAL directory: Rotate JOG DIAL .
Caller ID Erasing a name/number from the Caller ID list You can erase some or all of the entries in the Caller ID list. Erasing a specific caller’s information 1 Press CALLER ID SEARCH . Example: Display: USE JOG-DIAL Rotate JOG DIAL until the desired name is displayed. Example: 3 ERASE WENDY ROBERTS 1 2 3 4 5 6 7 8 9 Press ERASE . ● Telephone 2 CALLER ID SEARCH 2 NEW CALLS 0 The caller’s information will be erased.
Caller ID Storing your area code When this feature is set, the caller’s telephone number will be displayed without the area code when a call is received from the same area. If the call is received from outside your area, the telephone number will be displayed with “1” at the beginning. 1 Press MENU three times. 2 Press START/SET/COPY . Display: / 3.CALLER SET UP PRESS[▼▲]&[SET] 1 3 MENU Press or displayed.
Caller ID Automatic Caller ID list This feature will print a Caller ID list automatically after every 35 new calls. After printing, only the oldest caller information will be erased when a new one is received. When this feature is turned off, the unit will store the records of caller information, but will not print the Caller ID list automatically. Press MENU . 2 Press Display: / 1.SYSTEM SET UP , then 2 6 . AUTO CALL. LIST 1 3 MENU Telephone 1 Press START/SET/COPY .
Voice Contact Talking to the caller after fax transmission or reception You can have a conversation with the same call after the fax message is completed. This will save the added expense and time of making another call. This feature only works when the other party’s fax machine is equipped with a voice contact feature. Initiating voice contact 1 Press DIGITAL SP-PHONE while transmitting or receiving documents. Display: Handset VOICE STANDBY Your unit will call the other party with a distinctive ring.
Sending Faxes Sending a fax manually 1 2 3 Open the document feeder tray. 4 5 If necessary, press RESOLUTION repeatedly to select the desired setting (see below). Document guides Document feeder tray Adjust the width of the document guides to the size of the document. Insert the document (up to 15 pages) FACE DOWN until a single beep is heard and the unit grabs the document. Display: STANDARD FAC E DO WN Press DIGITAL SP-PHONE or lift the handset. TEL= 6 Dial the fax number.
Sending Faxes Sending a fax using a One-Touch Dial key Before using this feature, program the desired names and telephone numbers into a One-Touch Dial key (p. 34). 1 2 Open the document feeder tray. 3 Insert the document (up to 15 pages) FACE DOWN until a single beep is heard and the unit grabs the document. Document feeder tray Document guides Adjust the width of the document guides to the size of the document.
Sending Faxes Sending a fax using the JOG DIAL directory Before using this feature, program the desired names and telephone numbers into the directory (p. 36). 1 2 Open the document feeder tray. 3 Insert the document (up to 15 pages) FACE DOWN until a single beep is heard and the unit grabs the document. Adjust the width of the document guides to the size of the document. Display: 4 DIGITAL SP-PHONE FAC E DO If necessary, press RESOLUTION repeatedly to select the desired setting (p. 47).
Sending Faxes IQ-FAX This feature can only be used by those who apply to the FaxSav service. IQ-FAX is intelligent faxing which allows you to send faxes via the internet by using the IQ-FAX button. Behind the IQ-FAX button is the FaxSav Global Fax Network which manages the delivery of your fax to any fax machine in the world. It routes your fax via the best and most time efficient route and will automatically resend your fax for you, if the receiving fax machine is unavailable.
Sending Faxes Turning on the IQ-FAX function Before programming, confirm that your application has been processed by FaxSav. 1 Press MENU . 2 Press 3 Press START/SET/COPY . Display: / 1.SYSTEM SET UP MENU , then 7 5 . IQ-FAX MODE=OFF ▼▲ 1 2 3 4 5 6 7 8 9 0 4 Press or to select “ON”. MODE=ON ● ▼▲ START/SET/COPY If this feature is not required, select “OFF”. Press START/SET/COPY . 6 Press MENU .
Sending Faxes Sending a fax using the Internet 1 2 Open the document feeder tray. 3 Insert the document (up to 15 pages) FACE DOWN until a single beep is heard and the unit grabs the document. Document feeder tray Document guides Adjust the width of the document guides to the size of the document. Display: FAC E DO WN STANDARD 4 If necessary, press RESOLUTION repeatedly to select the desired setting (p. 47). 5 Press IQ-FAX .
Sending Faxes Documents you can send Maximum size Effective scanning area 600 mm (235/8") 128 mm (5") Minimum size Scanned area Single sheet: 45 g/m2 to 90 g/m2 (12 lb. to 24 lb.) 208 mm (83/16") Multiple sheets: 60 g/m2 to 75 g/m2 (16 lb. to 20 lb.) 4 mm 128 mm (5") 216 mm (81/2") Document weight Paper width 216 mm (81/2") Fax/Copy Note: ● Remove clips, staples or other similar fastening objects. ● Check that ink, paste or correction fluid has dried.
Sending Faxes Sending faxes by following the voice guide You can send the documents by following the voice guide. After transmission, the voice guide will turn off automatically. 1 2 Press MENU four times. Display: 4.SEND GUIDE Press HELP . Voice guide: HELP FAC E DO WN To transmit, insert the document face down until you hear the beep. 3 Insert the document FACE DOWN until a single beep is heard. Voice guide: MENU Press the speaker phone button, then dial the phone number.
Sending Faxes Sending report for confirmation The sending report will provide you with a printed record of the fax transmission result. One of the following choices is available. ERROR: ON: OFF: The sending report will print out only when fax transmission fails (pre-selected setting). The sending report will always print out, indicating whether fax transmission is successful or not. The sending report will not print. 1 Press MENU . 2 Press 3 Press START/SET/COPY . 4 5 Press 6 Press MENU .
Sending Faxes Automatic journal report This feature prints a journal report automatically after every 35 new fax communications. After printing, only the oldest communication result will be erased when a new communication occurs. When this feature is deactivated, the unit will store the records of the fax communications, but will not print the journal report automatically. 1 Press MENU . 2 Press 3 Press START/SET/COPY . Display: / 1.SYSTEM SET UP MENU , then 2 2 .
Sending Faxes Delayed transmission (sending a fax at a specified time) Using a built-in clock, this unit can send documents automatically at a specified time. This allows you to take advantage of low-cost calling hours offered by your telephone company. The delayed transmission can be reserved to take place up to 24 hours in advance. 1 2 Insert the document FACE DOWN. Display: STANDARD Press MENU . FAC 1.SYSTEM SET UP 3 Press 4 Press START/SET/COPY . E DO WN , then 2 5 .
Sending Faxes From memory The unit is able to scan and store documents into memory, and then transmit the stored documents. The memory capacity is approx. 25 pages based on the CCITT No. 1 test chart in standard resolution. For the CCITT No. 1 test chart, see page 123. Transmitting documents from memory 1 2 3 Enter the fax number using the dial keypad. Insert the document FACE DOWN. FAC E DO Press QUICK SCAN . The document will be fed into the unit and scanned into memory.
Sending Faxes Multiple stations This feature is useful when you send the same documents to selected parties whose telephone numbers are stored in a One-Touch Dial key and the JOG DIAL directory. You must program the desired parties into one of the BROADCAST key (One-Touch Dial key 1, 2 or 3). Important: ● Before programming, make sure that the desired telephone numbers have been stored into a One-Touch Dial key or the JOG DIAL directory.
Sending Faxes Adding a new name and number 1 Rotate JOG DIAL until the desired BROADCAST key is displayed. Example: Press DIRECTORY PROGRAM . 3 Press 5 ADD= DELETE=# to select “ADD”. Example: Press DIRECTORY PROGRAM to exit the program. 2 4 6 1 Alex 2 3 4 5 6 7 8 9 Rotate JOG DIAL until the desired name is displayed. Example: Jack 0 START/SET/COPY JOG DIAL DIRECTORY PROGRAM Press START/SET/COPY .
Sending Faxes Using the BROADCAST key The documents will be scanned and stored into memory when using the BROADCAST key. After transmission, the stored documents will be erased automatically. The memory capacity is approx. 25 pages based on the CCITT No. 1 test chart in standard resolution. For the CCITT No. 1 test chart, see page 123. 1 2 Insert the document FACE DOWN. Press BROADCAST . ● The documents will be fed into the unit and scanned into memory.
Sending Faxes Overseas You may experience difficulty when transmitting documents overseas. This feature makes sending documents easier as the transmission speed is slowed down. Before starting transmission, follow the steps below. 1 Press MENU . 2 Press / Display: 1.SYSTEM SET UP , then 2 3 . OVERSEAS MODE 1 3 MENU Press START/SET/COPY . MODE=OFF ▼▲ 2 3 4 5 6 7 8 9 0 4 Press or to select “ON”. MODE=ON ● ▼▲ If this feature is not required, select “OFF”. 5 Press START/SET/COPY .
Sending Faxes Connecting tone This feature allows you to hear connecting tones, such as a fax tone, ring back tone or busy tone for several seconds when you send a fax using a One-Touch Dial key or the JOG DIAL directory. This will tell you the status of the other party’s machine. If you hear a: — Fax tone: The other party’s machine is ready for reception. — Ring back tone: If this tone continues, the other party’s machine may not be a facsimile or ran out of paper. Check with the other party.
Receiving Faxes Setting the unit to receive calls Option A Option B To receive all voice and fax calls automatically. How you want the unit to receive faxes You have a separate telephone line just for fax calls. Hi, this . .. is Mike Voice/Fax call Fax call TAD/FAX mode FAX ONLY mode (Telephone Answering Device/Facsimile mode) (p. 84) PRE-SELECTED SETTING AUTO ANSWER is ON. (p. 67) AUTO ANSWER is ON. You have to set this.
Receiving Faxes Option C Option D Other options To answer all voice and fax calls yourself. You have a Distinctive Ring service from the telephone company (this allows you to have up to 3 telephone numbers on the same line). Voice mail If you have a voice mail service from your telephone company, you also need to subscribe to a Distinctive Ring service (p. 70, 71). Ring Ring Ring 2 number example To the same line Voice/Fax call (p. 66) AUTO ANSWER is OFF.
Receiving Faxes TEL mode (answering all calls manually) Press AUTO ANSWER to turn off the AUTO ANSWER mode. ● The display will show the following. Display: Handset TEL MODE 1 When the unit rings, press DIGITAL SP-PHONE or lift the handset to answer the call. 2 When: — document reception is required, — a fax calling tone (slow beep) is heard, or — no sound is heard, TAD/FAX ON START/SET/COPY press START/SET/COPY . DIGITAL SP-PHONE CONNECTING.....
Receiving Faxes FAX ONLY mode (all calls are received as faxes) Changing the AUTO ANSWER setting to the FAX ONLY mode 1 Press MENU . 2 Press 3 Press START/SET/COPY . 4 Press AUTO ANSWER TAD/FAX ON Display: 1.SYSTEM SET UP , then 7 7 . / ON AUTO ANSWER MODE=TAD/FAX or MENU ▼▲ to select “FAX ONLY”. MODE=FAX ONLY ▼▲ 1 2 3 4 5 6 7 8 9 0 Press START/SET/COPY . 6 7 Press MENU .
Receiving Faxes Setting the ring count in the FAX ONLY mode This setting determines the number of rings before the unit answers a call in the FAX ONLY mode. You can choose from 1 to 4 rings. Helpful hints: ● To answer a call before the unit does, increase the number of rings. ● If you have difficulty receiving faxes, the other parties may have tried to send faxes before confirming if your unit answered or not. Decrease the number of rings. 1 Select “FAX ONLY” in step 4 of feature setting #77 (p. 67).
Receiving Faxes Setting up with a computer Always connect the fax machine directly to the wall jack. Wall jack Fax machine Wall jack Computer 69 Fax/Copy Note: ● Set the TEL mode on the fax machine. ● The device which has the shortest ring count will answer a call first. Confirm the ring count for each device.
Receiving Faxes Distinctive Ring service (ring pattern detection feature) This feature can only be used when you subscribe to a Distinctive Ring service from your telephone company. For more information on the availability of this service, contact your telephone company before activating this feature. This feature will work irregardless of the AUTO ANSWER or receive mode settings.
Receiving Faxes Setting the Distinctive Ring pattern assigned for faxes Select the ring pattern of the facsimile number that is assigned by your telephone company. 1 Press MENU . 2 Press 3 Press START/SET/COPY . 4 Press or to select the ring pattern assigned to the facsimile number. A: Standard ring (one long ring) B: Double ring (two short rings) C: Triple ring (short-long-short rings) D: Other triple ring (short-short-long rings) OFF: Turns off the feature (pre-selected setting).
Receiving Faxes TEL/FAX mode (receiving voice calls with rings and fax calls without rings when you are near the unit) Use this mode when you are always near the unit and want the fax machine to detect faxes without ringing. When a call is received, the unit will work as follows. If you connected an extension telephone, see the next page. The following message will be played after the TEL/FAX delayed rings. The unit will ring up to 3 times.*** ing g “Hello! To send a fax, start transmission.
Receiving Faxes Ring pattern when an extension telephone is connected The following message will be played after the TEL/FAX delayed rings. “Hello! To send a fax, start transmission. To speak with someone, please wait.” The unit will ring up to 3 times.*** (The extension telephone will not ring.) Answer the call using the handset. OR Ring Ring Ring Silent fax recognition ring count Voice call The extension telephone will ring twice.* (The unit will not ring.
Receiving Faxes Changing the AUTO ANSWER setting to the TEL/FAX mode 1 Select “TEL/FAX” in step 4 of feature setting #77 (p. 67). ● The unit will print an information list. 2 If the AUTO ANSWER light is off, turn it on by pressing AUTO ANSWER . ● The unit will play the TEL/FAX greeting message and the display will show the following message. Display: AUTO ANSWER TAD/FAX ON ON TEL/FAX MODE 1 2 3 4 5 6 7 8 9 0 We recommend the following setup.
Receiving Faxes TEL/FAX delayed ring count This setting determines the number of times the extension telephone rings in the TEL/FAX mode. You can choose from 1 to 4 rings. When an extension telephone is not connected, this setting does not need to be changed. 1 Press MENU . 2 Press / Display: , then 7 8 . TEL/FAX RING 1 3 MENU 1.SYSTEM SET UP Press START/SET/COPY . RING=2 ▼▲ 2 3 4 5 6 7 8 9 0 Press or to select the desired number, or enter the number using the dial keypad.
Receiving Faxes Extension telephone When you connect an extension telephone on the same line, you can receive fax documents using the extension telephone. You do not have to go to the unit and press START/SET/COPY . Important: ● Use a touch tone telephone as the extension telephone and enter the fax activation code firmly. 1 2 3 When the extension telephone rings, lift the handset of the extension telephone.
Receiving Faxes Other size documents When the size of the document sent by the other party is as large as, or larger than the recording paper, the unit can reduce each page of the document and print it out on the recording paper by programming a suitable reduction rate. The reduction rate is determined by a combination of the size of the recording paper and received document.
Receiving Faxes Memory reception alert When received documents are stored into memory, the unit will alert you with beep tones. If you hear slow beeps, clear the printing problem or supply paper to print the stored documents. The beep tones will stop. 1 Press MENU . Display: 1.SYSTEM SET UP / 2 Press 3 Press START/SET/COPY . 4 MENU , then 4 4 . RECEIVE ALERT MODE=ON 1 ▼▲ 2 3 4 5 6 7 8 9 0 Press or to select the desired setting. ● If this feature is not required, select “OFF”.
Receiving Faxes Friendly reception The friendly reception feature allows you to receive fax documents automatically without pressing START/SET/COPY (p. 66). When this feature is deactivated, you have to press START/SET/COPY to receive fax documents each time you answer a fax call. 1 Press MENU . Display: 1.SYSTEM SET UP 2 Press 3 Press START/SET/COPY . MENU , then 4 6 . FRIENDLY RCV MODE=ON 1 ▼▲ Press or to select the desired setting. ● If this feature is not required, select “OFF”.
Receiving Faxes Pager call This feature allows your unit to call your pager when your unit receives a fax document and/or incoming messages. 1 Press MENU . 2 Press 3 Press START/SET/COPY . 4 Press Display: 6 1.SYSTEM SET UP Press START/SET/COPY . ● The unit will dial the stored number. PAGER TEST , then 7 0 . PAGER TRANSFER MODE=OFF or ▼▲ to select “ON”. MODE=ON ● 5 7 ▼▲ 8 9 10 Confirm if the message is displayed on your pager. Press DIGITAL SP-PHONE .
Receiving Faxes Film detection If this feature is activated, the display will show the following message when the remaining film prints about 15 letter size documents. Display: ● FILM NEAR EMPTY If you are using regular film (100 m roll) when the above message is displayed, the unit will also print a report. 1 Press MENU . Display: 1.SYSTEM SET UP 2 Press 3 Press START/SET/COPY . / MENU , then 7 9 . FILM DETECTION MODE=ON 5 Press START/SET/COPY . 6 Press MENU .
Copying Making a copy The unit can make single or multiple copies (up to 99). Any transmittable document (p. 53) can be copied. 1 2 3 Open the document feeder tray. Document guides Adjust the width of the document guides to the size of the document. Insert the document (up to 15 pages) FACE DOWN until a single beep is heard and the unit grabs the document. Display: STANDARD ● FAC E DO WN Make sure the handset is on the cradle.
Copying Choosing an enlargement/reduction rate The unit can make enlarged or reduced copies of a document. ■ To enlarge a document: Select “200%” or “150%” by rotating JOG DIAL . The unit will only enlarge the center part of the document and print it on two pages. See the examples below.
Setup TAD/FAX mode (using the built-in answering device and receiving voice and fax calls automatically) When you turn on AUTO ANSWER (the pre-selected setting is TAD/FAX), the unit will work as a fax machine and/or answering device. If a fax call is detected, the unit will automatically switch to receive faxes. If a voice call is detected, the answering device will begin recording and the caller can leave a voice message. ● You can use a pre-recorded greeting message (p.
Greeting Pre-recorded greeting messages The unit has pre-recorded greeting messages. Depending on the situation, one of the following messages will be played to the caller. ■ When you do not record your own greeting message (next page), one of the following messages will be played. TAD/FAX mode Hello! We are unable to answer right now. To send a fax, please start transmission. To leave a voice message, please speak after the beep. Thank you.
Greeting Recording your own greeting messages The recording time is limited to 16 seconds for each message. Record your message within 12 seconds for best performance. ● You can choose either 16 seconds or 60 seconds of recording time for the TAD/FAX greeting message (p. 88). Suggested messages TAD/FAX greeting message “This is (your name, business and/or telephone number). We are unable to answer right now. To send a fax, start transmission. To leave a message, speak after the beep. Thank you.
Greeting Erasing your own recorded greeting messages 1 Make sure that the AUTO ANSWER setting is set to the desired mode (TAD/FAX or TEL/FAX mode) where you want to erase the greeting message (p. 67). 2 Press ERASE two times. ● The display will show one of the following according to your selection in step 1. For the TAD/FAX greeting: Display: 2.TAD GREETING PRESS START STOP ERASE For the TEL/FAX greeting: START/COPY/SET 2.T/F GREETING PRESS START 3 Press START/SET/COPY .
Greeting Recording time for the TAD/FAX greeting message You can choose either 16 seconds or 60 seconds of recording time. 1 Press MENU . 2 Press 3 Display: / MENU 1.SYSTEM SET UP , then 5 4 . GREETING TIME Press START/SET/COPY . MODE=16s ▼▲ 1 2 3 4 5 6 7 8 9 0 4 5 Press 6 Press MENU . or to select the desired setting. START/SET/COPY Press START/SET/COPY .
Playing Messages Listening to recorded messages When the unit receives voice messages; — the PLAY MESSAGES indicator will flash, — the call counter will show the total number of recorded messages, and — slow beeps will sound if message alert (p. 102) is set to “ON”. When the PLAY MESSAGES indicator flashes CALLS (call counter) Press PLAY MESSAGES . ● Only the new recorded messages will be played. / When the PLAY MESSAGES indicator lights Press PLAY MESSAGES . ● All messages will be played.
Playing Messages Erasing recorded messages Erase unnecessary messages to prevent memory from becoming full. Erasing a specific message Press ERASE while listening to the message you want to erase. Erasing all the messages 1. Press ERASE after listening to all of the messages. Display: 1.ALL MESSAGES PRESS START STOP 2 Press START/SET/COPY . ERASE ERASE MESSAGES? YES: PRESS SET ● To stop erasing, press STOP . 3 Press START/SET/COPY .
Playing Messages Functions while playing a message (repeating, skipping and stopping) Repeating a message Rotate JOG DIAL one click to the left while listening to the message you want to repeat. ● If you rotate JOG DIAL within 5 seconds of the beginning of the message, the previous message will be played. ● To play back a specific message, rotate JOG DIAL to the left until you hear the message you want to repeat. SLOW Skipping a message Rotate JOG DIAL one click to the right to play the next message.
Recording Memo message (leaving a message for others or yourself) To leave a private message for someone or yourself, you can record a voice memo. This memo can be played back later, either directly or remotely. 1 Press RECORD . Display: 1.MEMO MESSAGE PRESS START 2 Press START/SET/COPY . ● A long beep will sound. MEMO RECORDING 3 4 Speak clearly into the microphone. When finished, press STOP . Microphone STOP RECORD START/COPY/SET Telephone conversation You can record a telephone conversation.
Remote Operation Operating from a remote location The following operations can be performed from a remote location using a touch tone telephone. Set the unit to the TAD/FAX mode before going out (p. 84).
Remote Operation Setting the remote operation ID The remote operation ID is used to access the answering device. Choose any 3-digit number except a number using digits 0 or 7. 1 Press MENU . 2 Press MENU Display: 1.SYSTEM SET UP , then 1 1 . REMOTE TAD ID 1 3 Press START/SET/COPY . 4 5 Enter the desired number. 6 Press MENU .
Remote Operation From a remote touch tone telephone Listening to messages 1 2 3 Call your unit. Enter the remote operation ID during the TAD/FAX greeting playback. — The voice guide will tell you the number of new recorded messages and play them automatically. ● You can repeat the new recorded messages by pressing 4 in the same call. Voice guide example: 3 new messages. Press 5 to listen to all of the recorded messages.
Remote Operation Erasing incoming messages from memory Erasing a specific message Press erase. 4 while listening to the message you want to Voice guide example: — A long beep and the voice guide will be heard. Then the unit will continue with the next message. The message has been erased. Erasing all messages Press 5 to erase all messages. — A long beep and the voice guide will be heard. Voice guide example: All messages have been erased.
Remote Operation Changing to the TEL mode You can change the setting of the receive mode from TAD/FAX to TEL from a remote location. 1. Call your unit. 2. Enter your remote operation ID. 3. Press 8 0 . Turning the message transfer on or off You must pre-program a transfer telephone number (p. 100) before using this feature. Voice guide example: Press 8 1 to turn ON the message transfer. Press 8 2 to turn OFF the message transfer.
Options Transferring recorded messages to another phone This feature allows your unit to call a designated telephone number each time an incoming voice message is recorded. Program the transfer telephone number first. When an incoming message is recorded in your unit, the message will be transferred. You can retrieve the message during the same call using the remote operation. — This feature operates in the TAD/FAX mode. — For details on the remote operation, see page 93.
Options Recording a message transfer greeting message The recording time is limited to 16 seconds. Record your message within 12 seconds for best performance. Suggested message Message transfer greeting message “This is a transferred message from (your name, business and/or telephone number). Please enter your remote ID for the remote operation.” Note: ● If you do not record a message, the pre-recorded message will be played (p. 98). 1 Press MENU . 2 Press / Display: MENU 1.
Options Setting the message transfer 1 Press MENU . 2 Press 3 Press START/SET/COPY . Display: / MENU 1.SYSTEM SET UP , then 6 0 . MESSAGE TRANS. MODE=OFF ▼▲ 1 2 3 4 5 6 7 8 9 0 4 Press or to select “ON”. ● If this feature is not required, select “OFF”. 5 Press START/SET/COPY . 6 Enter the transfer telephone number. 7 Press START/SET/COPY . 8 Press MENU . START/SET/COPY NO.= Example: NO.
Options Ring count in the TAD/FAX mode This feature determines the number of rings before the unit answers a call in the TAD/FAX mode. You can choose from 1, 2, 3, 4, TOLL SAVER and RINGER OFF. TOLL SAVER: RINGER OFF: When you call the unit from a remote location, the number of rings will tell you if there are any new voice messages. If the unit answers on the second ring, there is at least one new recorded message. If the unit answers on the fourth ring, there are no new recorded messages.
Options Incoming message recording time You can choose from two recording times for an incoming message. VOX (unlimited): The unit will record an incoming message as long as the caller talks (pre-selected setting). 1 MIN (1 minute): The unit will record each incoming message up to 1 minute. 1 Press MENU . 2 Press 3 Press START/SET/COPY . 4 5 Press 6 Press MENU . / Display: MENU 1.SYSTEM SET UP , then 1 0 .
Options Recording time alert (beeps when memory is almost full) When there is less than 60 seconds of recording time for incoming messages, the unit will alert the user with slow beeps. 1 Press MENU . 2 Press / Display: 1.SYSTEM SET UP , then 4 3 . REC. TIME ALERT 1 3 MENU Press START/SET/COPY . MODE=OFF ▼▲ 2 3 4 5 6 7 8 9 0 4 Press to select “ON”. MODE=ON ● ▼▲ START/SET/COPY If this feature is not required, select “OFF”. Press START/SET/COPY .
Error Messages Reports When your fax does not transmit, check the following items first. – The number you dialed is correct. – The other party’s machine is a facsimile. If the problem remains, correct it by following the communication message printed on the sending and journal reports (p. 55, 56). Communication message Error code Cause & Remedy 41–72 FF ● A transmission or reception error occurred. Try again or check with the other party. — ● The document is jammed. Remove the jammed document (p.
Error Messages LCD display If the unit detects a problem, one or more of the following messages will appear on the display. Display message Cause & Remedy ● There is something wrong with the unit. Contact our service personnel. ● The cover is open. Close it. CHECK DOCUMENT ● The document is not fed into the unit properly. Reinsert the document. If misfeeding occurs frequently, clean the document feeder rollers and try again (p. 115). If the problem remains, adjust the feeder pressure (p. 112).
Error Messages / Operations Display message PLEASE WAIT REDIAL TIME OUT REMOVE DOCUMENT Cause & Remedy ● The unit is checking if there is no slack on the film. Wait for a while. ● The other party’s fax machine is busy or ran out of recording paper. Try again. ● The document is jammed. Remove the jammed document (p. 112). Attempted to transmit a document longer than 600 mm (235/8"). Press the STOP button to remove the document. Divide the document into two or more sheets and try again.
Operations Fax transmission Problem Cause & Remedy The other party’s fax machine was busy or ran out of paper. Try again. ● The other party’s machine is not a facsimile. Check with the other party. ● The other party’s fax machine rings too many times. Send the fax manually - dial the number, confirm the fax tone, then press START/SET/COPY . I cannot send documents. ● The other party complains that letters on their received document are distorted.
Operations Receive mode Problem Cause & Remedy I cannot select the desired receive mode. ● If you set the TAD/FAX, FAX ONLY or TEL/FAX mode: – Select the desired mode using feature #77 (p. 67), and – Press AUTO ANSWER to turn on the AUTO ANSWER light. AUTO ANSWER TAD/FAX ON ON ● If you set the TEL mode: – Press AUTO ANSWER to turn off the AUTO ANSWER light. AUTO ANSWER TAD/FAX ON OFF Copying Problem Cause & Remedy The unit does not make a copy. ● You cannot make a copy during programming.
Operations If a power failure occurs The unit will not function. Transmission and reception will be interrupted. Check the transactions by printing a journal report. ● If fax documents are stored in memory, they will be lost. When power is restored, a power down report will be printed out stating which contents in memory have been erased. ● If delayed transmission is programmed and the start time has passed during a power failure, transmission will be attempted soon after power is restored.
Jams Recording paper jam If the unit does not eject any recording paper during reception or copying, the recording paper has jammed. Remove the jammed paper by following this page or the next page. When paper has jammed under the film cartridge The display will show the following message. Display: PAPER JAMMED Remove the jammed paper as follows. 1 2 Open the cover by pressing the cover open button. Film cartridge Remove the film cartridge. Cover open button 3 Remove the jammed recording paper.
Jams When paper has jammed near the recording paper entrance The display will show the following message. Display: CHECK PAPER PRESS START Remove the jammed paper as follows. 1 Pull the cassette open lever forward, then pull out the jammed recording paper from the recording paper entrance. 2 Press START/SET/COPY to clear the message. START/SET/COPY When paper has not been ejected even though “PAPER JAMMED” or “CHECK PAPER” is not displayed Help Confirm the recording paper exit.
Jams Sending document jams If the unit does not release the document during feeding, remove the document as follows. 1 Open the cover by pressing the cover open button. 2 3 Remove the jammed document carefully. Close the cover securely by pushing down on both ends. Note: ● Before opening the cover, do not pull out the jammed paper forcibly. Cover open button Sending document does not feed, or multi-feeds If no feeding or multiple feeding occurs frequently, adjust the feeder pressure.
Ink Film How much film you have left To check the amount of remaining film, proceed as follows. The display indicates the approximate amount of remaining film. Display: FILM E F FILM E F 1 Press MENU . 2 Press 3 MENU Display: 1.SYSTEM SET UP , then 1 8 . FILM REMAIN Press START/SET/COPY . Example: 4 When the film indicator points to this position, the remaining film will print up to 25 pages of letter size documents. Prepare a new film cartridge for replacement.
Ink Film Replacing the film cartridge When the unit detects the end of the film, the following message will be displayed. Display: FILM NEAR EMPTY The remaining film prints about 15 pages of letter size documents. Prepare a new film cartridge. FILM EMPTY The film is empty. Install a new film cartridge. The following replacement kit is available: KX-FA65: Film cartridge (prints about 330 letter size pages) To order a replacement kit, see page 16. 1 2 Open the cover by pressing the cover open button.
Cleaning Document feeder If misfeeding occurs frequently or if dirty patterns or black bands appear on a copied or transmitted document, clean the document feeder. 1 2 3 Disconnect the power cord and the telephone line cord. 4 Clean the white plate and glass with a soft dry cloth. 5 Close the cover securely by pushing down on both ends. 6 Connect the power cord and the telephone line cord. Telephone line cord Open the cover by pressing the cover open button.
Reports Printing the feature settings, telephone numbers, the journal, printer test list, broadcast list and Caller ID list You can print out the following documents. Feature list: provides you with the current settings of the basic and advanced programming features (p. 133–135). Telephone number list: provides you with names and telephone numbers which are stored in the One-Touch Dial keys and the JOG DIAL directory. The telephone number codes are as shown below. P: A pause has been entered.
Fax Voice Guidance Fax voice guidance You can hear the transmission result by the voice guidance. One of the following messages will be heard if this feature is set to on. — Transmission is complete. — Transmission has failed. — Transmission has been interrupted. When friendly reception (p. 79) is activated, one of the following messages will also be heard. — Please hang up the handset for reception. — Start reception. Changing the fax voice guidance setting One of the following choices is available.
Display Contrast / Reset Changing the LCD display contrast Use this feature to adjust the display contrast. NORMAL: (Pre-selected setting) DARKER: Used when the display contrast is too light. 1 Press MENU . Display: 1.SYSTEM SET UP 2 Press 3 Press START/SET/COPY . / MENU , then 3 9 . LCD CONTRAST MODE=NORMAL 4 5 Press 6 Press MENU . or ▼▲ to select the desired setting. 1 2 3 4 5 6 7 8 9 0 Press START/SET/COPY .
FCC Information List of FCC requirements and information If required by the telephone company, inform them of the following. ● FCC Registration No.: (found on the bottom of the unit) ● Ringer Equivalence No.: (found on the bottom of the unit) ● The particular telephone line to which the equipment is connected. This unit must not be connected to a coin operated line. If you are on a party line, check with your local telephone company.
Limited Warranty Panasonic Consumer Electronics Company, Division of Matsushita Electric Corporation of America One Panasonic Way, Secaucus, New Jersey 07094 Panasonic Sales Company Division of Matsushita Electric of Puerto Rico, Inc. Ave. 65 de Infantería, Km. 9.5, San Gabriel Industrial Park, Carolina, Puerto Rico 00985 PANASONIC Facsimile Products Limited Warranty Have any questions? CALL 1-800-HELPFAX on: How to operate the unit, How to get repair service, How to get supplies.
Limited Warranty Servicenter Directory For Product Information, Operating Assistance, Literature Request, Dealer Locations, and all Customer Service inquiries please contact: 1-800-HELP-FAX (435-7329), Monday-Friday 9am - 8pm EST. Web Site: http://www.Panasonic.com You can purchase parts, accessories or locate your nearest Servicenter by visiting our Web Site. Factory Servicenters Locations CALIFORNIA 6550 Katella Avenue Cypress, CA 90630 800 Dubuque Avenue S.
Limited Warranty Notes for product service and shipping the product For product service ● Servicenters are listed on page 99. ● Call toll free 1-800-HELP-FAX (435-7329) for the location of an authorized Servicenter. When you ship the product Carefully pack your unit, preferably in the original carton. ● Attach a letter, detailing the symptom or problem, to the outside of the carton. ● Send the unit to an authorized Servicenter, prepaid and adequately insured.
Specifications Technical data about this product Applicable Lines: Document Size: Effective Scanning Width: Recording Paper Size: Effective Printing Width: Transmission Time*: Scanning Density: Halftone Level: Scanner Type: Printer Type: Data Compression System: Modem Speed: Operating Environment: Dimensions (H × W × D): Mass (Weight): Power Consumption: Power Supply: Memory Capacity: Public Switched Telephone Network Max. 216 mm (81/2") in width Max.
Comienzo rápido en español Instalación Remove the shipping tape first. Cinta de transporte 1 Bandeja de papel Inserte las dos lengüetas de la bandeja de papel en las ranuras de la parte trasera de la unidad. Slot Lengüeta Cassette open lever 2 Papel de impresión A. Fan the stack of paper to prevent B. 124 a paper jam. Pull the cassette open lever forward and insert the paper into the cassette.
Comienzo rápido en español Conexiones 1 Cable del auricular A. Conéctelo a la unidad. B. Conéctelo al auricular. 2 Cable de línea telefónica A. Conéctelo a “LINE” de la unidad. B. Conéctelo a una toma de línea telefónica sencilla. RJ11C ( Protector contra sobrevoltaje de la línea 3 ) Cable de electricidad A. Conéctelo a la unidad. B. Conéctelo a una toma de Comienzo rápido en español corriente.
Comienzo rápido en español Programación inicial Ajuste de la fecha y la hora Teclas de marcación de un toque 1 Pulse MENU . 2 Pulse / , y luego 0 1 . MENU INSERT 3 Pulse START/SET/COPY . 4 Introduzca el mes/día/año correcto seleccionándolos con 2 dígitos para cada uno utilizando el teclado de marcación o JOG DIAL . Si utiliza JOG DIAL , pulse para mover el cursor. 5 Pulse START/SET/COPY .
Comienzo rápido en español Memorización de nombres y números de teléfono para la marcación de un toque 1 Pulse DIRECTORY PROGRAM . 2 Para las estaciones 1–3 Pulse una de las teclas de marcación de un toque. ● If you select One-Touch Dial key 1, 2, or 3, seleccione “DIAL MODE” pulsando START/SET/COPY para ir a la siguiente indicación. , y luego pulse Para las estaciones 4–6 Pulse LOWER , y luego pulse una de las teclas de marcación de un toque.
Comienzo rápido en español Para hacer/contestar una llamada de voz ■ Para hacer manualmente una llamada de voz 1 Levante el auricular. 2 Marque el número. 3 When finished talking, replace the handset. ■ Para hacer una llamada de voz utilizando la marcación de un toque 1 Levante el auricular. 2 Para las estaciones 1–3 Pulse la tecla de marcación de un toque deseada. Para las estaciones 4–6 Pulse LOWER , y luego pulse la tecla de marcación de un toque deseada. 3 When finished talking, replace the handset.
Comienzo rápido en español Envío de un fax ■ Envío manual de un fax 1 Abra la bandeja del alimentador de documentos. 2 Ajuste la anchura de las guías de documentos según el tamaño del documento. 3 Insert the document (up to 15 pages) FACE DOWN until a single beep is heard. 4 Pulse DIGITAL SP-PHONE . 5 Marque el número del fax. 6 Pulse START/SET/COPY cuando oiga el tono del fax. ■ Envío de un fax utilizando la marcación de un toque 1 Abra la bandeja del alimentador de documentos.
Comienzo rápido en español Para hacer una copia 1 Abra la bandeja del alimentador de documentos. 2 Ajuste la anchura de las guías de documentos según el tamaño del documento. 3 Insert the document (up to 15 pages) FACE DOWN until a single beep is heard. 4 Pulse START/SET/COPY . 5 Introduzca el número de copias. 6 Pulse START/SET/COPY . Operación del sistema de contestación ■ Preparación del mensaje de voz y de la recepción de documentos 1 Pulse AUTO ANSWER hasta que se encienda la luz AUTO ANSWER.
Index Index A Accessories . . . . . . . . . . . . . . . . . . . 15, 16 Advanced features . . . . . . . . . . . .134, 135 (Resetting) . . . . . . . . . . . . . . . . . . . .118 Alert (Memory reception) . . . . . . . . . . . . . .66 (Message) . . . . . . . . . . . . . . . . . . . .102 (Recording time) . . . . . . . . . . . . . . . .103 Area code . . . . . . . . . . . . . . . . . . . . . . . .44 AUTO ANSWER button . . . . . . . .64, 65, 84 AUTO ANSWER setting . . . . .
Index Message transfer . . . . . . . . . . . . . . 98–100 MUTE button . . . . . . . . . . . . . . . . . . . . .30 N NAME/TEL NO. key . . . . . . . . . . . . . . . .38 O One-Touch Dial (Making a voice call) . . . . . . . . . . . . .35 (Sending faxes) . . . . . . . . . . . . . . . . .48 (Storing) . . . . . . . . . . . . . . . . . . . . . . .34 Other size documents . . . . . . . . . . . . . . .77 Overseas transmission mode . . . . . . . . .62 Overview . . . . . . . . . . . . . . . . . . . . . . . .
Features Summary Summary of user programmable features Basic features Code Feature & Display Available settings Meaning Page Setting the date and time #01 (2 digits for each entry) SET DATE & TIME mm/dd/yy hh:mm 25 Setting your logo #02 YOUR LOGO (Up to 30 characters) 26 (Up to 20 digits) 28 Setting your facsimile telephone number #03 YOUR FAX NO.
Features Summary Advanced features Code #22 Feature & Display Setting the journal report to print automatically AUTO JOURNAL Sending documents overseas #23 OVERSEAS MODE Sending a fax at a specified time #25 #26 DELAYED SEND Setting the Caller ID list to print automatically #31 Deactivate ON Activate OFF Deactivate ON Activate 62 57 45 OFF Deactivate 100% 92% 86% 72% Deactivate reduction 92% reduction 86% reduction 72% reduction NORMAL Normal contrast DARKER Darker contrast RCV RE
Features Summary Code Feature & Display Available settings #47 #54 FAX GUIDANCE Setting the recording time for the TAD/FAX greeting message #67 #70 ON Activate OFF Deactivate Recording the message transfer greeting message TRNS-GREETING CHECK Checks the greeting message. RECORD Records the greeting message. ERASE Erases the greeting message. Setting the ICM monitor ON Activate OFF Deactivate ON Activate MESSAGE TRANS.
KX-FP101 Proof of Purchase Panasonic FAX ADVANTAGE PROGRAM Free peace of mind, direct from Panasonic NO EXTRA COST FAX ADVANTAGE PROGRA RAM M ■ ■ ■ 1-year limited warranty 1 parts & labor Toll-free help line Free overnight replacement 2 and repair program The Panasonic Fax Advantage Consumer Service Program. Panasonic knows that if your fax machine is not up and running, neither is your business. That’s why we created the Panasonic Fax Advantage Program.