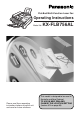
Flat-Bed Multi-Function Laser Fax Operating Instructions Model No. Please read these operating instructions before using the unit and save for future reference. KX-FLB756AL This model is designed to be used in Australia and New Zealand. TO USE IN NEW ZEALAND, CHANGE THE LOCATION SETTING (feature #74 on page 66).
Thank you for purchasing a Panasonic facsimile. Things you should keep a record of Attach your sales receipt here. For your future reference Date of purchase Serial number (found on the rear of the unit) Dealer’s name and address Dealer’s telephone number This model is designed to be used in Australia and New Zealand according to the location setting feature. The default setting is Australia. To use in New Zealand, change the setting (feature #74 on page 66).
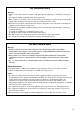
For Australian users Warning: ● Please ensure that a separate telephone, not dependent on local power, is available for emergency use. ● This equipment will be inoperable when mains power fails. ● When a failure occurs which results in the internal parts becoming accessible, disconnect the power supply cord immediately and return this unit to an authorised service centre.
Important information (for Australian users)! Instructions to customer Installation Attached to this apparatus is an approval label. This label is evidence that it is a “Permitted Attachment” which has been authorised to be connected to your telephone service. Conditions relating to connection and operation of this Permitted Attachment are contained in Telecommunications General By-Law 220 (5).
Safety instructions Important safety instructions! When using this unit, basic safety precautions should always be followed to reduce the risk of fire, electric shock, or personal injury. 1. Read and understand all instructions. 2. Follow all warnings and instructions marked on this unit. 3. Unplug this unit from power outlets before cleaning. Do not use liquid or aerosol cleaners. Use a damp cloth for cleaning. 4. Do not use this unit near liquid-for example, near a bath tub, washbowl, sink, etc.
Safety instructions CAUTION: Installation ● After moving the unit from cold areas to warmer areas, let the unit adjust to the warmer temperature and do not connect the unit for about 30 minutes. If the unit is connected too soon after a sudden climate change, condensation may form inside the unit causing malfunction. ● Never install telephone wiring during a lightning storm. ● Never install telephone jacks in wet locations unless the jack is specifically designed for wet locations.
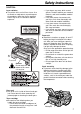
Safety instructions CAUTION: Laser radiation ● The printer of this unit utilises a laser. Use of controls or adjustments or performance of procedures other than those specified herein may result in hazardous radiation exposure. 1 Fuser unit Caution: Do not touch the bottom of this cover. It is very hot. — If you ingest any toner, drink several glasses of water to dilute your stomach contents, and seek immediate medical treatment.
Safety instructions FOR BEST PERFORMANCE: In the printing process, heat is used to fuse toner onto the page. As a result, it is normal for the machine to produce an odour during and shortly after printing. Be sure to use this unit in an area with proper ventilation. ● To extend the life of the drum unit, the unit should never be turned OFF immediately after printing. Leave the power turned ON for a minimum of 30 minutes after printing. ● Store unused paper in the original packaging, in a cool and dry place.
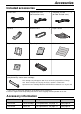
Accessories Included accessories! Power cord ..........................1 Telephone line cord ..............1 (for Australian users) Telephone line cord ..............1 (for New Zealand users) Handset ...............................1 Handset cord .......................1 Paper stacker ......................1 Paper tray............................1 Operating instructions .........1 Quick start sheet ...................1 CD-ROM..............................1 Drum unit .............................
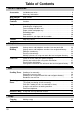
Table of Contents Initial Preparation Accessories Included accessories . . . . . . . . . . . . . . . . . . . . . . . . . . . . . . . . . . . . . 9 Accessory information . . . . . . . . . . . . . . . . . . . . . . . . . . . . . . . . . . . . 9 Help Button Help function . . . . . . . . . . . . . . . . . . . . . . . . . . . . . . . . . . . . . . . . . . 12 Finding the Controls Overview . . . . . . . . . . . . . . . . . . . . . . . . . . . . . . . . . . . . . . . . . . . . . 13 Location . . . . . . . . . .
Multi-Function Station Software Setup (PC) Connecting to a computer . . . . . . . . . . . . . . . . . . . . . . . . . . . . . . . . 51 Installing Multi-Function Station software . . . . . . . . . . . . . . . . . . . . . 52 Activating Multi-Function Station software . . . . . . . . . . . . . . . . . . . . 53 Printing (PC) Using the fax machine as a printer . . . . . . . . . . . . . . . . . . . . . . . . . . 54 Scanning (PC) Using the fax machine as a scanner . . . . . . . . . . . . . . . . . . . . . . .
Help Button Help function! You can print a quick reference for assistance as follows. 1 Press l. 2 Press ( or ) until the desired item is displayed. 1. How to set the date, time, your logo and fax number. Display: Display PRESS NAVI.[I & SET H] QUICK SET UP PRESS SET 2. How to program the features. FEATURE LIST PRESS SET 3. How to store names in the directory and how to dial them. DIRECTORY PRESS SET 4. Help with problems receiving faxes. FAX RECEIVING PRESS SET 5. How to use the copier function.
Finding the Controls Overview! Front view # Document guides $ Document exit % ADF (Auto Document Feeder) ) * # cover $ + % & Recording paper exit ' Paper stacker extender ( Paper stacker , - & . ' / ( The paper stacker may not be shown in all illustrations. ) Recording paper entrance * Paper tray + Recording paper guides , Document entrance - Document cover .
Finding the Controls Location! # $ ,- % . / # REDIAL/PAUSE To redial the last number dialled. ● To insert a pause during dialling. ● $ HANDSET MUTE ● To mute your voice to the other party during a conversation. Press this button again to resume the conversation. % Display & CALLER ID ● To use caller ID service (p. 31, 33). ' HELP ● To print a quick reference (p. 12). ( MENU ● To initiate or exit programming. ) COLLATE ● To make a collated copy (p. 50).
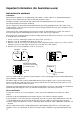
Setup Connecting the document cover! 1 Gently insert the two tabs on the document cover into the slots on the unit (#), then close the document cover ($). 2 Document cover Tabs 1 Slots 2 Connect the ADF cable to the jack on the back of the unit. ● The arrow ( ) on the ADF cable must be facing down. Arrow ( ) ADF cable Unlocking the shipping lock! The shipping lock is used to avoid damaging the scanner when it is being transported. Before using the unit, unlock the shipping lock.
Setup Toner cartridge and drum unit! Caution: ● Read the instructions below before you begin installation. After you have read them, open the drum unit protection bag. The drum unit contains a photosensitive drum. Exposing it to light may damage the drum. Once you have opened the protection bag: — Do not expose the drum unit to light for more than 5 minutes. — Do not touch or scratch the green drum surface. — Do not place the drum unit near dust or dirt, or in a high humidity area.
Setup 6 Turn the two levers on the toner cartridge with firm pressure. Levers 7 The toner cartridge is installed correctly when the triangles match. Triangles 8 Press down the printer cover open button then open the printer cover. Printer cover Printer cover open button 9 Install the drum and toner unit by holding the tabs. ● If the lower glass is dirty, clean it with a soft and dry cloth.
Setup Paper stacker and paper tray! Paper stacker Pegs Line up the slots in the paper stacker with the pegs on the bottom of the unit, then slide until locked. Open the paper stacker extender when using legal size paper. ● The paper stacker can hold up to approx. 100 sheets of printed paper. Remove the printed paper before the paper stacker becomes full. Paper stacker Slots Paper stacker extender Paper tray Paper tray Insert the paper tray into the slot on the back of the unit.
Setup Recording paper! A4, letter or legal size recording paper can be used for fax messages. The unit can hold up to 150 sheets of 60–75 g/m2 paper or 120 sheets of 90 g/m2 paper. See the note for paper specifications on page 83. ● The unit is set for A4 size paper by default. If you want to use letter or legal size paper, change the setting (feature #16 on page 63). 1 Pinch the right side of the recording paper guides, then slide it open to its full width.
Setup Connections! 1 Connect the handset cord. ● The jack on the longer, uncoiled end of the handset cord should be connected to the unit. 2 3 Connect the telephone line cord. Connect the power cord. ● When the power is turned on for the first time, the unit will print some basic information.
Setup Date and time, your logo and fax number! You should program the date and time, your logo and facsimile telephone number. This information will be printed on each page transmitted from your unit. Your fax number Your logo Example: FROM : Panasonic Fax FAX NO. : 1234567 Date and time Feb. 26 2003 09:02AM P 1 Fax Correspondence Setting the date and time 1 2 3 Press p. Display: H] Press ( or ) until the following is displayed. SET DATE & TIME PRESS SET 6 7 Press p. Display MENU Press w.
Setup Setting your logo The logo can be your company, division or name. 1 2 HANDSET MUTE (Insert) Display Press p. Display: SYSTEM SET UP PRESS NAVI.[I MENU H] Press ( or ) until the following is displayed. YOUR LOGO PRESS SET 3 Press w. 4 Enter your logo, up to 30 characters, using the dial keypad. See page 23 for details.
Setup To select characters with the dial keypad Pressing the dial keys will select a character as shown below. Keys Characters 1 1 [ ] { } + – / = 2 A B C a b c 2 3 D E F d e f 3 4 G H I g h i 4 5 J K L j k l 5 6 M N O m n o 6 7 P Q R S p q r s 7 8 T U V t u v 8 9 W X Y Z w x y z 9 0 0 ( ) < > ! " # $ , . _ ` : ; ? | % & ¥ ? @ ^ ’ ® To change capital or lower-case letter.
Setup Setting your facsimile telephone number 1 2 Press p. Display: Display SYSTEM SET UP PRESS NAVI.[I H] Press ( or ) until the following is displayed. YOUR FAX NO. PRESS SET 3 Press w. 4 Enter your facsimile telephone number, up to 20 digits, using the dial keypad. NO.= Example: 5 6 NO.=1234567 Press w. ● The next feature will be displayed. Press p. Note: ● You can enter your facsimile telephone number by pressing + or - in step 4. In this case, press ) to move the cursor.
Volume Adjusting volume! Ringer volume Display 4 levels (high/middle/low/off) are available. While the unit is idle, press + or -. To turn the ringer off: 1. Press - repeatedly until the following is displayed. Display: RINGER OFF= OK? YES:SET/NO:STOP SET 2. Press w. RINGER OFF To turn the ringer back on, press +. While the ringer volume is set to off: When a call is received, the unit will not ring and will display the following.
Automatic Dialling Storing names and telephone numbers into one-touch dial! For rapid access to frequently dialled numbers, the unit provides 12 entries for one-touch dial. ● Stations 1 to 3 can be used alternatively as broadcast keys (p. 38). 1 Press p repeatedly until the following is displayed. DIRECTORY SET Display: PRESS STATION OR / DIRECTORY SET PRESS NAVI.[I H] 2 For stations 1–3: Press one of the station keys.
Automatic Dialling Storing names and telephone numbers into navigator directory! For rapid access to frequently dialled numbers, the unit provides the navigator directory (100 entries). 1 Press p repeatedly until the following is displayed. DIRECTORY SET Display: PRESS STATION OR / DIRECTORY SET PRESS NAVI.[I H] 2 Press ( or ). 3 Enter the name, up to 10 characters (see page 23 for instructions). 5 NAME=Alice STORE:PRESS SET Press w.
Automatic Dialling Editing a stored entry! You can edit a name or number that is stored in one-touch dial and navigator directory. 1 2 Press ( or ). Display: DIRECTORY [+ -] Press + or - until the desired entry is displayed. Station key number for one-touch dial Mary Example: 0123456 ! Mary EDIT:PRESS MENU ! Mary SEND:PRESS SET 3 4 Press * to select “EDIT”. Example: Edit the name (see page 23 for instructions). Press w.
Automatic Dialling Making a phone call using one-touch dial and navigator directory! Before using this feature, program the desired names and telephone numbers into one-touch dial and navigator directory (p. 26, 27). Using one-touch dial 1 Press q or lift the handset. Display: Station keys TEL= PRESS STATION OR / TEL= PRESS NAVI.[I 2 H] For stations 1–6: Press the desired station key. Example: MONITOR TEL= LOWER STOP For stations 7–12: Press o, then press the desired station key.
Caller ID Caller ID service from your phone company! This unit is compatible with the Caller ID service offered by your local telephone company. To use this feature, you must subscribe to the Caller ID service. How Caller ID is displayed The calling party’s telephone number or name will be displayed after the first ring. You then have the option of whether or not to answer the call depending on the caller.
Caller ID Viewing and calling back using caller information! You can easily view caller information and call back. Important: ● Calling back will not be possible in the following cases: — The telephone number includes data other than numbers (i.e. : or #). — The caller information does not include a telephone number. 1 Press b. Example: 2 NEW CALLS PRESS NAVI.[+ -] (2 new calls are received) 3 FA DO CE WN Press + to search from the most recent caller information.
Caller ID Erasing caller information! 1 Press p repeatedly until the following is displayed. Display: 2 Press w. 3 Press w. CALLER SET UP PRESS SET STOP CALL LIST ERASE PRESS SET ERASE ALL OK? YES:SET/NO:STOP cancel erasing, press {, then p. ● To 4 Press w. 5 Press { to exit the program.
Caller ID Storing caller information into one-touch dial and navigator directory! Important: ● This feature is not available in the following cases: — The telephone number includes data other than numbers (i.e. : or #). — The caller information does not include a telephone number. 1 Press b. 2 Press + or - until the desired entry is displayed. 134567890 Example: Apr. 14 11:50AM Example: For navigator directory: 3 Press p. 4 For stations 1–3: Press the desired station key.
Sending Faxes Sending a fax manually! Using the auto document feeder Confirm that there are no documents on the scanner glass. Insert the document (up to 15 pages) FACE DOWN into the feeder until the unit grasps the document and a single beep is heard. Display: STANDARD 3 4 If necessary, press u repeatedly to select the desired setting (see below). 5 Dial the fax number. 6 When a fax tone is heard: Press i, and replace the handset if you are using it.
Sending Faxes Sending from memory ● Quick scan feature You can scan the document into memory before sending. 1. Insert the document. 2. Enter the fax number. 3. Press ê. ● Transmitting reservation (Dual Access) feature You can send the document even when the unit is just receiving a fax or sending a fax from memory. 1. Insert the document during fax reception or fax memory transmission. 2. Enter the fax number using the dial keypad, onetouch dial or navigator directory. 3. Press ê or i.
Sending Faxes Documents you can send! Using the auto document feeder Maximum size Effective scanning area 4 mm Scanned area 600 mm 182 mm Minimum size Document weight Single sheet: 45 g/m2 to 90 g/m2 Multiple sheets: 60 g/m2 to 80 g/m2 4 mm 128 mm 4 mm 216 mm 208 mm 4 mm Document width 216 mm Note: ● ● Remove clips, staples or other similar fasteners. Do not send the following types of documents: (Use the scanner glass for fax transmission.
Sending Faxes Sending a fax using one-touch dial and navigator directory! Before using this feature, program the desired names and telephone numbers into one-touch dial and navigator directory (p. 26, 27). Document guides Insert the document (up to 15 pages) FACE DOWN into the feeder until the unit grasps the document and a single beep is heard. ● Confirm that there are no documents on the scanner glass.
Sending Faxes Broadcast transmission! This feature is useful for sending the same document to selected parties (up to 20 entries). First program the entries, then see page 41 for transmission. ● The broadcast function utilises stations 1–3. The one-touch dial function will be cancelled. ● a key 1 and 2 can accept one-touch dial and navigator entries. HI key can also accept manual dialling entries. Programming entries into the broadcast memory 1 Press p repeatedly until the following is displayed.
Sending Faxes Adding a new entry into the broadcast memory 1 Press ( or ). 2 Press + or - until the following is displayed. Example: EDIT:PRESS MENU / SEND:PRESS SET Display: MENU DIRECTORY 3 Press p. 4 5 Press * to select “ADD”. 6 [+ -] SET STOP ADD=? DELETE=# Press + or - until the desired entry you want to add is displayed. Example (Navigator): Mary 15843724123 Example (Station 2): Peter 19265532168 Press w.
Sending Faxes Erasing a stored entry in the broadcast memory 1 Press ( or ). 2 Press + or - until the following is displayed. Example: EDIT:PRESS MENU / SEND:PRESS SET Display: MENU DIRECTORY 3 Press p. 4 5 Press # to select “DELETE”. [+ -] ADD=? DELETE=# Press + or - until the desired entry you want to erase is displayed. Example (Navigator): Dick 13281432968 Example (Station 3): Sam 19876543210 ● To cancel erasing, press {. 6 Press w.
Sending Faxes Sending the same document to pre-programmed parties 2 BROADCAST FA DO CE WN 1 Insert the document FACE DOWN into the feeder. ● Confirm that there are no documents on the scanner glass. ● If necessary, press u repeatedly to select the desired setting (p. 34). Press the desired a (1–2) or HI. ● You can also use the navigator key. Press ), then press + or - until the desired key name is displayed, and press i. Example: document will be fed into the unit and scanned into memory.
Receiving Faxes Setting the unit to receive faxes! Use only as a fax With answering machine External telephone answering machine (not included) How you want the unit to receive calls You have a separate telephone line just for faxes. You want to use the fax machine with an answering machine. FAX ONLY mode (p. 45) Activating an answering machine (p. 46) Turn AUTO ANSWER on by pressing PQ. Set the unit this way.
Receiving Faxes Mostly phone calls Other option Remote fax activation Ring Ring Ring You can also receive a fax using an extension telephone. While hearing a fax calling tone with an extension telephone, press *#9 (preselected fax activation code) to receive a fax (p. 48). You plan to answer the calls yourself. TEL mode (p. 44) Turn AUTO ANSWER off by pressing PQ. OFF When receiving calls: You have to answer all calls manually. To receive a fax document, press i for each fax you are receiving.
Receiving Faxes TEL mode! (answering all calls manually) Activating TEL mode If the FAX ON light is on, turn it off by pressing PQ. Display: TEL MODE Receiving a fax manually 1 2 When the unit rings, lift the handset to answer the call. When: — document reception is required, — a fax calling tone (slow beep) is heard, or — no sound is heard, press i. STOP FAX START OFF CONNECTING..... 3 Replace the handset. ● The unit will start fax reception.
Receiving Faxes FAX ONLY mode! (all calls are received as faxes) Activating FAX ONLY mode If the FAX ON light is off, turn it on by pressing PQ. Display: ● FAX ONLY MODE When receiving calls, the unit will automatically answer all calls and only receive fax documents. Note: ● The number of rings before a call is answered in FAX ONLY mode can be changed (feature #06 on page 62). ● This mode should not be used with a telephone line which is used for both phone calls and faxes.
Receiving Faxes Using the unit with an answering machine! Setting up the fax machine and an answering machine 1 Connect the answering machine. Remove the stopper and connect the cord. Telephone line cord (not included) Answering machine (not included) 2 3 Set the number of rings on the answering machine to less than 4. ● This will allow the answering machine to answer the call first. 4 5 Activate the answering machine.
Receiving Faxes How the fax machine and answering machine work Receiving phone calls The answering machine will record voice messages automatically. Receiving faxes The fax machine will receive documents automatically when the machine detects a fax calling tone. Receiving a voice message and fax document in one call The caller can leave a voice message and send a fax document during the same call. Inform the caller of the following procedure beforehand: 1. The caller calls your fax machine.
Receiving Faxes / Distinctive Ring Extension telephone! If you use the fax machine with an extension telephone, you can receive fax documents using the extension telephone. You do not have to press i on the fax machine. Important: ● Use a touch tone telephone as the extension telephone and enter the fax activation code firmly. 1 2 When the extension telephone rings, lift the handset of the extension telephone.
Copying Making a copy! The unit can make single or multiple copies (up to 99). Using the auto document feeder ● Confirm that there are no documents on the scanner glass. 1. Adjust the width of the document guides to the size of the document. Document guides FA DO CE WN 1 2. Insert the document (up to 15 pages) FACE DOWN into the feeder until the unit grasps the document and a single beep is heard.
Copying To enlarge a document The unit can enlarge copies to as much as 200% of the original by changing the enlargement rate 5% at a time. After step 3 on page 49, press + repeatedly to select the desired enlargement rate, then press d. using the auto document feeder, the unit will only enlarge the center of the upper part of the document. To make an enlarged copy of the bottom of the document, turn the document around, and then make a copy.
Setup (PC) Connecting to a computer! Panasonic Multi-Function Station software enables your fax machine to carry out the following functions: — Printing on plain paper, transparencies, labels and envelopes — Scanning documents and converting an image into text with Readiris OCR software — Scanning from other applications for Microsoft ® Windows ® that support TWAIN scanning — Storing, editing or erasing entries in directories using your PC — Programming the basic and advanced features using your PC — Sendin
Setup (PC) Installing Multi-Function Station software! 1 Connect the fax machine to the PC (page 51). ● 2 To use via USB connection, you must set the cable type to “USB” (feature #15 on page 63). The default setting is “PARALLEL”. Start Windows 95/98/Me/NT4.0/2000/ XP and close all other applications. ● ● 3 The following dialogue box will appear. Click [Cancel] to close it. You must be logged in as an administrator in Windows NT4.0/2000/XP Insert the included CD-ROM into your CD-ROM drive.
Setup (PC) Activating Multi-Function Station software! 1 2 Click [Start] in Windows. Point to [Programs], point to [Panasonic Multi-Function Station] and click [Launcher]. ● [Launcher] will appear. Remote Control (p. 58) ● To store, edit or erase entries in directories. ● To program the basic and advanced features. ● To view or erase items in the journal report or Caller ID list. ● To store caller information into directories. Viewer (Scan) (p.
Printing (PC) Using the fax machine as a printer! You can print not only on plain paper but also on special media (transparencies/labels/envelopes). Printing from Windows applications You can print a file created in a Windows application. For example, to print from Microsoft Word, proceed as follows: 1 2 Open the document you want to print. Select [Print...] from the [File] menu. ● The [Print] dialogue box will appear. For details about the [Print] dialogue box, click [?], then click the desired item.
Printing (PC) Transparencies Use transparencies designed for laser printing. Using transparencies incorrectly and/or transparencies not designed for Laser Printers may jam and/or cause damage to your machine which will not be covered by the warranty. Load transparency sheets one page at a time for printing. Print side must face down. Remove each transparency after printing and place it on a flat surface to cool and to prevent it from curling. ● Close the paper stacker extender (p.
Printing (PC) Envelopes Use envelopes designed for laser printing. Using incorrect envelopes may jam and/or cause damage to your machine which will not be covered by the warranty. We recommend the following: — High quality envelopes of 90 g/m2 paper, — Envelopes that have thin, sharply creased leading edges, and — Envelopes that have diagonal seams as shown. You can load up to 10 envelopes of 90 g/m2 paper at a time for printing. Print side must face down. ● Remove each envelope after printing.
Scanning (PC) Using the fax machine as a scanner! Using Multi-Function Viewer 1 Using the auto document feeder Insert the document (up to 15 pages) FACE DOWN in the fax machine. 4 Using the scanner glass Place the document FACE DOWN on the scanner glass of the fax machine. 2 3 Press ê. Click [Scan]. The scanned image will be displayed in the [Multi-Function Viewer] window after scanning. ● To save the scanned image, select [Save] from the [File] menu.
Remote Control (PC) Operating the fax machine from your computer! You can easily operate the following functions from your computer. — Storing, editing or erasing entries in directories (p. 26–28, 38–40) — Programming the basic and advanced features (p. 62–66) — Viewing or erasing items in the journal report (p. 35) — Storing the journal report as PC file — Viewing or erasing items in the Caller ID list (p. 30) — Storing caller information into directories (p.
PC Fax Fax sending/receiving using Multi-Function Station software! Sending a PC document as a fax message from your PC You can access the fax function from a Windows application using Multi-Function Station software. For example, to send a document created from Microsoft Word, proceed as follows: 1 2 Open the document you want to send. 3 4 Select [Panasonic MFS PC FAX] as the active printer. 5 Enter the fax number using the keypad display or the directory. 6 Click [Send].
PC Fax Receiving a fax into your PC You can receive a fax on your computer. The received fax document is saved as an image file (TIFF-G4 format). 1 2 Start Multi-Function Station. 3 When a fax call is received, your PC will receive a document through the fax machine. If you do not want to be disturbed by incoming faxes while using the PC You can change the setting to receive a fax directly on the fax machine. 1. Click [Tools] in the menu bar, then click [Function Setup].
Features Summary Programming! The unit provides various programming features. Program the desired settings by referring to the programming tables (p. 62–66). General programming method 1 2 Press p. Display: MENU SYSTEM SET UP PRESS NAVI.[I H] Select the feature you wish to program. For basic features (p. 62, 63): Press ( or ) until the desired feature is displayed. For advanced features (p.
Features Summary Basic features! How to set the basic features 1. Press p. 2. Press ( or ) until the desired feature is displayed. 3. Press + or - until the desired setting is displayed. Note: ● Step 3 may be slightly different depending on the feature. ● See page 61 for more details. 4. Press w. 5. Press p. Programming table For the settings column, the bold type indicates the default setting. Code Feature & Display Settings See page 21 for details.
Features Summary Code Feature & Display Settings Securing the remote operation for the answering machine REMOTE TAM ACT. =OFF [±] #12 If you are using the unit with an answering machine, activate this feature, and set the remote activation ID to secure the remote operation for the answering machine.
Features Summary Advanced features! How to set the advanced features 1. Press p. 3. Press + or - until the desired setting is displayed. 2. Press ( or ) until the following is displayed: 4. Press w. 5. Press p. ADVANCED MODE PRESS SET Note: then press w and press ( or ) until the desired feature is displayed. ● Step 3 may be slightly different depending on the feature. ● See page 61 for more details. Programming table For the settings column, the bold type indicates the default setting.
Features Summary Code #26 #31 Feature & Display Setting the Caller ID list to print automatically AUTO CALL. LIST =ON [±] Setting the Distinctive Ring pattern RING DETECTION =OFF [±] Settings ON #39 AUTO REDUCTION =ON [±] ON ON OFF Changing the display contrast NORMAL #41 If you use an extension telephone and wish to use it to receive a fax, activate this feature, and enter the code (p. 48). ● This code is also used to receive a voice message and a fax in the same call (p. 47).
Features Summary Code Feature & Display Settings Setting the original mode ORIGINAL =NORMAL #58 NORMAL [±] To send or copy a document with faint or dark writing, set this feature before starting transmission or copying.
Error Messages Reports! If your unit cannot send a fax, check the following: — The number you dialled is correct. — The other party’s machine is a facsimile. If the problem remains, correct it by following the communication message printed on the sending and journal reports (p. 35). COMMUNICATION ERROR (CODE: 40–42, 46–72, FF) ● A transmission or reception error occurred. Try again or check with the other party. NO DOCUMENT ● The document was not fed into the unit properly.
Error Messages Display! If the unit detects a problem, one or more of the following messages will appear on the display. Display message CALL SERVICE CARRIAGE ERROR / RELEASE SHIPPING LOCK CHANGE DRUM Cause & solution ● There is something wrong with the unit. Contact our service personnel. ● The shipping lock is locked. Unlock the shipping lock (p. 15). If the display messages still remain after unlocking, there is something wrong with the carriage sensor. Contact our service personnel.
Error Messages Display message LINE IN USE MEMORY FULL MODEM ERROR Cause & solution ● You cannot change the cable type setting (feature #15 on page 63) while the line is in use. Hang up and try again. ● When making a copy, the document being stored exceeds the memory capacity of the unit. Press { to clear the message. Divide the document into sections. ● There is something wrong with the modem circuit. Contact our service personnel.
Operations When a function does not work, check here! General I cannot make and receive calls. ● The power cord or telephone line cord is not connected. Check the connections (p. 20). ● If you used a splitter to connect the unit, remove the splitter and connect the unit to the wall jack directly. If the unit operates properly, check the splitter. I cannot make calls. ● The dialling mode setting is wrong. Change the setting of feature #13 (p. 63). (Australian users only) The unit does not work.
Operations Fax – receiving I cannot receive documents. ● The telephone line cord is connected to the “EXT” jack on the unit. Connect to the “LINE” jack (p. 20). I cannot receive documents automatically. ● The receiving mode is set to TEL mode. Set to FAX ONLY mode (p. 45). ● The time taken to answer the call is too long. Decrease the number of rings of feature #06 (p. 62). The other party complains that they cannot send a document.
Operations The printing quality is poor. Original Copy ABC ● Some paper has instructions recommending which side to print on. Try turning the paper over. ● You may have used paper with a cotton and/or fibre content that is over 20%, such as letterhead or resume paper. ● The remaining toner is low. Replace the toner cartridge (p. 74). ● We recommend you replace the drum unit every third time you replace the toner cartridge (p. 74). To check the drum life and quality, please print the printer test list (p.
Operations When I exit Multi-Function Station, the [Multi-Function Viewer] window does not close. ● The [Multi-Function Viewer] window can be operated separately. Click the [X] button to close the window. I cannot scan. ● When scanning at a high resolution, a large amount of available memory is required. If your PC warns of insufficient memory, close all other applications and try again. ● The fax machine is in use. Try again later. ● There is not enough space on the hard disk.
Replacement Replacing the toner cartridge and the drum unit! When the display shows the following, replace the toner cartridge. TONER EMPTY TONER LOW or We recommend you replace the drum unit every third time you replace the toner cartridge. To check the drum life and quality, please print the printer test list (p. 81). To ensure that the unit operates properly, we recommend the use of Panasonic toner cartridge (Model No. KX-FA76A) and drum unit (Model No. KX-FA78A). See page 9 for accessory information.
Replacement 4 5 Tap on the used toner cartridge several times to allow the remaining toner to fall into the drum unit. Remove the drum and toner unit by holding the two tabs. ● If you replace the toner cartridge and the drum unit at the same time, skip to step 7. Drum and toner unit Turn the two levers on the used toner cartridge firmly. Levers Used toner cartridge Levers 6 7 Pull up the right edge of the used toner cartridge (#). Remove the cartridge from the drum unit ($).
Replacement / Jams 10 Turn the two levers on the toner cartridge with firm pressure. 11 The toner cartridge is installed when the triangles match. Levers Triangles 12 Install the drum and toner unit by holding the tabs. ● If the lower glass is dirty, clean it with a soft and dry cloth. Drum and toner unit Lower glass Caution: Do not touch the bottom of this cover when cleaning the lower glass. It is very hot. 13 Close the printer cover by pushing down on both sides until locked.
Jams 2 When the recording paper has jammed near the drum and toner unit: Remove the jammed paper carefully by pulling it toward you. Jammed paper When the recording paper has jammed near the recording paper exit (Fuser unit): Remove the recording paper (#), then remove the drum and toner unit to allow the jammed paper to pull free from the rear cabinet ($). # $ Drum and toner unit Jammed paper Remove the jammed paper from fuser unit by pulling it upwards carefully.
Jams / Cleaning Document jams - sending! 1 Lift, and hold open the ADF cover. ● Do not pull out the jammed document forcibly before lifting the ADF cover. 2 Remove the jammed document carefully. ● If you cannot remove the jammed document, open the document cover, remove the document, then close the document cover. ADF cover Jammed document Jammed document Document cover 3 Close the ADF cover.
Cleaning Lower glass Caution: ● Be careful when handling the drum and toner unit. See the caution for the drum unit on page 74 for details. ● Do not use paper products, such as paper towels or tissues, to clean the inside of the unit. The area near the lower glass is hot. We recommend to clean the lower glass after the unit cools. 1 Disconnect the power cord and the telephone line cord. Power cord 2 Telephone line cord Press down the printer cover open button then open the printer cover.
Cleaning 6 Close the printer cover by pushing down on both sides until locked. Printer cover 7 Reconnect the power cord and the telephone line cord. Power cord Telephone line cord Document feeder rollers! If misfeeding of your original occurs frequently, clean the document feeder rollers. 1 Lift, and hold open the ADF cover. 2 Clean the document feeder rollers with a soft and dry cloth. ADF cover Document feeder rollers 3 80 Close the ADF cover.
Printed Reports Reference lists and reports! You can print out the following lists and reports for your reference. Setup list: provides you with the current settings of the basic and advanced programming features (p. 62–66). Telephone number list: provides you with names and telephone numbers which are stored in one-touch dial and navigator directory. Journal report: keeps records of fax transmission and reception.
Specifications Technical data about this product! Applicable lines: Document size: Effective scanning width: Effective printing width: Transmission time*: Scanning density: Halftone level: Scanner type: Printer type: Data compression system: Modem speed: Operating environment: Dimensions (H x W x D): Mass (Weight): Power consumption: Power supply: Memory capacity: Laser diode properties: Print speed: Printing resolution: Public Switched Telephone Network Max. 216 mm in width / Max.
Specifications ■ Paper specifications: Plain paper/Transparency: Envelope: A4: Letter: Legal: 210 mm x 297 mm 216 mm x 279 mm 216 mm x 356 mm COM10: 105 mm x 241 mm DL: 110 mm x 220 mm Note: ● Do not use the following types of paper: — Paper with a cotton and/or fibre content that is over 20%, such as letterhead paper or paper used for resumes — Extremely smooth or shiny paper, or paper that is highly textured — Coated, damaged or wrinkled paper — Paper with irregularities, such as tabs or staples — Pa
Index Program index! Basic features Advanced features Code/Feature name Code/Feature name Date and time .....................................21 Your logo.............................................22 Your fax number .................................24 Sending report ..............................35, 62 Fax ring setting ...................................62 Remote activation ID ..........................63 Dialling mode (For Australian users only) .................63 #15 Cable selection ................
Index Index! A B C D Accessories . . . . . . . . . . . . . . . . . . . .9 (Paper stacker) . . . . . . . . . . . . . .18 (Paper tray) . . . . . . . . . . . . . . . . .18 Advanced features . . . . . . . . . . .64–66 Alert (Memory reception) (Feature #44) . .65 Answering machine . . . . . . . . . . . . . .46 Auto document feeder . . . . . . . . .34, 49 Auto reduction (Feature #37) . . . .44, 65 Basic features . . . . . . . . . . . . . . .62, 63 Broadcast transmission . . . . . . . . . . .
Index P Paper size (Feature #16) . . . . . . . . . .63 Parallel cable . . . . . . . . . . . . . . . . . .51 Power failure . . . . . . . . . . . . . . . . . . .73 Printer . . . . . . . . . . . . . . . . . . . . . . . .54 Printing paper size . . . . . . . . . . .54, 83 R Receiving alert (Feature #44) . . . . . .65 Receiving setting . . . . . . . . . . . . .42, 43 Recording paper . . . . . . . . . . . . . . . .19 Remote activation ID (Feature #12) . .63 Remote control . . . . . . . . . . . . . . . . .
Panasonic Communications Co., Ltd.