High Speed Laser Fax with Copier Function Operating Instructions KX-FL501 Model No. FOR FAX ADVANTAGE ASSISTANCE: – CALL 1-800-HELP-FAX (1-800-435-7329) – E-MAIL TO consumerproducts@panasonic.com for customers in the U.S.A. or Puerto Rico – REFER TO www.panasonic.com for customers in the U.S.A. or Puerto Rico Please read these Operating Instructions before using the unit and save for future reference. This model is designed to be used only in the U.S.A.
Thank you for purchasing a Panasonic facsimile.
Safety instructions Important safety instructions! When using this unit, basic safety precautions should always be followed to reduce the risk of fire, electric shock, or personal injury. 1. Read and understand all instructions. 2. Follow all warnings and instructions marked on this unit. 3. Unplug this unit from power outlets before cleaning. Do not use liquid or aerosol cleaners. Use a damp cloth for cleaning. 4.
Safety instructions CAUTION: Laser radiation ● The printer of this unit utilizes a laser. Use of controls or adjustments or performance of procedures other than those specified herein may result in hazardous radiation exposure. DANGER-Invisible laser radiation when open and interlock defeated. AVOID DIRECT EXPOSURE TO BEAM. Toner cartridge ● Be careful of the following when you handle the toner cartridge.
Safety instructions CAUTION: OTHER INFORMATION: Installation ● Never install telephone wiring during a lightning storm. ● Keep ● Never ● The install telephone jacks in wet locations unless the jack is specifically designed for wet locations. ● Never touch uninsulated telephone wires or terminals unless the telephone line has been disconnected at the network interface. ● Use caution when installing or modifying telephone lines.
Table of Contents Initial Preparation Accessories Included accessories . . . . . . . . . . . . . . . . . . . . . . . . . . . . . . . . . . . . . 8 Accessory information . . . . . . . . . . . . . . . . . . . . . . . . . . . . . . . . . . . . 8 Help Button Help function . . . . . . . . . . . . . . . . . . . . . . . . . . . . . . . . . . . . . . . . . . . 9 Finding the Controls Overview . . . . . . . . . . . . . . . . . . . . . . . . . . . . . . . . . . . . . . . . . . . . . 10 Location. . . . . . . . . .
Copy Copying Making a copy . . . . . . . . . . . . . . . . . . . . . . . . . . . . . . . . . . . . . . . . 50 Convenient way to make a copy . . . . . . . . . . . . . . . . . . . . . . . . . . . 50 Programmable Features Features Summary Programming . . . . . . . . . . . . . . . . . . . . . . . . . . . . . . . . . . . . . . . . . . 52 Basic features . . . . . . . . . . . . . . . . . . . . . . . . . . . . . . . . . . . . . . . . . 53 Advanced features. . . . . . . . . . . . . . . . . . . . . . . . . . . . .
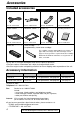
Accessories Included accessories! Power cord ..............1 Telephone line cord...1 Handset...................1 Handset cord...........1 Part No. PFJA1030Z Part No. PQJA10075Z Part No. PFJXE0805Z Part No. PFJA1029Z Paper stacker ..........1 Document stacker ...1 Paper tray ...............1 Operating instructions...1 Part No. PFZX1FL501M Part No. PFKS1055Z Part No. PFZXFL501M Part No. PFQX1456Y Drum unit.................1 Toner cartridge.........
Help Button Help function! You can print a quick reference for assistance as follows. 1 Press HELP . 2 Rotate JOG DIAL until the desired item is displayed. 1. How to set the date, time, your logo and fax number. HELP Display: ROTATE Display & SET QUICK SET UP 2. How to program the features. JOG DIAL SET FEATURE LIST 3. How to store names in the JOG DIAL directory and how to dial them. JOG-DIAL 4. Help with problems sending/receiving faxes. FAX SND/RCV 5. How to use the copier function.
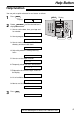
Finding the Controls Overview! Handset ●To make or answer calls Document guides Paper tray Speaker (Left side of the unit) Recording paper entrance Front cover Document entrance Document stacker Front cover open button Document exit Recording paper exit Paper stacker extender Paper stacker *The document stacker and paper stacker may not be shown in all illustrations. 10 For fax advantage assistance, call 1-800-435-7329.
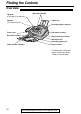
Finding the Controls Location! ●To ●To turn on/off AUTO ANSWER (p. 40, 41). ●To ●To ●To ●To make a collated copy (p. 51). store a scanned document into memory, and then send it (p. 31). ●To adjust volumes (p. 21). select an enlargement or reduction rate in copy mode (p. 51). ●To use ONE-TOUCH DIAL (p. 22, 25, 32). transmit to multiple stations (p. 37, 39). print a quick reference (p. 9). ●To Display Dial keypad select a resolution (p. 31, 50).
Setup Toner cartridge and drum unit! Caution: ● Read the instructions below before you begin installation. After you have read them, open the drum unit protection bag. The drum unit contains a photosensitive drum. Exposing it to light may damage the drum. Once you have opened the protection bag: —Do not expose the drum unit to light for more than 5 minutes. —Do not touch or scratch the green drum surface. —Do not place the drum unit near dust or dirt, or in a high humidity area.
Setup 5 The toner cartridge is installed when the triangles match. Triangles 6 Tap on the toner cartridge several times to allow the toner to fall into the drum unit. Grab the tabs, and shake the drum and toner unit horizontally several times. Toner cartridge Tabs 7 Push the front cover open button then open the front cover. 8 Install the drum and toner unit by holding the tabs.
Setup Paper tray, document stacker and paper stacker! Paper tray Insert the paper tray into the two slots on the back of the unit ( 1 ). Paper tray Let it lean back until it clicks into place( 2 ). 1 2 Document stacker Align with the ribs on the document exit ( 1 ). Pull the document stacker forward gently until it clicks into place ( 2 ).
Setup Recording paper! Letter or legal size recording paper can be loaded. The unit can hold up to 150 sheets of 60 g/m2 to 75 g/m2 (16 lb. to 20 lb.) paper or 120 sheets of 90 g/m2 (24 lb.) paper. ●The unit is set for letter size paper by default. If you want to use legal size paper, change the setting (feature #16 on page 54). 1 2 Fan the stack of paper to prevent a paper jam. Insert the paper into the recording paper entrance. ●The paper should not be over the tab.
Setup Connections! 1 2 3 Connect the handset cord. Connect the telephone line cord. Connect the power cord. ●When the power is turned on for the first time, the unit will print some basic information. To a power outlet (120 V, 60 Hz) Power cord surge ( Power ) protector Connect to “LINE”. To a single telephone line jack (RJ11C) surge ( Line protector ) Handset cord Telephone line cord Caution: ● When you operate this product, the power outlet should be near the product and easily accessible.
Setup Date and time, your logo and facsimile telephone number! You should program the date and time, your logo and facsimile telephone number. This information will be printed on each page transmitted from your unit. Your logo Example: Your facsimile telephone number FROM : Panasonic Fax FAX NO. : 1234567 Date and time Feb. 26 2000 09:02AM P1 Fax Correspondence Setting the date and time 1 Press MENU . 2 Press 3 Press SET . 4 Display: SYSTEM SET UP , then 0 1 .
Setup Setting your logo The logo can be your company, division or name. 1 Press MENU . 2 Press 3 Press SET . 4 Enter your logo, up to 30 characters, using the dial keypad. See the next page for details. Display: Display MENU / SYSTEM SET UP , then 0 2 . YOUR LOGO LOGO= FLASH JOG DIAL (Hyphen) SET STOP (Delete) HANDSET MUTE (Insert) Example: “Bill” 1. Press 2 twice. LOGO=B To change capital or lower case letters Cursor Pressing the key will change to capital or lower case alternatively.
Setup To select characters with the dial keypad Pressing the dial keys will select a character as shown below. Keys Characters 1 1 [ ] { } + – / = 2 A B C a b c 2 3 D E F d e f 3 4 G H I g h i 4 5 J K L j k l 5 6 M N O m n o 6 7 P Q R S p q r s 7 8 T U V t u v 8 9 W X Y Z w x y z 9 0 0 ( ) ! " # $ , . _ % & ¥ ` : ; ? | @ ^ ’ → To change capital or lower case letter.
Setup Setting your facsimile telephone number 1 Press MENU . 2 Press 3 Press SET . 4 Enter your facsimile telephone number, up to 20 digits, using the dial keypad. Display: Display SYSTEM SET UP MENU / , then 0 3 . YOUR FAX NO. NO.= Example: 5 Press SET . 6 Press MENU . FLASH (Hyphen) JOG DIAL NO.=1234567 SETUP ITEM [ SET STOP (Delete) ] Note: ● You can enter your facsimile telephone number by rotating JOG DIAL . If you use JOG DIAL , press to move the cursor.
Volumes Adjusting volumes! Ringer volume Display 4 levels (high/middle/low/off) are available. While the unit is idle, press or . / ●If any documents are in the document entrance, you cannot adjust the ringer volume. Confirm that there are no documents in the entrance. ■ To turn the ringer off: 1. Press repeatedly until the following message is displayed. Display: RINGER OFF= OK? SET YES:SET/NO:STOP 2. Press SET . Melody ringer ●To turn the ringer back on, press .
Automatic Dialing Storing names and telephone numbers in ONE-TOUCH DIAL! For rapid access to frequently dialed numbers, the unit provides 10 stations of ONE-TOUCH DIAL keys. ● ONE-TOUCH DIAL 1 to 3 can be alternatively used as broadcast keys (p. 37). 1 Press DIRECTORY PROGRAM . Display: Display ONE-TOUCH DIAL / PRESS STATION OR USE JOG-DIAL 2 For ONE-TOUCH DIAL 1–3: Press one of the ONE-TOUCH DIAL keys. DIAL MODE Press SET to go to the next prompt.
Automatic Dialing Storing names and telephone numbers in JOG DIAL! For rapid access to frequently dialed numbers, the unit provides a JOG DIAL directory (100 stations). For your convenience, the following 2 stations have been pre-programmed. HELP-FAX (1-800-435-7329): If you cannot correct a problem after trying the help function (p. 9), call using this station (p. 25). IQ-FAX-CS (IQ-FAX Customer Service Center)(1-888-332-9728): If you have a problem with IQ-FAX, call using this station (p. 25).
Automatic Dialing Editing and erasing a stored name and number! Editing a stored name and number You can edit a name or number stored in ONE-TOUCH DIAL and JOG DIAL. 1 Rotate JOG DIAL until the desired name is displayed. Example: Mary means the station number for ONE-TOUCH DIAL 2 Press DIRECTORY PROGRAM . 3 Press EDIT= 6 7 Edit the telephone number. For further details, see page 23. Press SET . REGISTERED DELETE=# Display to select “EDIT”.
Automatic Dialing Making a voice call using ONE-TOUCH DIAL and JOG DIAL! Before using this feature, program the desired names and telephone numbers into ONE-TOUCH DIAL and JOG DIAL (p. 22, 23). Using ONE-TOUCH DIAL 1 Display Press MONITOR or lift the handset. Display: Handset TEL= ● Confirm that there are no documents in the document entrance. 2 For ONE-TOUCH DIAL 1–5: Press the desired ONE-TOUCH DIAL key. For ONE-TOUCH DIAL 6–10: Press LOWER , then press the desired ONE-TOUCH DIAL key.
Caller ID Caller ID service from your phone company! This unit is compatible with the Caller ID service offered by your local telephone company. To use this feature, you must subscribe to the Caller ID service. Set the following ring count settings to 2 or more rings beforehand. —FAX ring count (feature #06 on page 53) —TEL/FAX ring count (feature #78 on page 59) How Caller ID is displayed The calling party’s name or telephone number will be displayed after the first ring.
Caller ID Viewing and calling back using caller information! You can easily view caller information and call back. Important: ●Calling back will not be available in the following cases. —The telephone number includes data other than numbers (i.e. —The caller information does not include a telephone number. 1 Press CALLER ID SEARCH . Example (2 new calls are received): Example: Display: 2 or #). Handset Display 2 NEW CALLS USE JOG-DIAL Rotate JOG DIAL to the right (clockwise).
Caller ID Confirming caller information using the Caller ID list! The unit will store the 30 most recent caller information. —To print manually, see below. —To print automatically after every 30 new calls, activate feature #26 (p. 55). Sample of a Caller ID list CALLER ID LIST Mar. 20 2000 09:19AM YOUR LOGO : YOUR FAX NO. : NO.
Caller ID Storing caller information in ONE-TOUCH DIAL and JOG DIAL! Important: ●This feature is not available in the following cases. —The telephone number includes data other than numbers (i.e. —The caller information does not include a telephone number. 1 For JOG DIAL: Press CALLER ID SEARCH . Example: or #). Rotate JOG DIAL . 2 NEW CALLS NAME=WENDY ROBE Display: 2 WENDY ROBERTS NO.=13456789012 5 Press SET . REGISTERED Press DIRECTORY PROGRAM . PRESS STATION OR USE JOG-DIAL 4 Press SET .
Voice Contact Talking to the other party after fax transmission or reception! You can talk to the other party after a fax message is completed. This will save the added expense and time of making another call. This feature only works when the other party’s fax machine is equipped with a voice contact feature. Initiating voice contact 1 Press MONITOR while transmitting or receiving documents. Display: Display VOICE STANDBY ●Your unit will call the other party with a distinctive ring.
Sending Faxes Sending a fax manually! 1 2 Document guides Adjust the width of the document guides to the size of the document. Insert the document (up to 15 pages) FACE DOWN until the unit grabs the document and a single beep is heard. Display: FACE DOW Display N Handset STANDARD 3 If necessary, press RESOLUTION repeatedly to select the desired setting (see below). 4 5 6 Press MONITOR or lift the handset. TEL= MONITOR STOP FAX START Dial the fax number.
Sending Faxes Sending a fax using ONE-TOUCH DIAL and JOG DIAL! Before using this feature, program the desired names and telephone numbers into ONE-TOUCH DIAL and JOG DIAL (p. 22, 23). 1 2 Adjust the width of the document guides to the size of the document. Document guides Insert the document (up to 15 pages) FACE DOWN until the unit grabs the document and a single beep is heard. Display: Display FACE DOW N STANDARD 3 If necessary, press RESOLUTION repeatedly to select the desired setting (p. 31).
Sending Faxes Documents you can send! Maximum size Effective scanning area 4 mm Scanned area 600 mm (235⁄8" ) 128 mm (5" ) Minimum size 128 mm (5" ) 4 mm 216 mm (81⁄2" ) 4 mm Document weight Single sheet: 45 g/m2 to 90 g/m2 (12 lb. to 24 lb.) Multiple sheets: 60 g/m2 to 75 g/m2 (16 lb. to 20 lb.) 4 mm 208 mm (83⁄16" ) Paper width 216 mm (81⁄2" ) Note: ● Remove clips, staples or other similar fasteners. that ink, paste or correction fluid has dried. ● Do not send the following types of documents.
Sending Faxes Reports for confirmation! To confirm the communication results, the following reports are available. Sending report This report will provide you with a printed record of transmission results. To use this feature, activate feature #04 (p. 53). Sample of a sending report SENDING REPORT YOUR LOGO : YOUR FAX NO. : NO. OTHER FACSIMILE START TIME Jan.20 09:18AM 01 2345678 USAGE TIME 00'51 MODE SND PAGES RESULT COMMUNICATION ERROR 00 SND: Sent directly.
Sending Faxes IQ-FAX! This feature can only be used after applying to NetMoves. IQ-FAX is intelligent faxing which allows you to send faxes via the Internet using the IQ-FAX button. Behind the IQ-FAX button is the NetMoves Global Fax Network which manages the delivery of your fax to any fax machine in the world. It routes your fax via the best and most time-efficient route and will automatically resend your fax for you if the receiving fax machine is unavailable.
Sending Faxes Sending a fax using the Internet 1 2 Adjust the width of the document guides to the size of the document. Insert the document (up to 15 pages) FACE DOWN until the unit grabs the document and a single beep is heard. Display: Document guides ONE-TOUCH DIAL Display FACE DOW N STANDARD 3 If necessary, press RESOLUTION repeatedly to select the desired setting (p. 31). 4 Press IQ-FAX . IQ-FAX IQFAX TO WHERE? JOG DIAL 5 Enter the fax number. Using the dial keypad.
Sending Faxes Broadcast transmission! This feature is useful for sending the same document often to selected parties (up to 20 stations). First program the stations, then see page 39 for transmission. ●The broadcast function utilizes ONE-TOUCH DIAL 1–3. The one-touch dial function will be canceled. ●BROADCAST key 1 and 2 can accept ONE-TOUCH DIAL and JOG DIAL entries. MANUAL BROAD key can also accept manual dialing entries.
Sending Faxes Adding a new station 1 Rotate JOG DIAL until the desired key name is displayed. Example: 2 3 4 5 6 Press DIRECTORY PROGRAM to exit the program. Display Press DIRECTORY PROGRAM . ADD= Press DELETE=# to select “ADD”. Rotate JOG DIAL until the desired name you want to add is displayed (only using JOG DIAL is available). Example (JOG DIAL): Mike Example (ONE-TOUCH DIAL-2): Peter Press JOG DIAL DIRECTORY PROGRAM SET STOP SET .
Sending Faxes Sending the same document to pre-programmed parties 1 2 Insert the document FACE DOWN. ●If necessary, press RESOLUTION repeatedly to select the desired setting (p. 31). MANUAL BROAD BROADCAST Display Press the desired BROADCAST (1–2) or MANUAL BROAD . FACE D W N FACE DOO WN ●You can also use JOG DIAL . Display the desired key name, and press FAX START . Example: ●The document will be fed into the unit and scanned into memory.
Receiving Faxes Setting the unit to receive faxes! Use only as a fax With answering machine External telephone answering machine (not included) How you want the unit to receive calls You have a separate telephone line just for faxes. You want to use the fax machine with an answering machine. FAX ONLY mode (p. 43) Activating an answering machine (p. 44) Turn AUTO ANSWER on by pressing AUTO ANSWER . You have to set this. ●Set ON This is how the unit will operate.
Receiving Faxes Voice mail service (Distinctive Ring) Mostly voice calls Other options With a PC 2-number example Ring Ring To the same line Facsimile No. (555-1333) Ring Telephone No. (555-1111) TEL/FAX mode You need to subscribe to Distinctive Ring Service. You plan to answer the calls yourself. Setting the Distinctive Ring pattern (feature #31 on page 56) TEL mode (p. 42) Select the same ring pattern assigned to the facsimile number. (Default setting is B.
Receiving Faxes TEL mode! (answering all calls manually) Activating TEL mode OFF If the AUTO ANSWER light is on, turn it off by pressing AUTO ANSWER . Display: Display TEL MODE Receiving a fax manually 1 2 When the unit rings, lift the handset to answer the call. Handset STOP When: —document reception is required, —a fax calling tone (slow beep) is heard, or —no sound is heard, press FAX START . CONNECTING..... FAX START Note: ● If 3 Replace the handset. ●The unit will start fax reception.
Receiving Faxes FAX ONLY mode! (all calls are received as faxes) Activating FAX ONLY mode 1 2 Set feature #77 to “FAX ONLY” (p. 59). If the AUTO ANSWER light is off, turn it on by pressing AUTO ANSWER . ●The display will show the number of rings before the unit answers a call in FAX ONLY mode. Display: Example: 3 ON Display PICKUP & RCV FAX AFTER 3 RINGS If you wish to change the ring count setting, rotate JOG DIAL until the desired number is displayed, and press SET .
Receiving Faxes Using the unit with an answering machine! Setting up the fax machine and an answering machine 1 Connect the answering machine. Remove the stopper and connect the cord. Telephone line cord (not included) Answering machine (not included) 2 3 Set the number of rings on the answering machine to less than 4. ●This will allow the answering machine to answer the call first. 4 5 Activate the answering machine.
Receiving Faxes How the fax machine and answering machine work Receiving voice calls The answering machine will record voice messages automatically. Receiving fax calls The fax machine will receive documents automatically when the machine detects a fax calling tone. Receiving a voice message and fax document in one call The answering machine will record the voice message first. The fax machine will then be activated by the caller’s request and will receive the document.
Receiving Faxes TEL/FAX mode! (receiving voice calls with rings and fax calls without rings when you are near the unit) Use this mode when you are always near the fax machine, and want to receive faxes without the unit ringing. When a call is received, the fax machine will work as follows. To set TEL/FAX mode, see below. A call is received. The fax machine will ring up to 3 times. “Silent fax recognition ring count” The fax machine will not ring.
Receiving Faxes When an extension telephone is connected A call is received. The fax machine will not ring, but the extension telephone will ring twice. “TEL/FAX delayed ring count” Voice call The extension telephone will not ring, but the fax machine will ring up to 3 times. “Silent fax recognition ring count” g Rin ng Ri ing R Ring Ring ●The call is connected. Fax calling tone* The fax machine will automatically receive documents without ringing.
Receiving Faxes Using with an answering machine and computer! We recommend that you always connect the fax machine directly to the wall jack. EXT Wall jack Computer Wall jack Answering machine Note: ● Set the fax machine to TEL mode. device which has the shortest ring count will answer a call first. ● If you use your computer as an answering machine, connect the telephone line cord from the EXT jack to the computer.
Receiving Faxes Pager call - when the unit receives a fax! This feature allows your unit to call your pager when your unit receives a fax document. 1 Press MENU . Display: SYSTEM SET UP , then 7 0 . 2 Press 3 Press SET . 4 Rotate JOG DIAL to select “ON”. 11 12 Check that your pager received the pager test call. Press MONITOR . FAX PAGER CALL Display MENU MODE=OFF MODE=ON ●If this feature is not required, select “OFF”. 5 Press SET . 6 Enter your pager number up to 30 digits.
Copying Making a copy! The unit can make single or multiple copies (up to 99). 1 2 Adjust the width of the document guides to the size of the document. Insert the document (up to 15 pages) FACE DOWN until the unit grabs the document and a single beep is heard. Display: ●Make 3 Document guides FACE DOW Display N STANDARD sure the handset is on the cradle. Press COPY START . 100% FINE [01] COPY START ●If necessary, enter the number of copies (up to 99). 4 STOP COLLATE Press COPY START .
Copying To reduce or enlarge a document To make a reduced copy, press COPY ZOOM repeatedly and select the desired reduction rate. The unit can reduce copies to as little as 50% of the original by changing the reduction rate 5% at a time. To make an enlarged copy, press COPY ZOOM repeatedly and select the desired enlargement rate. The unit can enlarge copies to as much as 200% of the original by changing the enlargement rate 5% at a time.
Features Summary Programming! The unit provides various programming features. Program the desired settings by referring to the programming tables (p. 53–59). General programming method 1 Press MENU . 2 Select the feature you wish to program. ■For basic features (p. 53, 54): Rotate JOG DIAL until the desired feature is displayed. ■For advanced features (p. 55–59): Rotate JOG DIAL until the following is displayed.
Features Summary Basic features! Programming table Code Display & Feature SET DATE & TIME #01 #02 To set the date and time. YOUR LOGO To set your logo. YOUR FAX NO. #03 To set your facsimile telephone number. SENDING REPORT #04 To print and check the sending report for fax transmission results (p. 34). Settings mm/dd/yy hh:mm (2 digits for each entry) See page 17 for details. (Up to 30 characters) See page 18 for details. See page 20 for details.
Features Summary Basic features (cont.)! How to set menu options 1. Press MENU . 2. Rotate JOG DIAL until the desired feature is displayed. 5. Press SET . 6. Press MENU . 3. Press SET . 4. Rotate JOG DIAL until the desired setting is displayed. Note: ● Step 4 may be slightly different depending on the feature. ● See page 52 for more details. Programming table (cont.) Code Display & Feature Settings REMOTE TAM ACT.
Features Summary Advanced features! How to set menu options 1. Press MENU . 2. Rotate JOG DIAL until the following is displayed. Display: 4. Rotate JOG DIAL until the desired setting is displayed. 5. Press SET . 6. Press MENU . ADVANCED MODE Press SET and rotate JOG DIAL until the desired feature is displayed. Note: ● Step 4 may be slightly different depending on the feature. ● See page 52 for more details. 3. Press SET .
Features Summary Advanced features (cont.)! How to set menu options 1. Press MENU . 2. Rotate JOG DIAL until the following is displayed. Display: 4. Rotate JOG DIAL until the desired setting is displayed. 5. Press SET . 6. Press MENU . ADVANCED MODE Press SET and rotate JOG DIAL until the desired feature is displayed. Note: ● Step 4 may be slightly different depending on the feature. ● See page 52 for more details. 3. Press SET . Programming table (cont.
Features Summary Code Display & Feature Settings How the unit operates If the other party’s fax machine does not send a fax calling tone, select “ON”. The unit detects a silent pause and activates the fax function. ●If you use an answering machine to give greeting messages and record incoming messages on a single cassette tape, select “OFF”. ● SILENT DETECT. #40 If you use the unit with an answering machine and wish to receive faxes from older model fax machines, activate this feature.
Features Summary Advanced features (cont.)! How to set menu options 1. Press MENU . 2. Rotate JOG DIAL until the following is displayed. Display: 4. Rotate JOG DIAL until the desired setting is displayed. 5. Press SET . 6. Press MENU . ADVANCED MODE Press SET and rotate JOG DIAL until the desired feature is displayed. Note: ● Step 4 may be slightly different depending on the feature. ● See page 52 for more details. 3. Press SET . Programming table (cont.
Features Summary Code Display & Feature AUTO ANSWER #77 To change the receive mode in the AUTO ANSWER setting. Settings FAX ONLY TEL/FAX How the unit operates “FAX ONLY”: Facsimile only mode (p. 43) “TEL/FAX”: Telephone/Facsimile mode (p. 46, 47) See pages 46 and 47 for details. TEL/FAX RING #78 If you use an extension telephone in TEL/FAX mode, select the desired number of rings of the extension telephone. TONER SAVE #79 To save on toner consumption.
Error Messages Reports! If your unit cannot send a fax, check the following: —the number you dialed is correct, —the other party’s machine is a facsimile. If the problem remains, correct it by following the communication message printed on the sending and journal reports (p. 34).
Error Messages Display! If the unit detects a problem, one or more of the following messages will appear on the display. Display message Cause & solution CALL SERVICE ●There is something wrong with the unit. Contact our service personnel. CHANGE DRUM ●There is something wrong with the drum unit. Replace the drum unit and the toner cartridge (p. 68). CHECK DOCUMENT ●The document was not fed into the unit properly. Reinsert the document.
Error Messages Display message Cause & solution NO FAX REPLY ●The other party’s fax machine is busy or has run out of recording paper. Try again. OUT OF PAPER ●Recording PAPER JAMMED ●A PLEASE WAIT ●The REDIAL TIME OUT ●The REMOVE DOCUMENT ●The paper is not installed or the unit has run out of paper. Install paper (p. 15). ●Recording paper is not fed into the unit properly. Reinstall paper (p. 15). recording paper jam occurred. Clear the jammed paper (p. 70). unit is warming up.
Operations When a function does not work, check here before requesting help! General Cause & solution Problem I cannot make and receive calls. ●The power cord or telephone line cord is not connected. Check the connections (p. 16). ●If you used a splitter to connect the unit, remove the splitter and connect the unit to the wall jack directly. If the unit operates properly, check the splitter. I cannot make calls. ●The The unit does not work. ●Disconnect The unit does not ring.
Operations Fax – sending Cause & solution Problem I cannot send documents. ●The telephone line cord is connected to the EXT jack on the unit. Connect to the LINE jack (p. 16). ●The other party’s fax machine is busy or has run out of recording paper. Try again. ●The other party’s machine is not a facsimile. Check with the other party. ●The other party’s fax machine rings too many times. Send the fax manually – dial the number, confirm the fax tone, then press FAX START .
Operations Fax – receiving (cont.) Cause & solution Problem The printing quality is poor. ●The other party sent a faint document. Ask them to send a clearer copy of the document. ●Some paper has instructions recommending which side to print on. Try turning the paper over. ●You may have used paper with a cotton and/or fiber content that is over 20%, such as letterhead or resume paper. ●The remaining toner is low. Replace the toner cartridge (p. 68).
Operations Using an answering machine Cause & solution Problem I cannot receive documents automatically. ●Your I cannot receive voice messages. ●Check I cannot retrieve recorded voice messages on the answering machine from a remote location. ●The I pressed the remote access code to access the answering machine remotely, but the line was disconnected. ●The Callers complain that they cannot send a document. ●Your 66 greeting message on the answering machine is too long.
Operations If a power failure occurs! ●The unit will not function. transmission and reception will be interrupted. ●If delayed transmission of feature #25 (p. 55) is programmed and the start time has passed during a power failure, transmission will be attempted soon after power is restored. ●If fax documents are stored in memory, they will be lost. When power is restored, a power down report will be printed out stating which contents in memory have been erased.
Replacement Replacing the toner cartridge and the drum unit! ■When the display shows the following message, replace the toner cartridge. TONER LOW or TONER EMPTY ■We recommend you replace the drum unit every third time you replace the toner cartridge. To check the drum life and quality, please print the printer test list (p. 76). Model No. KX-FA76 toner cartridge and Model No. KX-FA77/KX-FA77D drum unit are available for replacement (p. 8). Caution: ● The drum unit contains a photosensitive drum.
Replacement 5 6 Pull up the right edge of the used toner cartridge ( 1 ). Remove the cartridge from the drum unit ( 2 ). ●The toner may stick to the cartridge and the drum unit. Be careful in handling. See page 4 for details. ●Do not drop the toner on the green drum surface. ●Put the used toner cartridge into the protection bag. Used toner cartridge Drum unit Green drum surface If you replace the drum unit at the same Protection bar time, remove the new drum unit from the protection bag.
Replacement / Jams 11 Install the drum and toner unit by holding the tabs. Drum and toner unit ●If the lower glass is dirty, clean it with a soft dry cloth. Lower glass 12 Close the front cover, until locked, by pushing down on both sides. Front cover Waste disposal method ●Waste material may be dumped or incinerated under conditions which meet all federal, state and local environmental regulations.
Jams When the recording paper has jammed near the recording paper exit: Remove the jammed paper by pulling it toward you. Jammed paper 3 Close the front cover, until locked, by pushing down on both sides. 4 Remove the recording paper. Straighten and reinsert it into the recording paper entrance. Front cover Recording paper entrance When the recording paper was not fed into the unit properly The display will show the following message. FAILED PICK UP Remove the recording paper.
Jams Document jams - sending! 1 Front cover Push the front cover open button then open the front cover. Caution: The fuser unit gets hot. Do not touch it. Front cover open button Fuser unit 2 3 4 Pull down the middle guide while holding the front cover. Jammed document Front cover Remove the jammed document carefully. Middle guide 5 Close the front cover, until locked, by pushing down on both sides. Lift the middle guide firmly.
Jams No feeding or multiple feeding occurs while sending! If no feeding or multiple feeding occurs frequently, adjust the feeder pressure. Shift the position of the green lever by using a stick like instrument with a pointed end. Left: When documents do not feed. Center:Standard position (pre-selected) Right: When documents multi–feed. Green lever Left For fax advantage assistance, call 1-800-435-7329.
Cleaning Cleaning the inside of the unit! If any of the following problems occurs, clean the inside of the unit: —If misfeeding of your original occurs frequently. —If a black line, a white line or a dirty pattern appears on your recording paper, on your original, or on the fax document received by the other party. Caution: ●Be careful in handling the toner drum unit. See the caution for the drum unit on page 68 for details.
Cleaning 6 Remove the drum and toner unit by holding the two tabs. Drum and toner unit 7 Clean the lower glass with a soft dry cloth. Lower glass 8 Reinstall the drum and toner unit by holding the tabs. 9 Close the front cover, until locked, by pushing down on both sides. 10 Front cover Reconnect the power cord and the telephone line cord. Power cord Telephone line cord For fax advantage assistance, call 1-800-435-7329.
Printed Reports Reference lists and reports! You can print out the following lists and reports for your reference. Setup list: provides you with the current settings of the basic and advanced programming features (p. 53–59). Telephone number list: provides you with names and telephone numbers which are stored in ONE-TOUCH DIAL and JOG DIAL. Journal report: keeps records of fax transmission and reception. This report will be printed automatically after every 30 fax communications (p. 34).
FCC Information List of FCC requirements and information! If required by the telephone company, inform them of the following. ●FCC Registration No.: (found on the rear of the unit) ●Ringer Equivalence No.: (found on the rear of the unit) ●The particular telephone line to which the equipment is connected. This unit must not be connected to a coin operated line. If you are on a party line, check with your local telephone company.
Limited Warranty Have any questions? For in warranty support, CALL 1-800-HELP-FAX (1-800-435-7329) on: operating the unit, getting repair service, and/or getting supplies. Panasonic Consumer Electronics Company, Division of Matsushita Electric Corporation of America One Panasonic Way, Secaucus, New Jersey 07094 Panasonic Sales Company, Division of Matsushita Electric of Puerto Rico, Inc. Ave. 65 de Infantería, Km. 9.
Servicenter Directory Servicenter directory! To obtain technical support within the warranty period or product service, please contact:1-800-HELP-FAX (1-800-435-7329), Monday-Friday 9am-8pm EST. To obtain continued technical support after the warranty has expired, please contact: 1-900-555-PANA (1-900-555-7262) for support on a fee basis. Web Site: www.panasonic.com (for customers in the USA or Puerto Rico ONLY) You can purchase parts, accessories or locate your nearest servicenter by visiting our Web Site.
Specifications Technical data about this product! Applicable Lines: Document Size: Effective Scanning Width: Recording Paper Size: Public Switched Telephone Network Max. 216 mm (81⁄2" ) in width / Max. 600 mm (235⁄8" ) in length 208 mm (83⁄16" ) Letter: 216 mm x 279 mm (81⁄2" x 11" ) Legal: 216 mm x 356 mm (81⁄2" x 14" ) Effective Printing Width: 208 mm (83⁄16" ) Transmission Time*: Approx. 8 s/page (ECM-MMR)** Scanning Density: Horizontal: 8 pels/mm (203 pels/inch) Vertical: 3.
Specifications Toner life! Model No. KX-FA76 toner cartridge can print approx. 2,000 sheets of letter size paper with a 5% image area. Toner life depends on the amount of content in a received, copied or printed document. The following is the approximate relationship between image area and toner life for Model No. KX-FA76 toner cartridge. Toner life varies in actual usage. 10% image area 5% image area 15% image area Note: Toner life for KX-FA76 ● The sheets 2,000 Average use (Toner save mode is off.
Index Index! A Accessories . . . . . . . . . . . . . . . . . . . .8 Advanced features . . . . . . . . . . .55–59 Answering machine . . . . . . . . . . . . . .44 AUTO ANSWER button . . . . .42, 43, 46 Auto Answer setting (Feature #77) . . . .59 Auto disconnection (Feature #49) . . .57 Auto reduction (Feature #37) . . . .42, 56 B Basic features . . . . . . . . . . . . . . .53, 54 BROADCAST keys . . . . . . . . . . .37, 39 Broadcast sending report . . . . . . . . .39 Broadcast transmission . . . . . . . . .
Index O One-touch dial (Card) . . . . . . . . . . . . . . . . . .22, 76 (Making a voice call) . . . . . . . . . . .25 (Sending faxes) . . . . . . . . . . . . . .32 (Storing) . . . . . . . . . . . . . . . . . . . .22 Overseas mode (Feature #23) . . . . . .55 P Pager call (Feature #70) . . . . . . .49, 58 Paper jam . . . . . . . . . . . . . . . . . . . . .70 Paper size (Feature #16) . . . . . . . . . .54 Paper stacker . . . . . . . . . . . . . . . . . .14 Paper tray . . . . . . . . . . . . . . . . . . . .
KX-FL501 Proof of Purchase Panasonic FAX ADVANTAGE PROGRAM Free peace of mind, direct from Panasonic NO EXTRA COST FAX ADVANTAGE PROGRAM ■ 1-year limited warranty 1: parts, labor, and toll-free help line 2 ■ Free overnight replacement 3 and repair program The Panasonic Fax Advantage Consumer Service Program. Panasonic knows that if your fax machine is not up and running, neither is your business. That’s why we created the Panasonic Fax Advantage Program.