
High Speed Color Scanner Operating Instructions
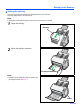

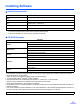
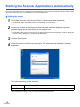
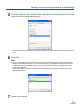
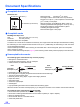
Table Of Contents
- Table of Contents
- Notice
- For Your Safety
- Component Identification
- Setting up the Scanner
- Installing Software
- Starting the Scanner Applications Automatically
- Document Specifications
- Loading Documents
- Clearing Paper Jams
- Mixed Batch Card Guide
- Cleaning the Unit
- Replacing Consumables
- Removing the Stand
- Repacking Instructions
- Specifications
- Troubleshooting
- Index

Setting up the Scanner
12
Power turn-on sequence
1
Turn on the power of the scanner.
• Connect the power cord to the AC adaptor.
• Connect the AC adaptor to the scanner.
• Plug into an AC outlet.
• Push the power switch.
• The LED (Green) will blink for about 30
seconds and then it will become steady.
Note:
• Install the software first.
About LED
The status of the scanner can be established by the condition of the two LED indicators shown in the table below:
*1
The scanning lamp(s) periodically lights up in sleep mode. This is not an unusual event.
For details on sleep mode, refer to the User Utility Reference Manual.
*2
It will take about 30 seconds to initialize the scanner.
LED (Green)LED (Red)Status
ON OFF Ready
Blink (Slow) OFF Sleep
*1
ON Blink (Slow) Warning
Blink (Slow) Blink (Slow) Warning/Sleep
ON ON Error
Blink (Fast) OFF Warming up
*2
AC adaptor
Power cord
Power switch ( )
USB cable
Ready
Error
Start / Stop
LED (Green)
LED (Red)