EP1060/EP1260 MASSAGE LOUNGER EP1260 EP1060 Instruction Manual 30
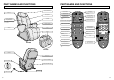
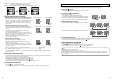
PART NAMES AND FUNCTIONS PART NAMES AND FUNCTIONS SEAT CONTROLLER Cover Closed Cover Open Back Cushion Zip ON/OFF Button Stop Button Backrest • Used to stop the massage immediately. ON/OFF Lamp Back Cushion Shoulder Position Adjustment Button neck roller position reclining Reclining Button neck roller position reclining • Used to adjust the angle of the backrest and legrest. • Used to adjust the shoulder position.
SETTING UP THE MASSAGE LOUNGER HOW TO USE THE MASSAGE LOUNGER — INTRODUCTION WHERE TO USE THE UNIT CAUTION • Here you will find an overview of how to use the massage lounger. Please refer to the pages shown for further details. 1. After Carrying Out Safety Checks, Turn the Unit On (See Page 36) • Do not use the unit in areas with high humidity, such as the bathroom, etc. as this can lead to electric shock or other accidents. • Place the unit on a totally flat surface.
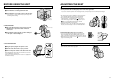
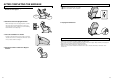
BEFORE USING THE UNIT ADJUSTING THE SEAT AFTER CHECKING THE SURROUNDING AREA, TURN ON THE POWER 1. Check the Surrounding Area BEFORE SITTING DOWN CAUTION • Slowly sit down after checking the position of the massage heads. z Check that there is nothing behind the unit. If you do not check the position of the massage heads, you may be injured or the unit may be damaged. x Check that there is enough room to recline the unit.
PROGRAMMED OPERATION RECLINING THE SEAT 1. Reclining The Seat • Please check that there are no children or pets in the vicinity of the unit before use. reclining • Hold down the Reclining Button to recline the seat and raise the legrest. • When both the backrest and legrest have been extended as far as possible you will hear a “peep, peep, peep” sound. • When first using the unit, please do not fully recline the seat. 1. Press the 1 Press neck roller position Angle Reclined reclining 2.
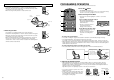
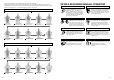
• When the Shoulder Position Indicator is flashing, adjust the position of the massage heads (upper roller) so that they lightly touch the shoulder. • The shoulder position can be adjusted up and down 10cm. • When it is not possible to correctly adjust the shoulder position, slide your body down and try adjusting it again. MANUAL OPERATION MANUAL OPERATION FOR THE UPPER BODY Too high • Please check that there are no children or pets in the vicinity of the unit before use.
Example 2 Changing to a massage type outside the category. (Changing to Tap B when Knead is selected.) • When Knead is combined with Tap B, deselecting Knead will leave only Tap. manual operation shiatsu swedish manual operation knead shiatsu swedish LEG MASSAGE IN MANUAL OPERATION • It is possible to carry out leg massage at the same time as upper body massage. • If your calves are not in the correct position in the legrest, please adjust your legs so that they are.
AFTER COMPLETING THE MASSAGE DISCONNECT THE POWER 1. Turn Off the Power RETURN THE SEAT TO THE ORIGINAL POSITION 1. Check that there is Nothing Under the Backrest or the Legrest. z Turn the power switch to the “off” position. x Turn the lock switch to the “lock” position. on off lock Check that there is nothing here 2. Return the Seat to the Upright Position. Check that there is nothing here open lock switch 2.
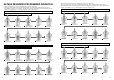
DETAILS REGARDING PROGRAMMED OPERATION • The movements below are shown in simplified form for the sake of illustration. • When the programs have finished the unit will automatically stop. (Although programmed operation lasts for approximately 15 minutes (12–17 minutes), this will vary according to the shoulder position and program selected, whether or not tapping is on or off, and the weight of the person using the unit.
• The movements below are shown in simplified form for the sake of illustration. • When the programs have finished the unit will automatically stop. (Although programmed operation lasts for approximately 15 minutes (12–17 minutes), this will vary according to the shoulder position and program selected, whether or not tapping is on or off, and the weight of the person using the unit.
CLEANING AND MAINTENANCE TROUBLESHOOTING PILLOW, BACK CUSHION, SEAT AND ARMREST SYNTHETIC LEATHER • Rub the synthetic leather lightly using a soft and dry cloth for normal cleaning. (Please do not use a cloth containing any kind of chemicals.) • If the leather becomes dirty, apply a 3–5% solution of a mild detergent in warm water using a soft cloth, tapping the surface to remove it.
Problem It is not possible to recline the unit. The legrest cannot be raised or lowered. Even though I press the reclining button nothing appears to happen. H H If the unit encounters an obstacle or if excessive force is exerted on it during operation, in the interests of safety the unit will come to a stop. If all markings and buttons on the controller start to flash, which is extremely unusual, turn off the power switch, wait for approximately 10 seconds and then turn the power switch on again.
SAFETY PRECAUTIONS OPERATING PRECAUTIONS WARNING: To avoid the risk of injury. WARNING: To avoid damaging the unit. 1. Pregnant women, people who are ill, in poor physical shape or undergoing medical treatment, and people suffering from back, neck, shoulder or hip pain should consult their doctor before using the unit. If you have a pacemaker, defibrillator, or other personal medical device, consult with the manufacturer of your device before using the unit.
GROUNDING INSTRUCTIONS SPECIFICATIONS (EP1060) The unit must be properly grounded. If it should malfunction or breakdown, grounding provides a path of least resistance for electric current in order to reduce the risk of electric shock. This unit is equipped with a cord with an equipment-grounding conductor and a grounding plug. The plug must be plugged into an appropriate outlet that has been properly installed in accordance with all local codes and ordinances.