Operating Instructions Multi-Function Printer Model No. DP-MB350 Do NOT connect the unit to a computer with the USB cable until prompted to do so during the setup of Multi-Function Station (CD-ROM). 1 2 L This unit is compatible with Caller ID. You must subscribe to the appropriate service offered by your service provider/telephone company.
Thank you for purchasing a Panasonic product. You can select the English or Spanish language. The display and reports will be in the selected language. The default setting is English. If you want to change the setting, see feature #110 on page 58. Caution: L Do not rub or use an eraser on the printed side of the recording paper, as the print may smear. Notice for product disposal, transfer, or return: L This product can store your private/confidential information.
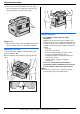
Important Information Important 1For assistance, Information please contact an authorized Panasonic dealer. For your safety Laser radiation The printer of this unit utilizes a laser. Use of controls or adjustments or performance of procedures other than those specified herein may result in hazardous radiation exposure. Fuser unit During or immediately after printing, the fuser unit (1) gets hot. This is normal. Do not touch the fuser unit.
Important Information L Do not cover slots or openings on the unit. Inspect the air circulation vents regularly and remove any dust build-up with a vacuum cleaner (1). 1 Illegal copies Routine care L Wipe the outer surface of the unit with a soft cloth. Do not use benzine, thinner, or any abrasive powder. Moving the unit The unit is heavy. It is highly recommended that two people handle this unit. When moving the unit, hold by the grips (2) on both sides.
Table of Contents 1. Introduction and Installation 1. Table of Contents Accessories 1.1 1.2 Supplied accessories .................................... 7 Accessory information ................................... 7 Finding the Controls 1.3 1.4 1.5 Button descriptions........................................ 8 Display descriptions ...................................... 9 Overview ..................................................... 10 Installation 1.6 1.7 Toner cartridge and drum cartridge.............
Table of Contents Troubleshooting 11.3 When a function does not work ................... 85 12.Paper Jams Jams 12.1 Recording paper jam ................................... 94 12.2 Document jams (Automatic document feeder) .................................................................. 100 13.Cleaning Cleaning 13.1 Cleaning the white plates and glass.......... 101 13.2 Cleaning the document feeder rollers........ 102 14.General Information Printed Reports 14.1 Reference lists and reports ..............
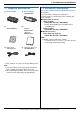
1. Introduction and Installation 1 Introduction 1For Accessories assistance, andplease Installation contact an authorized Panasonic dealer. 1.1 Supplied accessories 1.2 Accessory information 1 Toner cartridge 2 Drum cartridge (DQ-DCB020)*1 3 CD-ROM (PNJKMB300Z)*1 4 Quick reference guide (English– PNQW1864Z)*1 (Spanish– PNQW1865Z)*1 Accessories for this unit can be ordered online, by fax, or by telephone.
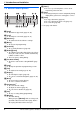
1. Introduction and Installation O {Flash} Finding the Controls L To access special telephone services or for transferring extension calls. 1.3 Button descriptions A B CD EF G H P {Tone} L To change from pulse to tone temporarily during dialing when your line has rotary/pulse service. Q {Start} L To copy a document (page 36). L To scan a document (push scan) (page 31). L To send a fax (page 42). I JK L M N OP Q *1 See page 9 for details. A {Copy} L To switch to copy mode (page 19, 36).
1. Introduction and Installation 1.4 Display descriptions B A C 1.4.1 Display and buttons The following buttons can be used to navigate through operations or to select items shown on the display. A B Copy Basic Copies 01 Zoom 100% Contrast Resolution Text/Photo Page Layout Disabled Copy: Select Menu. C D A {Advance} L To change the display between basic and advanced feature modes. L To change the feature settings during operation.
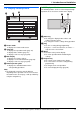
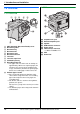
1. Introduction and Installation 1.5.2 Rear view 1.5 Overview 1.5.1 Front view A 4 5 1 2 3 B 6 C k 7 j D E F G 8 1 2 3 4 5 6 7 8 9 j 9 ADF (Automatic Document Feeder) cover Document guides Document tray Document exit Document cover Document entrance Left cover Left cover open lever Standard input tray Recording paper exit L The paper exit area of this unit can hold up to approximately 100 sheets of printed paper (the number of sheets may vary depending on the usage environment).
1. Introduction and Installation Installation 1.6 Toner cartridge and drum cartridge The supplied toner cartridge is a starter toner cartridge. Caution: L Read the following instructions before you begin installation. After you have read them, open the drum cartridge protective bag. The drum cartridge contains a photosensitive drum. Exposing it to light may damage the drum. Once you have opened the protective bag: – Do not expose the drum cartridge to light for more than 3 minutes.
1. Introduction and Installation 6 Hold the left cover release lever (9), and then pull open the left cover (j). 7 Install the drum and toner unit (l) by holding the center handle. L Make sure that the arrows (m) match to install the drum and toner unit correctly. l 9 m j k Caution: L During or immediately after printing, the fuser unit (k) gets hot. Wait until the fuser unit cools down. 8 Close the left cover.
1. Introduction and Installation – – “Change Supplies Toner Low” “Change Supplies Toner Empty” Note: L To check the drum life and quality, please print the printer test list (page 103) and refer to page 105 for information on the drum life. If printing quality is still poor or “Replace Drum” appears on the display, replace the toner cartridge and drum cartridge. L To ensure that the unit operates properly, we recommend the use of Panasonic toner cartridge and drum cartridge.
1. Introduction and Installation 1 Pull the standard input tray (1) until it clicks into 1.7 Recording paper The standard input tray unit can hold: – Up to 520 sheets of 75 g/m2 (20 lb) paper. – Up to 470 sheets of 80 g/m2 (21 lb) paper. – Up to 410 sheets of 90 g/m2 (24 lb) paper. – Up to 100 sheets of 105 g/m2 (28 lb) paper. – Up to 25 transparencies.*1 – Up to 25 labels.*1 place, then pull it completely out, lifting the front part of the tray. *1 Only when using the unit as a printer.
1. Introduction and Installation Important: L Push down to lock the plate (5) in the standard input tray, if it has come up. 5 Insert the standard input tray into the unit, lifting the front part of the tray. Then push it completely into the unit. 5 4 L Make sure that the recording paper guides (6) are at the paper size mark and the recording paper is under the paper limit mark (7). The paper should not be loaded over the tab (8).
1. Introduction and Installation Do not touch the plate (9) on the left side of the standard input tray. 9 Approx. 4.8 kg (10.6 lb) 16 For assistance, please contact an authorized Panasonic dealer.
2. Preparation 2 Preparation 2For Connections assistance, and please Setup contact an authorized Panasonic dealer. 2.1 Connections Caution: L When you operate this product, the power outlet should be near the product and easily accessible. 8 Using surge protectors L The warranty does not cover damage due to power line surges or lightning. For additional protection, we recommend using a surge protector (k).
2. Preparation 2.2 Turning the power switch ON 2.3 Dialing mode Turn the power switch to the ON position (1). If you cannot dial (page 42), change this setting according to your telephone line service. 1 {Menu} {Set} 1 {Menu} 2 Press {#}{1}{2}{0} to display “Dialing Mode”. 3 Press {1} or {2} to select the desired setting. {1} “Pulse”: For rotary/pulse dial service. {2} “Tone” (default): For tone dial service. 4 {Set} 5 Press {Menu} to exit.
2. Preparation Document Requirements 2.4 Selecting the operation mode (Scan/Copy/Fax) You can select the desired mode by pressing one of the following buttons. 2.5 Setting the original 2.5.1 Using the scanner glass 1 2 – – – {Scan}: Select this mode when using the unit as a scanner (page 31). {Copy}: Select this mode when using the unit as a copier (page 36). {Fax}: Select this mode when using the unit as a fax machine (page 42). Note: L The default operation mode is the copy mode.
2. Preparation Minimum document size 128 mm (5") 2.5.2 Using the automatic document feeder 1 128 mm (5") 600 mm (23 5/8") Maximum document size 216 mm (8 1/2") 1 Insert the document (up to 50 pages) FACE UP into the feeder until a single beep is heard. Effective scanning area 2 Adjust the width of the document guides (1) to fit the actual size of the document. Note: L Confirm that there are no documents on the scanner glass. L Confirm that any ink, paste or correction fluid has dried completely.
2. Preparation Volume Initial Programming 2.6 Adjusting the volume 2.7 Date and time Important: L Before adjusting the volume, set the operation mode to fax mode. If the {Fax} light is OFF, turn it ON by pressing {Fax}. We recommend you to set the date and time. The other party will receive your unit’s date and time as the header information. {Menu} {Set} {V}{^}{<}{>} {Fax} {V}{^}{<}{>} 1 {Menu} i {#}{1}{0}{1} i {Set} 2 Enter the current month/date/year/hour/minute. Ringer volume 1.
2. Preparation L You can turn this feature OFF (feature #226 on page 59). 2.8 Your logo You can program your logo (name, company name, etc.) so that it appears on the top of each page sent. {Menu} {Back} {Set} {<}{>} 1 {Menu} i {#}{1}{0}{2} i {Set} 2 Enter your logo, up to 30 characters (see page 77 for character entry). i {Set} 3 Press {Menu} to exit. To correct a mistake Press {<} or {>} to move the cursor to the incorrect character, and make the correction.
2. Preparation 2.9 Your fax number You can program your fax number so that it appears on the top of each page sent. {Menu} {Flash} {Back} {Set} {<}{>} 1 {Menu} i {#}{1}{0}{3} i {Set} 2 Enter your fax number, up to 20 digits. L L L L To enter a “+”, press {*}. To enter a space, press {#}. To enter a hyphen, press {Flash}. To erase a number, press {Back}. 2.
2. Preparation For the default gateway: 1. Press {5}{0}{3} to display “Default Gateway”. 2. {Set} i Enter the default gateway of the network. i {Set} 5 Press {Menu} to exit. 6 Install Multi-Function Station on the computer that you want to use it with. See page 24 for details. To correct a mistake in the IP address, subnet mask, or default gateway Press {<} or {>} to move the cursor to the incorrect number, and make the correction. 2.10.
2. Preparation 2.11.2 Installing Multi-Function Station on a computer L Install Multi-Function Station (CD-ROM) before connecting the unit to a computer with the USB cable. If the unit is connected to a computer with the USB cable before installing Multi-Function Station, the [Found New Hardware Wizard] dialog box will appear. Click [Cancel] to close it. L The screenshots shown in these instructions are for Windows XP and are included for reference only.
2. Preparation L Adobe® Reader® is required to view the operating instructions. Note: L If the screen prompts you to insert the CD-ROM for the operating system when installing Multi-Function Station, insert it into your CD-ROM drive. L If you install the operating instructions, you can view it anytime by clicking [o] on the Multi-Function Station launcher. 2.
2. Preparation For Windows XP: [p] L To display usage tips. [n] L To display information about Multi-Function Station. Note: L You can confirm if the unit is connected to your computer by using Device Monitor (page 78). L Computer features (printing, scanning, etc.) may not function properly in the following situations: – When the unit is connected to a computer that was custom-built by the user. – When the unit is connected to the computer via a PCI card or other expansion card.
3. Printer 3 Printer Printer 3.1 Printing from Windows applications You can print a file created in a Windows application. For example, to print from WordPad, proceed as follows: 1 Open the document you want to print. 2 Select [Print...] from the [File] menu. L The [Print] dialog box will appear. For details about the [Print] dialog box, click [?], then click the desired item.
3. Printer 7 Click [Print] or [OK]. 3.1.2 Printing on special media You can print not only on plain paper but also on special media (transparencies / labels). L Please refer to page 104 for information on recording paper. L To load paper, see page 14. To print on transparencies Use transparencies designed for laser printing. We recommend the following: 3M® CG3300/CG5000 L Do not stack more than 25 transparencies at a time.
3. Printer 6 Close the web browser. Note: L This feature can be programmed only through the web browser interface (page 57). L To view the recent scan to email print information, click [List] next to [Email Print Log] (page 76). L If the attached file is too large or is in an unsupported format, it will not be printed properly. L You can change the email checking interval (page 76) or header print setting (page 76). L Consult your service provider or network administrator for details.
4. Scanner 4 Scanner Scanner 4.1 Scanning from the unit (Push Scan) You can easily scan the document by using the operation panel on the unit. You can select one of the following scanning modes depending on how you intend to use the scanned image.
4. Scanner 4.1.2 Scan to save as a file 1 Set the original (page 19). 2 {Scan} 3 Press {V} or {^} repeatedly to select “PC”. i {Set} 4 For USB connection: Press {V} or {^} repeatedly to select “USB Host”. i {Set} For LAN connection: Press {V} or {^} repeatedly to select the computer to which you want to send the scanned image. i {Set} 5 Press {V} or {^} repeatedly to select “File”. i {Set} 6 If necessary, change the scanning settings.
4. Scanner 1 Set the original (page 19). 2 {Scan} 3 Press {V} or {^} repeatedly to select “Email Address”. i {Set} 4 Enter the destination email address. Using navigator key: Press {V}, {^}, {<} or {>} repeatedly to select the desired destination. Using dial keypad: 6 {Start} L The scanned image will be automatically saved in the selected folder on the FTP server. Note: L To stop scanning, see page 78. L You can save the images in TIFF, JPEG or PDF formats.
4. Scanner 4.2 Scanning from a computer (Pull Scan) Note: L When scanning a document, we recommend using the scanner glass rather than the automatic document feeder for better results. L Do not open the document cover when scanning a document with the automatic document feeder. 4.2.1 Using Multi-Function scan application By clicking an application icon, the selected application starts automatically after scanning. 1 Set the original (page 19). 2 Start Multi-Function Station.
4. Scanner L You can move, copy and delete a file or page. 4.2.3 Using other applications Multi-Function Station includes a TWAIN and WIA compliant scanner driver. You can also scan using other applications that support TWAIN or WIA scanning. For scanning example, proceed as follows: 1 Set the original (page 19). 2 Start an application that supports TWAIN or WIA scanning. 3 For TWAIN scanning: Select [Acquire Image...] from the [File] menu. For WIA scanning: Select [From Scanner or Camera...
5. Copier 3. {Set} 5 Copier Copy 5.1 Making a copy 5.1.1 Using the scanner glass To select the contrast Adjust this setting depending on the darkness or lightness of the document. 5 levels (low to high) are available. 1. Press {V} or {^} repeatedly to select “Contrast”. {Copy} 2. Press {<} or {>}. i {Set} Note: L You can hold the previous contrast setting (feature #462 on page 60). To select the resolution 1. Press {V} or {^} repeatedly to select “Resolution”. 2.
5. Copier – N in 1 feature (page 40) – Separate N in 1 feature (page 40) – Booklet feature (page 41) L You can hold the previous zoom setting (feature #468 on page 67). 5.1.2 Using the automatic document feeder L When using the scanner glass, the unit will only enlarge the right top corner of the document starting from the m mark on the unit. L When using the automatic document feeder, the unit will only enlarge the center of the upper part of the document.
5. Copier 5.2.1 Collate copy “5.2.1 Collate copy”, page 38). The unit will make 1 set of a collated copy and stop temporarily so you can check whether the copy was made as you expected. If the copy is correct, press {Start} to continue copying. If the copy is not correct, press {Stop} and start again from the beginning. The unit can collate multiple copies in the same order as the original document pages. 5.2.2 Duplex feature 5.2 More copying features L Make sure that the {Copy} light is ON.
5. Copier L Other copy settings are also available. See page 36 for details. 6. When using the scanner glass: – – “Short → Long Edge”: For short edge originals to long edge copies “Short → Short Edge”: For short edge originals to short edge copies 1. {Start} L The unit will scan 1 page. 4. {Set} 2. Place the next document on the scanner glass and press {Set}. L The unit will start copying. 5. If necessary, enter the number of copies (page 36). L Other copy settings are also available.
5. Copier L Other copy settings are also available. See page 36 for details. 7 Quick ID copy feature: 1. {Start} L The unit will scan 1 page. 2. Place the next document on the scanner glass and press {Set}. Repeat this until all the documents are scanned. L The unit will start copying. L You can press {Start} anytime to start copying. Easy repeat feature: {Start} 8 After you finish copying, press {Stop} to reset this feature. Note: L You can save the previous page layout setting (feature #467 on page 67).
5. Copier 8. After you finish copying, press {Stop} to reset this feature. 5.2.6 Booklet feature You can make copies, and then fold them in half to create booklets. The documents will be reduced to fit the recording paper. 1 Set the original (page 19). 2 Press {V} or {^} repeatedly to select “Page Layout”. i {<}/{>} 3 Press {V} or {^} repeatedly to select “Booklet”. i {Set} 4 Press {V} or {^} repeatedly to select the desired binding direction and pages.
6. Fax 6 Fax Sending Faxes 6.1 Sending a fax manually 6.1.1 Using the scanner glass By using the scanner glass, you can send a page from booklets or small size paper that cannot be sent with the automatic document feeder. the default operation mode (feature #464 on page 60). To select the resolution 1. Press {V} or {^} repeatedly to select “Resolution”. 2. Press {<} or {>} repeatedly to select the desired resolution. i {Set} – “Standard”: For normal-sized characters. – “Fine”: For small-sized characters.
6. Fax make sure that feature #401 is activated (page 62). For an explanation of the messages, see page 81. To send 2-sided originals 1. Set the original (page 20). Printing a journal report A journal report provides you with a printed record of the 30 most recent faxes. To print it manually, see page 103. To print it automatically after every 30 new fax transmissions and receptions, make sure feature #402 is activated (page 62). For an explanation of the messages, see page 81. 2. {Duplex} 3.
6. Fax L To erase all items, press {<} or {>} repeatedly to select “Erase All”. i {Set} i {Start} 6.2 Storing items for the navigator directory 4 Press {V}, {^}, {<} or {>} repeatedly to select the The unit provides a navigator directory (300 items). {Menu} {Set} {V}{^}{<}{>} {Stop} {Start} 6.2.1 Storing navigator directory items 1 {Menu} 2 Press {V} or {^} repeatedly to select “Directory Set”. 3 Press {<} or {>} repeatedly to select “New Addition”.
6. Fax 6.3 Sending a fax using navigator directory Before using this feature, store the desired names and telephone numbers into the navigator directory (page 44). L Make sure that the {Fax} light is ON. 6.3.1 Using the scanner glass 1 Set the original (page 19). 2 Press {<} or {>} to initiate the navigator directory. 3 Press {V}, {^}, {<} or {>} repeatedly to select the desired item. i {Set} 4 If necessary, change the resolution (page 42) and the contrast (page 42).
6. Fax L To add other items, repeat this step (up to 20 items). 6 {Back} i {Menu} 6.4.3 Erasing a stored item from the broadcast memory 1 {Menu} 2 Press {V} or {^} repeatedly to select “Directory Set”. 3 Press {<} or {>} repeatedly to select “Broadcast”. i {Set} 4 Press {V} or {^} repeatedly to select the desired broadcast memory location (“” to “”). i {<}/{>} L If you changed the broadcast memory name when programming, select that name.
6. Fax Receiving Faxes 6.5 Sending an electronic document as a fax message from your computer You can access the fax function from a Windows application using Multi-Function Station. For example, to send a document created from WordPad, proceed as follows. 1 Open the document you want to send. 2 Select [Print...] from the [File] menu. L The [Print] dialog box will appear. 6.6 Receiving a fax automatically – Auto answer ON 6.6.
6. Fax 6.7 Receiving a fax manually – Auto answer OFF 6.8 Displaying a received fax document Important: L Use this mode with an extension telephone. You can display a received fax document on the unit. You can print or save the necessary document after you confirm the image. Make sure the fax preview mode setting is turned ON beforehand (feature #448 on page 52). L Make sure that the {Fax} light is ON. L Make sure that the unit is idle. 6.7.
6. Fax Keypad Action {4} Returns to the previous page (only available for multiple pages) {6} Goes to the next page (only available for multiple pages) {2} Enlarges an image {8} Reduces an image {5} Rotates an image (90 °, 180 °, 270 °) {^}{V}{<}{>} Scrolls an image 6.8.2 Printing a fax document 1 {Advance} 2 Press {V} or {^} repeatedly to select “Fax Preview”. i {Set} 3 Press {V} or {^} repeatedly to select the desired fax document. i {Start} L The received fax document will be printed.
6. Fax 6.9 Using the unit with an answering machine 6.9.1 Setting up the unit and an answering machine 1 Connect the answering machine (1). L An answering machine is not supplied. L Remove the stopper (2) if attached. 2 Note: L If the call is a phone call, the answering machine will record voice messages. If a fax calling tone is detected, the fax machine will receive a fax automatically.
6. Fax 6.10 Junk fax prohibitor (preventing fax reception from undesired callers) If you subscribe to Caller ID service (page 54), this feature prevents fax reception from calls that do not show caller information. Additionally, the unit will not accept faxes originating from numbers that match the ones on a programmable junk fax prohibitor list. L Make sure that the {Fax} light is ON. Important: L This feature does not work if you receive faxes manually. 6.10.
6. Fax 6.11 Receiving a fax on your computer 6.12 Web fax preview (LAN connection only) You can receive a fax document on your computer. The received fax document is saved as an image file (TIFFG4 format). Important: L Make sure the PC fax setting is set to “Always” or “Connected” beforehand (feature #442 on page 65). L Make sure the computer setting for the PC fax reception is set beforehand (feature #443 on page 24). L Make sure the fax preview mode is turned OFF beforehand (feature #448 on page 52).
6. Fax 5 Enter the web fax preview access code (feature #450 on page 52). i [Submit] L A list of the received fax documents will be displayed. 6 Click the desired icon to preview, print or save a fax document. L While previewing the document, you can manipulate the fax document (Example: enlarge, rotate etc.). 7 Close the web browser. Note: L The display speed depends on the contents and size of the document. L The received fax document is saved as an image file (PDF format).
7. Caller ID 7 Caller Caller IDID 7.1 Caller ID service This unit is compatible with the Caller ID service offered by your local telephone company. To use this unit’s Caller ID features, you must subscribe to a Caller ID service. Make sure the following ring count is set to 2 or more rings beforehand. – FAX ring count (feature #210 on page 59) L The name display service may not be available in some areas. For further information, please contact your telephone company. 7.1.
7. Caller ID 7.3 Erasing caller information 7.4 Storing caller information 7.3.1 Erasing all caller information 1 {Caller ID} 2 Press {V} or {^} repeatedly to select the desired 1 {Menu} 2 Press {V} or {^} repeatedly to select “Caller Setup”. i {Set} L “Erase All OK?” will be displayed. L To cancel erasing, press {Stop}, then press {Menu}. 3 {Set} 4 Press {Menu} to exit. item. 3 {Set} 4 Edit the name if necessary. i {Set} i {V}/{^} 5 Edit the telephone number if necessary.
8. Distinctive Ring 8 Distinctive Distinctive Ring Ring 8.1 Distinctive Ring service When a call is made to one of your phone numbers, the telephone company sends a ring pattern to your telephone line to indicate which number the call is intended for. By setting up this unit for Distinctive Ring, you can make the unit automatically start fax reception when a call comes to the fax number. To use this service, you must subscribe to the Distinctive Ring service offered by your local telephone company.
9. Programmable Features 9 Programmable Features Summary Features 9.1 Programming {Menu} {Set} 1 {Menu} 2 Press {#} and the 3-digit code (page 58 to page 74). 3 Press the appropriate selection to display the desired setting. L This step will vary depending on the feature. 4 {Set} 5 Press {Menu} to exit. To select features through the web browser interface (LAN connection only) You can change features through the web browser interface instead of the unit. 1. Start Multi-Function Station.
9. Programmable Features 9.2 Basic features Feature/Code Selection Setting the date and time {#}{1}{0}{1} Enter the date and time using the dial keypad. See page 21 for details. Setting your logo {#}{1}{0}{2} Enter your logo using the dial keypad. See page 22 for details. Setting your fax number {#}{1}{0}{3} Enter your fax number using the dial keypad. See page 23 for details. Selecting the language {#}{1}{1}{0} The display and reports will be in the selected language.
9. Programmable Features Feature/Code Selection Setting the toner maintenance time {#}{1}{5}{8} The unit will automatically activate for maintenance, once every 24 hours. Because this is to prevent the toner from solidifying, the noise that the unit makes during maintenance cannot be stopped. However, if the unit’s noise bothers you, you can change the start time. 1. {Menu} i {#}{1}{5}{8} i {Set} 2. Enter the maintenance start time. L The default time is “12:00AM”.
9. Programmable Features Feature/Code Selection Setting the recording paper type {#}{3}{8}{3} {1} “Plain Paper” (default): 75 g/m2 to 90 g/m2 (20 lb to 24 lb) paper. {2} “Thin Paper”: 64 g/m2 to 75 g/m2 (17 lb to 20 lb) paper. {3} “Thick Paper”: 90 g/m2 to 165 g/m2 (24 lb to 44 lb) paper. Note: L This setting is valid for both the standard input tray and the lower input tray.
9. Programmable Features Feature/Code Selection Setting toner save feature {#}{4}{8}{2} {0} “Off” (default): Deactivates this feature. {1} “On”: The toner cartridge will last longer. Note: L This feature may lower the print quality by reducing toner consumption. L This setting is valid for copying, and when the unit automatically prints reports/lists. L This setting is invalid for printing received faxes. Viewing the counter {#}{4}{8}{4} To confirm the count number of prints. 1.
9. Programmable Features 9.3 Fax features Feature/Code Selection Erasing all items stored for the navigator directory {#}{2}{8}{9} {0} “No” (default) {1} “Yes” L Disconnect the telephone line cord, USB cable and LAN cable before activating this feature. To erase all items: 1. {Menu} i {#}{2}{8}{9} 2. Press {1} to select “Yes”. i {Set} 3. Press {1} to select “Yes”. i {Set} i {Menu} Printing a confirmation report {#}{4}{0}{1} {0} “Off”: Confirmation reports will not be printed.
9. Programmable Features Feature/Code Selection Sending a fax at a specific time {#}{4}{1}{2} This feature allows you to take advantage of low-cost calling hours offered by your telephone company. This feature can be set up to 24 hours in advance of the desired time. {0} “Off” (default) {1} “On” To send a document: 1. If the {Fax} light is OFF, turn it ON by pressing {Fax}. 2. Set the original (page 19). 3. {Menu} i {#}{4}{1}{2} 4. Press {1} to select “On”. i {Set} 5. Enter the fax number.
9. Programmable Features Feature/Code Selection Setting the ring pattern for fax (Distinctive Ring feature) {#}{4}{3}{1} {1} “A” {2} “B” {3} “C” {4} “D” {5} “B-D” (default) See page 56 for details. Setting auto reduction feature {#}{4}{3}{2} To receive a fax document that is longer than your recording paper. {0} “Off”: The unit will print received documents at their original size. {1} “On” (default): The unit will fit received documents onto your recording paper.
9. Programmable Features Feature/Code Selection Receiving a fax into the computer {#}{4}{4}{2} If you wish to receive a fax into a computer, activate this feature and run [PC FAX] from Multi-Function Station. This feature is available when the fax preview mode is turned OFF (feature #448 on page 52). {0} “Off” (default): Deactivates this feature. {1} “Always”: If the unit recognizes the connection to the computer, it will transfer received documents to the computer.
9. Programmable Features Feature/Code Selection Setting the information for saving a fax document as an email attachment (via an email server) (LAN connection only) L This feature can be programmed only through the web browser interface. When you save the fax document as an email attachment, you need to program the email server and SMTP server settings beforehand. Consult your service provider or network administrator for details. 1. Start Multi-Function Station. 2.
9. Programmable Features 9.4 Copy features Feature/Code Selection Setting the paper input tray to use for copy {#}{4}{6}{0} This feature will be displayed only when the lower input tray is installed (page 79). {1} “#1” (default): Standard input tray {2} “#2”: Lower input tray {3} “#1+#2” Note: L To select “#2”, select “Plain Paper” or “Thin Paper” for the recording paper type setting (feature #383 on page 60).
9. Programmable Features Feature/Code Selection Setting the paper input tray prompt for copy {#}{4}{7}{1} This feature will be displayed only when the lower input tray is installed (page 79). {0} “Off”: Deactivates this feature. {1} “Auto” (default): When making a copy, you will be prompted to select the desired paper input tray if the recording paper size setting is different for the standard input tray (feature #380 on page 59) and the lower input tray (feature #382 on page 59).
9. Programmable Features 9.5 PC print features Feature/Code Selection Setting the paper input tray in PCL {#}{7}{6}{0} This feature will be displayed only when the lower input tray is installed (page 79). {1} “#1” (default): Standard input tray {2} “#2”: Lower input tray {3} “#1+#2” Note: L To select “#2”, select “Plain Paper” or “Thin Paper” for the recording paper type setting (feature #383 on page 60).
9. Programmable Features Feature/Code Selection Setting the font number in PCL {#}{7}{6}{9} To set the font number to be used in PCL printing. The unit assigns a number to each font. 1. {Menu} i {#}{7}{6}{9} i {Set} 2. Enter the font number from “000” to “054”, using the dial keypad. L The default setting is “000”. 3. {Set} i {Menu} Note: L If the font source in PCL (feature #768 on page 69) is set to “Download Font”, the default setting is “001”. L To print the font list, see page 103.
9. Programmable Features 9.6 Scan features Feature/Code Selection Setting the scan mode for Push Scan {#}{4}{9}{3} {1} “Viewer” (default): The scanned image will be displayed in the [Quick Image Navigator]*1/[Multi-Function Viewer]*2 window. {2} “File”: The scanned image will be saved as a file. {3} “Email”: The scanned image will be saved for email attachment. {4} “OCR”: The scanned image will be displayed in the OCR window.
9. Programmable Features Feature/Code Selection Setting the information for scan to FTP (LAN connection only) L This feature can be programmed only through the web browser interface. When you send scanned files to an FTP server, you can register FTP destinations (up to 6 destinations) to the unit through the web browser interface. 1. Start Multi-Function Station. 2. [Utilities] i [Configuration Web Page] i [Advance Configuration] 3.
9. Programmable Features 9.7 LAN features Feature/Code Selection LAN setting with a DHCP server {#}{5}{0}{0} {0} “Disabled”: Deactivates this feature. {1} “Enabled” (default): The following will be allocated automatically using a DHCP (Dynamic Host Configuration Protocol) server. – IP address – Subnet mask – Default gateway Setting the IP address for the LAN connection {#}{5}{0}{1} This feature is available when feature #500 is deactivated.
9. Programmable Features Feature/Code Selection Approving users for the LAN connection {#}{5}{3}{2} {0} “Disabled” (default): Deactivates this feature. {1} “Enabled”: The unit will deny/approve access from the pre-programmed IP patterns. You can program whether to deny or approve IP addresses. Up to 4 patterns each for IPv4 and IPv6 can be programmed through the web browser interface. 1. Start Multi-Function Station. 2. [Utilities] i [Configuration Web Page] i [Network Configuration] 3.
9. Programmable Features 9.8 Network features (LAN connection only) These features can be programmed through the web browser interface. Feature Tab Selection Setting the LAN features [LAN Feature] Enter the LAN feature settings. See page 73 for details. Setting the community name for SNMP [SNMP] Enter the SNMP community name. Consult your service provider or network administrator for details. Setting the location where you use this unit [SNMP] Enter the location information of the unit.
9. Programmable Features Feature Tab Selection Setting the scan to email print feature [Scan to Email Print] [Enabled]: The unit will automatically print email attachment that it receives. [Disabled] (default): Deactivates this feature. See page 29 for details. Setting the email checking interval [Scan to Email Print] Enter the desired email checking interval for the scan to email print feature.
10. Useful Information 10 Useful Useful Information Information 10.1 Character entry 10.2 Status of the unit The dial keypad is used to enter characters and numbers. – Press {<} or {>} to move the cursor. – Press the dial keys to enter characters and numbers. – Press {Back} to erase the character or number highlighted by the cursor. Press and hold {Back} to erase all characters or numbers.
10. Useful Information 10.2.2 Using Device Monitor You can confirm the setting information and current status of the unit from your computer. 1 Start Multi-Function Station. 2 [Utilities] i [Device Monitor] L The [Device Monitor] window will appear. 3 Confirm the status of the unit. [Status]: Current status of the unit Note: L Additional information (toner and recording paper status, unit information, etc.) will be displayed in [Status] tab by clicking [Advanced Information].
10. Useful Information Option 10.4 Lower input tray (optional) Caution for the lower input tray L Do not drop the lower input tray. You can add a lower input tray. See page 7 for accessory information. The lower input tray can hold: – Up to 520 sheets of 75 g/m2 (20 lb) paper. – Up to 470 sheets of 80 g/m2 (21 lb) paper. – Up to 410 sheets of 90 g/m2 (24 lb) paper. L The unit is set for printing letter-size plain paper by default.
10. Useful Information 10.5 Setting the lower input tray To use the lower input tray with your computer, proceed as follows. 1 [Start] 2 Open the printer window. For Windows 98/Windows Me/Windows 2000: [Settings] i [Printers] For Windows XP Professional: [Printers and Faxes] For Windows XP Home: [Control Panel] i [Printers and Other Hardware] i [Printers and Faxes] For Windows Vista: [Control Panel] i [Printers] 3 Select the unit’s name.
11. Help 11 Help and Displays Reports 11.1 Report messages To indicate the unit’s fax transmission/reception status, one of the following messages will be printed on the confirmation and journal reports (page 42). Message Code Communication Error 40-42 46-72 FF Cause & Solution L A transmission or reception error occurred. Try again or check with the other party. 43 44 L A line problem occurred. Connect the telephone line cord to a different jack and try again.
11. Help 11.2 Display messages To indicate the unit’s status, one or more of the following messages will appear on the display. Display Cause & Solution “Call Service” L There is something wrong with the unit. Contact our service personnel. “Change Drum” L There is something wrong with the drum cartridge. Replace the drum cartridge. “Change Supplies Toner Empty” L The toner is empty. Replace the toner cartridge immediately. “Change Supplies Toner Low” L The toner is reaching the end of its life.
11. Help Display Cause & Solution “Fax in Memory” L The unit has a document in memory. See the other displayed message instructions to print out the document. For fax memory capacity, see page 104. L If the PC fax setting (feature #442 on page 65) is set to “Always”, – check the connection between the computer and the unit. – check that the computer is turned ON.
11. Help Display Cause & Solution “Redial Time Out” L The other party’s fax machine is busy or has run out of recording paper. Try again. “Remove Document” L The document is jammed. Remove the jammed document (page 100). L Attempted to send or copy a document longer than 600 mm (235/8") of 1sided document / 360 mm (143/16") of 2-sided document using the automatic document feeder. Press {Stop} to remove the document. Divide the document into two or more sheets and try again.
11. Help Troubleshooting 11.3 When a function does not work 11.3.1 General Problem Cause & Solution The unit does not work. L Check the connections (page 17, 25). The recording paper exit becomes full quickly or the recording paper does not stack properly at the recording paper exit. L High humidity may cause the recording paper to curl. Try turning the paper over and re-inserting it. If the curl on the paper is heavy, please remove it from the recording paper exit.
11. Help Problem Cause & Solution I forgot the password for feature programming via remote operation. L You may have changed the feature programming password. If you do not remember it, assign a new password using feature #155 (page 58). When required to enter the current password, enter “0101” instead. 11.3.2 Printing problems Problem Cause & Solution The printing quality is poor (e.g. has smudges, blurred points or lines). ABC L Some paper has instructions recommending which side to print on.
11. Help Problem Cause & Solution I cannot find the PCL driver. L The PCL driver can be found in the following folder on the supplied CDROM.
11. Help 11.3.4 Copier Problem Cause & Solution The unit will not make a copy. L You cannot make a copy during programming. Make the copy after programming. L The document was not fed into the unit properly. Re-insert the document. L Recording paper is not loaded or the unit has run out of paper. Load paper (page 14). Letters on the copied documents are not clear. L The original document is too dark or too light. Change the contrast (page 36) and try again.
11. Help Problem Cause & Solution I cannot receive documents. L You may have subscribed to a voice mail service due to service packs offered by your telephone company. Fax reception may not be possible when voice mail is activated so we recommend you to: – contact your telephone company and request to deactivate voice mail service, or – subscribe to a Distinctive Ring service (page 56). L The telephone line cord is connected to the [EXT] jack on the unit. Connect to the [LINE] jack (page 17).
11. Help Problem Cause & Solution When an extension telephone is connected, I cannot receive documents by pressing {*}{#}{9}. L You must set remote fax activation to ON (feature #434 on page 64) beforehand. L Press {*}{#}{9} firmly. L You may have changed the remote fax activation code from {*}{#}{9} (default setting). Verify the remote fax activation code (feature #434 on page 64). I cannot hear a dial tone. L The telephone line cord is connected to the [EXT] jack on the unit.
11. Help 11.3.6 Network Problem Cause & Solution I cannot operate the following functions. – PC printing – Scanning – Remote Control – PC FAX – Device Monitor L Confirm the LED via the LAN port of the main board. If the LED is glowing or blinking, network access is working correctly. If the LED is not glowing or blinking, confirm the LAN cable (category 5 straight cable) is connected to the LAN port of the main board correctly.
11. Help Problem Cause & Solution The [Windows Security Alert] dialog box appears and asks if I want to block [PCCMFLPD] and I cannot operate the following functions after installing the Microsoft Windows XP Service Pack 2 or later. – PC printing – Scanning – Remote Control – PC FAX – Device Monitor L Click [Keep Blocking] and run the Windows Firewall Setting Tool to allow the data transmission for Multi-Function Station (page 92). 11.3.
11. Help L If the [Select Language] dialog box appears, select the desired language that you want to use with this software. Click [OK]. 2 [Tools] i [Windows Firewall Setting] L The [Windows Firewall Setting Tool] window will appear. 3 [Add to the exceptions list] i [OK] i [OK] To confirm the security settings (For Windows XP users) 1. [Start] i [Control Panel] i [Security Center] L The [Windows Security Center] window will appear. 2. [Windows Firewall] L The [Windows Firewall] dialog box will appear. 3.
12. Paper Jams 12 Paper Jams Jams 12.1 Recording paper jam 1 Hold the left cover open lever (1), and then pull open the left cover (2). Caution: L Do not pull out the jammed paper forcibly before opening the left cover. 1 2 L Do not open the paper input tray before opening the left cover as the jammed paper may be pulled and the jam may get worse. 3 Caution: L During or immediately after printing, the fuser unit (3) gets hot. Wait until the fuser unit cools down before removing the jammed paper. 12.
12. Paper Jams 2 Remove the jammed paper. L If paper is jammed inside the left cover, see case 1 to case 5 (page 95 to page 97). L If paper is not jammed inside the left cover, see case 6 (page 97). Case 3: When the recording paper has jammed near the fuser unit: 1. Push down both green levers (6) until they stop. Case 1: When the recording paper has jammed near the rollers: Remove the jammed paper (4) carefully by pulling it upward.
12. Paper Jams When the recording paper has jammed over the fuser unit: Push down the upper green lever (8), and remove the jammed paper (9) carefully by pulling it toward you. Case 4: When the recording paper has jammed near the recording paper exit: 1. Push down both green levers (k) until they stop. 8 9 k 3. Push up the green levers (j) to the original position. 2. Remove the jammed paper (l) carefully by pulling it rightward.
12. Paper Jams 3. Push up the green levers (m) to the original position. When the recording paper has jammed near the automatic duplex unit: Remove the jammed paper (o) carefully by pulling it toward you. o m Case 5: When the recording paper has jammed inside of the automatic duplex unit: When the recording paper has jammed near the roller: Remove the jammed paper (n) carefully by pulling it upward. n Case 6: When the recording paper has jammed near the standard input tray: 1.
12. Paper Jams 2. Remove the jammed paper (q) carefully by pulling it toward you. 12.1.2 When the recording paper has jammed near the lower input tray The display will show the following: – “Paper Jammed” “Open Tray #2” “Left Cover” – “Paper Jammed” b “Open Tray #2 Left Cover” 1 Open the cover (1) at the left side of the lower input tray. q 3. Insert the standard input tray into the unit, lifting the front part of the tray. Then push it completely into the unit. 1 2 Remove the jammed paper (2).
12. Paper Jams 3 Close the cover at the left side of the lower input tray. 12.1.3 When the recording paper is not fed into the unit properly The display will show the following: – “Check Pick Up Input Tray #1” (standard input tray) – “Check Pick Up Input Tray #2” (lower input tray) 1 Pull the paper input tray until it clicks into place, then pull it completely out, lifting the front part of the tray. Remove the recording paper and straighten. 2 Re-load the recording paper.
12. Paper Jams 2 When the document has jammed near the 12.2 Document jams (Automatic document feeder) document entrance: Remove the jammed document (3) carefully. 3 Caution: L Do not pull out the jammed document forcibly before lifting the ADF cover. 1 Open the ADF cover (1) while holding the When the document has jammed near the document exit: Open the document tray (4) and remove the jammed document (5) carefully. document cover (2). 4 1 5 2 3 Close the ADF cover.
13. Cleaning 3 Close the document cover (5). 13 Cleaning Cleaning 13.1 Cleaning the white plates and glass 5 Clean the white plates and glass when a black line, a white line or a dirty pattern appears on: – your recording paper, – the original document, – the scanned data, or – the fax document received by the other party. Caution: L Do not use paper products, such as paper towels or tissues for cleaning. 1 Open the document cover (1).
13. Cleaning 4 Close the ADF cover. 13.2 Cleaning the document feeder rollers Clean the rollers when documents frequently misfeed. Caution: L Do not use paper products, such as paper towels or tissues for cleaning. 1 Turn the power switch OFF. 2 Open the ADF cover (1) while holding the document cover (2). 1 2 3 Clean the document feeder rollers (3) with a cloth moistened with water, and let all parts dry thoroughly. 3 102 5 Turn the power switch ON.
14. General Information 14 General Printed Reports Information Specifications 14.1 Reference lists and reports 14.2 Specifications You can print out the following lists and reports for your reference. – “Setup List” – “Tel No. List” – “Journal Report” – “Broadcast List” – “Printer Test” – “Caller ID List” – “PCL Font List” – “Address List” – “FTP Server List” ■ Applicable lines: Public Switched Telephone Network ■ Document size: Max. 216 mm (81/2") in width, Max.
14. General Information ■ Memory capacity (for operation and storing memory): 128 MB ■ Fax memory capacity: 10 MB in total Approx. 630 pages of memory reception (max. 255 pages per one reception) Approx. 150 pages of memory transmission (Based on the ITU-T No. 1 Test Chart in standard resolution, without using the Error Correction Mode.
14. General Information Example 3 Approx. 2,600 pages can be printed. Table of Contents1. 1. Table of Contents / Introduction and Installation Accessories 1.1 Included accessories. 1.2 Accessory information.Finding the Controls 1.3 Description of buttons. 1.4 Overview Installation 1.5 Toner cartridge and drum unit 1.6 Document tray 1.7 Output tray 1.8 Recording paper 2. Preparation 2.1 Connections Thank you for purchasing a Panasonic fax machine.
14. General Information Copyrights 14.3 Information of copyrights and licenses L This product uses a part of NetBSD kernel. The use of a part of NetBSD kernel is based on the typical BSD style license below. Copyright (c) The Regents of the University of California. All rights reserved. Redistribution and use in source and binary forms, with or without modification, are permitted provided that the following conditions are met: 1.
14. General Information Copyright (c) 1982, 1986, 1990, 1991, 1993 The Regents of the University of California. All rights reserved. Copyright (c) 1982, 1986, 1990, 1993 The Regents of the University of California. All rights reserved. Copyright (c) 1982, 1986, 1990, 1993, 1994 The Regents of the University of California. All rights reserved. Copyright (c) 1982, 1986, 1991, 1993 The Regents of the University of California. All rights reserved.
14. General Information Copyright (c) 1996,1999 by Internet Software Consortium. Copyright (c) 1996-1999 by Internet Software Consortium. Copyright (c) 1997 Jonathan Stone and Jason R. Thorpe. All rights reserved. Copyright (c) 1997 Christos Zoulas. All rights reserved. Copyright (c) 1997 Manuel Bouyer. All rights reserved. Copyright (c) 1997, 1998 The NetBSD Foundation, Inc. All rights reserved. Copyright (c) 1997, 1998, 1999, 2000 The NetBSD Foundation, Inc. All rights reserved.
14. General Information L This product contains Net-SNMP software and is using it based on the following license conditions.
14. General Information ---- Part 3: Cambridge Broadband Ltd. copyright notice (BSD) ----Portions of this code are copyright (c) 2001-2003, Cambridge Broadband Ltd. All rights reserved. Redistribution and use in source and binary forms, with or without modification, are permitted provided that the following conditions are met: * Redistributions of source code must retain the above copyright notice, this list of conditions and the following disclaimer.
14. General Information FOR ANY DIRECT, INDIRECT, INCIDENTAL, SPECIAL, EXEMPLARY, OR CONSEQUENTIAL DAMAGES (INCLUDING, BUT NOT LIMITED TO, PROCUREMENT OF SUBSTITUTE GOODS OR SERVICES; LOSS OF USE, DATA, OR PROFITS; OR BUSINESS INTERRUPTION) HOWEVER CAUSED AND ON ANY THEORY OF LIABILITY, WHETHER IN CONTRACT, STRICT LIABILITY, OR TORT (INCLUDING NEGLIGENCE OR OTHERWISE) ARISING IN ANY WAY OUT OF THE USE OF THIS SOFTWARE, EVEN IF ADVISED OF THE POSSIBILITY OF SUCH DAMAGE.
14. General Information L This product contains NetBSD software and is using it based on the following license conditions. /* * Copyright (c) 1989 The Regents of the University of California. * All rights reserved. * * This code is derived from software contributed to Berkeley by Tom Truscott. * * Redistribution and use in source and binary forms, with or without modification, are permitted provided * that the following conditions are met: * 1.
14. General Information * LOSS OF USE, DATA, OR PROFITS; OR BUSINESS INTERRUPTION) HOWEVER CAUSED AND * ON ANY THEORY OF LIABILITY, WHETHER IN CONTRACT, STRICT LIABILITY, OR TORT * (INCLUDING NEGLIGENCE OR OTHERWISE) ARISING IN ANY WAY OUT OF THE USE OF THIS * SOFTWARE, EVEN IF ADVISED OF THE POSSIBILITY OF SUCH DAMAGE. */ L This product contains NetBSD software and is using it based on the following license conditions. /** Copyright (c) 1990, 1993 * The Regents of the University of California.
14. General Information L This product contains NetBSD software and is using it based on the following license conditions. /** Copyright (c) 1990 The Regents of the University of California. * All rights reserved. * * This code is derived from software contributed to Berkeley by Chris Torek. * * Redistribution and use in source and binary forms, with or without modification, are permitted provided * that the following conditions are met: * 1.
14. General Information L This product contains NetBSD software and is using it based on the following license conditions. /* * Copyright (c) 1989 The Regents of the University of California. * All rights reserved. * * This code is derived from software contributed to Berkeley by Tom Truscott. * * Redistribution and use in source and binary forms, with or without modification, are permitted provided * that the following conditions are met: * 1.
15. Index 15. Index 15.
15.
15.
Notes 119
PNQX2279ZA CM0709TM0 (CD)