
Printer/Fax/Scanner/Copier Operating Instructions
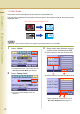
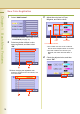


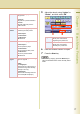

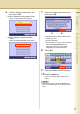
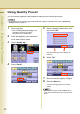
Table Of Contents
- Operating Instructions
- Conventions
- Table of Contents
- Basic Menu Features
- Basic Operation Procedure
- Selecting the Color Mode
- Selecting Original Type and Adjusting the Density
- Registering Quality Preset
- Using Quality Preset
- Quality Adjusting
- Proof Copying
- Confirming/Editing the Selected Copy Features
- Storing a Job in Memory
- Recalling a Preset Job Stored in Memory
- Checking the Waiting to Copy Job
- Completion Notice
- More Menus Features
- 2-Sided Copy Mode
- Basic Operation for the 2-Sided Copy Mode
- Copying 2-Sided Original(s) onto Two Separate Sheets
- Copying Facing Page Original to Two Separate Sheets
- From 1-Sided Originals to 2-Sided Copies Using Saddle Stitch (Booklet)
- Copying Mixed Size Originals from the ADF
- Copying Special Originals (Thin Paper, etc.) from the ADF
- Sort Mode
- Zoom Mode
- Effect Modes
- Insertion Modes
- Overlay Modes
- 2-Sided Copy Mode
- Other Features
- Appendix
19
Chapter 1 Basic Menu Features
6
Select a Quality Preset button, and
then select “OK”.
When registering a new Quality Preset
Select an empty Quality Preset button.
When updating a registered Quality
Preset
Select the registered Quality Preset button.
7
Enter the Quality Preset name, and
then select “OK”.
z Registration will not be permitted without
assigning a name.
z Up to 20 characters.
z For instructions on how to enter characters,
refer to Using the Keyboard in the
Operating Instructions (For Function
Parameters) of provided CD-ROM.
8
Select “
OK
”.
9
Enter the desired number of copies.
10
Press the Start key.
Confirm the image quality of the copied
papers.
z After finishing copying, press the Reset key to
return to the initial screen of the currently active
mode.