
Digital Colour Imaging Systems Operating Instructions
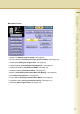
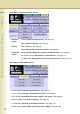
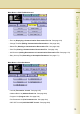
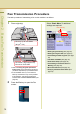


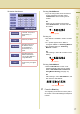
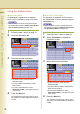
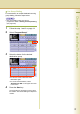
Table Of Contents
- Operating Instructions
- Conventions
- Table of Contents
- Getting To Know Your Machine
- Basic Fax Transmission
- Fax Transmission Procedure
- Entering a Destination
- Transmission with Destination Monitoring
- Talking to the Remote Party Before Transmission
- Setting Original Quality
- Setting the Original Size
- Transmitting 2-Sided Originals
- Verification Stamp
- Transmitting a Document Stored in Memory
- Job Build and SADF
- Direct Transmission
- Verifying Communication Status
- Rotated Transmission
- Batch Transmission
- Getting an Outside Line Using PIN Code Access
- Using Program Keys
- Cancelling a Communication
- Dial Prefix
- Convenient Fax Features
- Fax Reception
- Internet Fax
- What is Internet Fax?
- What Internet Fax Can Do
- Tips for Internet Fax
- Preparing to Use Internet Fax
- Sending an Email Procedure
- Entering an Email Address
- Using Cc, Bcc and From
- Setting a File Type and a File Name
- Emailing an A3-Sized Document
- Setting Message Delivery Notice (MDN)
- When Email Transmission Fails
- Using a Completion Notice
- Receiving an Email
- Receiving an Email on a Computer
- Inbound Routing
- Using the Relay Feature
- Relayed Transmission from Internet Fax
- Relayed Transmission from PC
- Result of Relayed Transmission
- Useful Terms to Remember
- Handling Communication Reservation Files
- Program Destinations/Program Keys
- Reading Reports/Lists
- Solving Problems
- Appendix

16
Chapter 2 Basic Fax Transmission
Entering a Destination
Stations can be entered by using the following methods or a combination of these:
Manual Dialling
To enter a destination telephone number, follow the steps below.
z This function is not available when the Function Parameter “136 Restrict Direct Dial” (Fax/Email Settings >
Fax Parameters) is set to “Valid”.
1
Follow the step 1 and 2 on page 14.
2
Enter the fax number using the
Keypad.
The Number Pad screen opens automatically.
z Telephone number field is limited to 36-digit
in length.
z
For transmission to additional destinations,
enter their fax numbers, and then select “
Set
”
after each destination. When you finish
entering the last destination’s fax number,
select “
OK
”. (Do not select “
Set
” at this time.)
z When the Function Parameter “137 Re-
enter Direct Dial” (Fax/Email Settings >
Fax Parameters) is set to “Valid”, enter the
fax number twice for manual dialling. For
more details, refer to Fax/Email Settings in
the Operating Instructions (For Function
Parameters) of provided CD-ROM.
z To confirm the destinations, select
“Destinations: ###” on the upper left corner
of the screen.
z If you make a mistake, select “Clear” to
delete entries one digit at a time.
z Fax number entry is also possible from the
“Number Pad” in the Address Book screen,
instead of the Control Panel Keypad.
Enter the telephone number directly. (See below)
Use the pre-programmed Address Book.
Manual Dialling
Using the Address Book
Use a Key Name (See page 18)
Select from “Favourites” (See page 18)
Use Group Dialling (See page 19)
Searching for a Destination
Search through the Address Book (Local Search) (See page 20)
Search through the LDAP Server (LDAP Search) (See page 21)
(This feature is available in certain countries only.)
Redialling
Use the last dialled remote station. (See page 23)
Search the Address Book or the Global directory service (LDAP).