Operating Instructions (Detailed Information) Streaming Player Model No. DMP-MST60 DMP-MS10 チ Unless otherwise indicated, illustrations in these operating instructions are of DMP-MST60. Model number suffix “EB” denotes UK model.
Table of contents Getting started Accessories . . . . . . . . . . . . . . . . . . . . . . . . . . .3 Unit and media care . . . . . . . . . . . . . . . . . . . . .3 Control reference guide . . . . . . . . . . . . . . . . . .4 Connections and Settings Connecting to a TV . . . . . . . . . . . . . . . . . . . . . .7 Connecting to the AC adaptor . . . . . . . . . . . . .7 Connecting to an amplifier/receiver . . . . . . . . .8 Connecting to the network . . . . . . . . . . . . . . . .8 Settings. . . . . . . . . .
Getting started Accessories Unit and media care Getting started Check the supplied accessories before using this unit. ≥ Product numbers provided in these operating instructions correct as of January 2013. These may be subject to change. 1 2 1 1 Remote control [MST60] (N2QAYB000891) [MS10] (N2QAYB000886) Batteries for remote control AC adaptor (VSK0812) ≥ For use with this unit only. Do not use it with other equipment. ≥ Do not use any other AC adaptors except the supplied one.
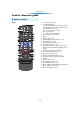
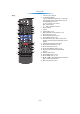
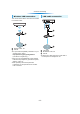
Getting started Control reference guide Remote control [MST60] 11 1 2 1 2 12 3 13 14 4 5 15 6 7 16 17 18 8 19 9 10 20 3 4 5 6 7 8 9 10 11 12 13 14 15 16 17 18 19 20 -4- Turn the unit on and off TV operation buttons You can operate the Panasonic TV using the unit’s remote control. Some buttons may not work depending on the TV.
Getting started [MS10] 11 1 2 1 リワヱヶヵ モヷ 2 ヴヵモヵヶヴ 12 ヴユヵヵリワヨヴチ 13 3 ュロワモ 14 4 5 ヤモワヤユロ モヶュリヰ ヴユモンヤラ 6 ヱロモヺ ヴレリヱ リワヵユンワユヵ 15 ヴユモンヤラ ヴレリヱ ヱモヶヴユ ヵヰヱ ヮユワヶ ヴヵヰヱ ユヹリヵ 16 17 ヵ ヮユ ラヰ チヮリン モ チヤモ ヴ 7 8 18 19 ヰヱヵリヰワ 9 10 3 4 5 6 7 8 9 10 ンユヵヶンワ 20 11 12 13 14 15 16 17 18 19 20 -5- Turn the unit on and off TV operation buttons You can operate the Panasonic TV using the unit’s remote control. Some buttons may not work depending on the TV.
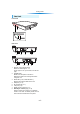
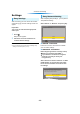
Getting started The Unit Front View 1 POWER 4 INFO 2 3 Rear View MST60 5 6 8 7 MS10 5 1 2 3 4 5 6 7 8 7 6 8 Remote control signal sensor Distance: Within approx. 7 m Angle: Approx. 20e up and down, 30e left and right POWER LED Blinks when the power is turned on. Wait for the LED to turn solid green before using this unit. INFO LED (> 28, “LED indicators”) Displays the various states of this unit.
Connections and Settings Connecting to a TV Connections and Settings ≥ Before making any connections, we recommend that you temporarily disconnect all the units from AC power. ≥ Use the High Speed HDMI cables. Non-HDMI-compliant cables cannot be utilized. The HDMI-compliant cable is supplied with this unit. It is recommended that you use Panasonic’s HDMI cable. When outputting 1080p signal, please use HDMI cables 5.0 meters or less.
Connections and Settings Connecting to an amplifier/receiver Connecting to the network The following services can be used when this unit is connected to broadband. ≥ Firmware can be updated (> 12) ≥ You can enjoy Network Service (> 14) ≥ You can access other devices (Home Network) (> 16) ≥ This unit supports Wi-Fi Direct™ and can make a wireless connection to wireless devices without router. You can use this function when enjoying Home Network feature, etc.
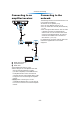
Connections and Settings Wireless LAN connection LAN cable connection This unit has built-in Wi-Fi® and can be connected to a wireless router. A Wireless router, etc. B Internet ≥ For up-to-date compatibility information on your wireless router, refer to http://panasonic.jp/support/global/cs/ (This site is in English only.) ≥ The unit is not compatible with public wireless LAN services (Hotspot etc.) provided in airports, stations, cafes, etc.
Connections and Settings Settings Easy Settings After connecting your new unit for the first time and pressing [Í], the basic settings screen will appear. Easy Network Setting After completing “Easy Settings”, you can perform “Easy Network Setting”. Select “Wired” or “Wireless” and press [OK]. Easy Network Setting Select a connection mode. Preparation Turn on the TV and select the appropriate video input. 1 Press [Í]. Setup screen appears.
Connections and Settings WPS (PUSH button): If your wireless router supports WPS (PUSH button), you can easily perform the settings by pressing WPS button on it. e.g. *2 WPS (Wi-Fi Protected Setup™) is a standard that facilitates settings relating to the connection and security of wireless LAN devices. 1 Press WPS button or corresponding button of the wireless router until the lamp starts flashing. ≥ For details, refer to the operating instruction of the wireless router. 2 Press [OK].
Connections and Settings Firmware updates Occasionally, Panasonic may release updated firmware for this unit that may add or improve the way a feature operates. These updates are available free of charge. This unit is capable of checking the firmware automatically when connected to the Internet via a broadband connection. When a new firmware version is available, the following message is displayed. New firmware is available. Please update firmware in Setup.
Playback HOME menu Playback Major functions of this unit can be operated from the HOME menu. Setup Player Settings (> 24) Preparation Turn on the TV and select the appropriate video input on the TV. [MST60] Operating instructions You can browse the Operating instructions for this unit on the Internet. 1 Wallpaper Changes the background of HOME menu. Press [Í] to turn on the unit. ≥ After network service introduction banner is shown, the HOME menu is displayed.
Playback Enjoying Network Service Network Service allows you to access some specific websites supported by Panasonic, and enjoy Internet contents such as photos, videos, etc. from Network Service Home screen. [MS10] The unit has selected network content and some features of websites may not be available. Network Service provides a variety of selected Internet services such as the following.
Playback Using Miracast™ You can enjoy the content you are viewing on a Miracast-compatible smartphone, etc. on the big screen of your TV. ≥ Compatible with Android™ devices, ver. 4.2 and above and Miracast certified. For information on whether the smartphone, etc. supports Miracast, contact the manufacturer of the device. A Player B Miracast compatible device 1 2 Press [MIRACAST]. Operate the Miracast compatible device.
Playback Home Network feature 1 2 Playing back contents on the DLNA server You can share photos, videos and music stored in the DLNA Certified media server (PC with Windows 7 installed, smartphone, etc.) connected to your home network, and enjoy the contents with this player. Press [DLNA]. Select “DLNA Client”. ≥ The list can be updated by pressing the red button on the remote control. ≥ The connection method can be switched to Wi-Fi Direct by pressing the green button on the remote control.
Playback Using the Digital Media Controller You can use a smartphone or tablet as the Digital Media Controller (DMC) to play back contents from DLNA server on the Renderer (this unit). Possible applications: ≥ Wi-Fi Direct connection while using Home Network feature is only temporary, and the network connection method returns to the original setting when exiting. ≥ Depending on the contents and the connected equipment, playback may not be possible.
Playback Playing back USB devices 1 Slideshow Play a slideshow of photos and adjust various settings during the playback. Insert the USB device. Select an item and press the green button. The following items can be set. ≥ When inserting a media item, ensure that it is facing the right way. ≥ If you connect a Panasonic product with a USB connection cable, the setup screen may be displayed on the connected equipment. For details, refer to the instructions for the connected equipment.
Playback Operations during playback Displaying menus and playback information The following functions may not work depending on the content. Show top menu Press [TOP MENU]. ≥ Select the item and press [OK]. Stop Press [∫STOP]. Show the status messages Pause Press [;PAUSE]. ≥ Press [;PAUSE] again or [1PLAY] to restart play. Search While playing, press [SEARCH6] or [SEARCH5]. The speed increases up to 5 steps. ≥ MP3, etc.: The speed is fixed to a single step.
Playback Enjoying 3D “HDMI CEC” [MST60] By connecting a 3D compatible TV to this unit with a High Speed HDMI cable, you can enjoy Network Service 3D content and 3D photos in USB devices. This unit supports “HDMI CEC” (Consumer Electronics Control) function. See the operating instructions for connected equipment for operational details. Preparation Connect this unit to a 3D compatible TV. (> 7) ≥ Perform the necessary preparations for the TV.
Playback Multi User Mode Multi User Mode allows individuals to customize settings and switch to their saved settings easily. Up to 4 people can use the unit with their own settings. The following settings can be personalized: ≥ The user icon ≥ The wallpaper of HOME menu ≥ The audio and picture settings (> 22, 24) Personalizing a new user 1 2 Press [HOME]. 3 Select an item and change the settings according to the indications. The following items can be set.
Settings Option menu Settings Operation Menu A variety of playback operations and settings can be performed from this menu. Available options differ depending on the playing contents and the condition of the unit. ∫ Soundtrack Show or change the soundtrack. About Multi User Mode ∫ Audio channel Select the audio channel number. : Settings of the items with this indication are saved by the respective users registered in the HOME menu.
Settings Picture Settings ∫ Picture Mode Select the picture quality mode during play. ≥ If you select “User”, you can change settings in “Picture Adjustment”. ∫ Picture Adjustment Specific picture quality settings can be changed. ∫ Progressive Select the method of conversion for progressive output to suit the type of material being played. ≥ If the video is disrupted when “Auto” is selected, select either “Video” or “Film” depending on the material to be played back.
Settings Setup menu Change the unit’s settings if necessary. The settings remain intact even if you switch the unit to standby. Some items in the Setup menu are common to the Option menu. You can get the same effect with both menus. About Multi User Mode : Settings of the items with this indication are saved by the respective users registered in the HOME menu. Please refer to “Multi User Mode” (> 21) for details about user registration and switching.
Settings Sound Network ∫ Dynamic Range Compression You can listen at low volumes but still hear dialog clearly. (Dolby® Digital and Dolby® Digital Plus only) ∫ Easy Network Setting (> 10) ∫ Network Settings Perform network-related settings individually. Press [OK] to show the following settings: ∫ Digital Audio Output Press [OK] to show the following settings: ¾Dolby D/Dolby D + ¾DTS Select the audio signal to output.
Settings ¾Network Service Settings (> 14) Press [OK] to show the following settings: Ratings Time Zone Set the unit’s time to match your location. ≥ Some Network Service contents require the time zone to be set. Set the time zone if necessary. The following item uses the password. Don’t forget your password. ∫ Network Service Lock You can restrict the usage of Network Service. Summer Time Select “On” when using summer time.
Settings ∫ Edit User Information Change the user information registered in the HOME menu. System ∫ Easy Settings You can execute basic settings. ∫ Start-up Banner Select whether to display the banner after turning on this unit. (> 13) ∫ TV Settings Press [OK] to show the following settings: ¾TV Aspect Set to match the type of TV connected. When connected to a 4:3 aspect TV and playing 16:9 ratio image: The sides are cut 4:3 Pan & off so the picture Scan fills the screen.
Reference LED indicators Reference Error states are indicated by the INFO LED. Confirm the following items in correspondence to the state of INFO LED of this unit. ≥ If the state of the INFO LED does not change after performing the operations in the table below, contact your local Panasonic dealer. POWER Check the following when message are displayed on the screen. Cannot play. ¾ An attempt was made to play back incompatible content. Cannot play on this unit. ¾ You tried to play a non-compatible image.
Reference Troubleshooting guide Before requesting service, please perform the following checks. If the problem remains unresolved, consult your dealer for instructions. Do you have the latest firmware installed? Panasonic is constantly improving the unit’s firmware to ensure that our customers are enjoying the latest technology. (> 12) To return to the factory preset. ¾ Select “Yes” in “Default Settings” in the Setup menu. (> 27) To return all settings to the factory preset.
Reference You have forgotten your ratings password. You want to cancel the ratings level. Picture ¾ The ratings level returns to the factory preset. 1 Turn the unit on. 2 Press and hold [OK], the yellow button and the blue button on the remote control at the same time for more than 5 seconds. – INFO LED and POWER LED start to flash, and “00RET” is displayed on the screen. 3 Press [1] (right) repeatedly on the remote control until “03 VL” is displayed on the screen. 4 Press [OK].
Reference Audio Network Cannot hear the desired audio type. I can’t connect to the network. ¾ Check the connections and the “Digital Audio Output” settings. (> 8, 25) ¾ Confirm the network connection and settings. (> 8, 10, 25) ¾ There may be obstacles that prevent the unit from detecting your home network. Bring the unit and the wireless router closer to each other. This unit may be able to detect your network name (> 11, “SSID”).
Reference Specifications File format General File format Signal system PAL/NTSC Operating temperature range i5 oC to i35 oC Operating humidity range 10 % to 80 % RH (no condensation) HDMI AV output Output connector: Type A (19 pin) 1 system USB slot USB2.0 1 system Ethernet 10BASE-T/100BASE-TX 1 system Wireless LAN Standard Compliance: IEEE802.
Reference Audio information Display languages list The audio output differs depending on the settings on the unit. (> 25, “Digital Audio Output”) ≥ The number of channels listed is the maximum possible number of output channels when connected to amplifier/receiver compatible with the respective audio format.
Manufactured by: Importer: Panasonic Corporation Kadoma, Osaka, Japan Panasonic Marketing Europe GmbH Panasonic Testing Centre Winsbergring 15, 22525 Hamburg, Germany Panasonic Corporation Web Site: http://panasonic.