
User Manual


Table Of Contents
- Finding the information you need
- How to use this manual
- Contents
- Contents by Function
- Before Use
- Preparations
- Basics
- Recording mode
- Taking pictures with automatic settings (Intelligent Auto Mode)
- Taking Pictures of Yourself [Self Shot]
- Taking pictures after automatically setting the aperture value and shutter speed (Programme AE Mode)
- Taking pictures by setting the aperture value and shutter speed
- Taking pictures by setting the aperture value (Aperture-Priority AE Mode)
- Taking pictures by setting the shutter speed (Shutter-Priority AE Mode)
- Taking pictures by setting the aperture value and shutter speed (Manual Exposure Mode)
- Checking the effects of the aperture value and shutter speed (Preview Mode)
- Easily set aperture / shutter speed for suitable exposure (One Push AE)
- Recording panorama pictures (Panorama Shot Mode)
- Taking pictures according to the scene (Scene Guide Mode)
- Taking Pictures with different picture effects (Creative Control Mode)
- Recording motion pictures by setting the aperture value/shutter speed (Creative Video Mode)
- Registering your own settings and recording (Custom Mode)
- Focus, Brightness (Exposure) and Colour tone Settings
- 4K Photo and Drive Settings
- Recording 4K Photos
- Selecting pictures from 4K burst file and saving
- Adjusting the focus after recording ([Post Focus]/[Focus Stacking])
- Selecting a Drive Mode
- Taking Pictures While Adjusting a Setting Automatically (Bracket Recording)
- Taking pictures automatically at set intervals [Time Lapse Shot]
- Creating stop motion animation [Stop Motion Animation]
- Stabiliser, Zoom and Flash
- Recording motion pictures
- Playing Back and Editing Pictures
- Using Menu Functions
- Wi-Fi
- What you can do with the Wi-Fi® function
- Wi-Fi Function
- Operating the camera by connecting it to a smartphone
- Installing the smartphone/tablet app “Panasonic Image App”
- Connecting to a smartphone
- Taking pictures via a smartphone (remote recording)
- Playing back pictures in the camera on a smartphone
- Saving pictures in the camera to a smartphone
- Sending pictures in the camera to social networking services
- Adding location information to pictures in the camera from a smartphone
- Combining motion pictures recorded with Snap Movie according to your preference on a smartphone
- Displaying still pictures on a TV
- Sending pictures
- Sending pictures to a smartphone
- Wireless printing
- Sending pictures to AV device
- Sending pictures to a PC
- Using WEB services
- Using “LUMIX CLUB”
- About connections
- [Wi-Fi Setup]
- Connecting with other devices
- Others
179
SQW0740
Using Menu Functions
Menu list
[Multi Exp.]
Recording mode:
You can create an effect similar to the operation of up to four times of exposure on a
single picture.
→ [Rec] → [Multi Exp.]
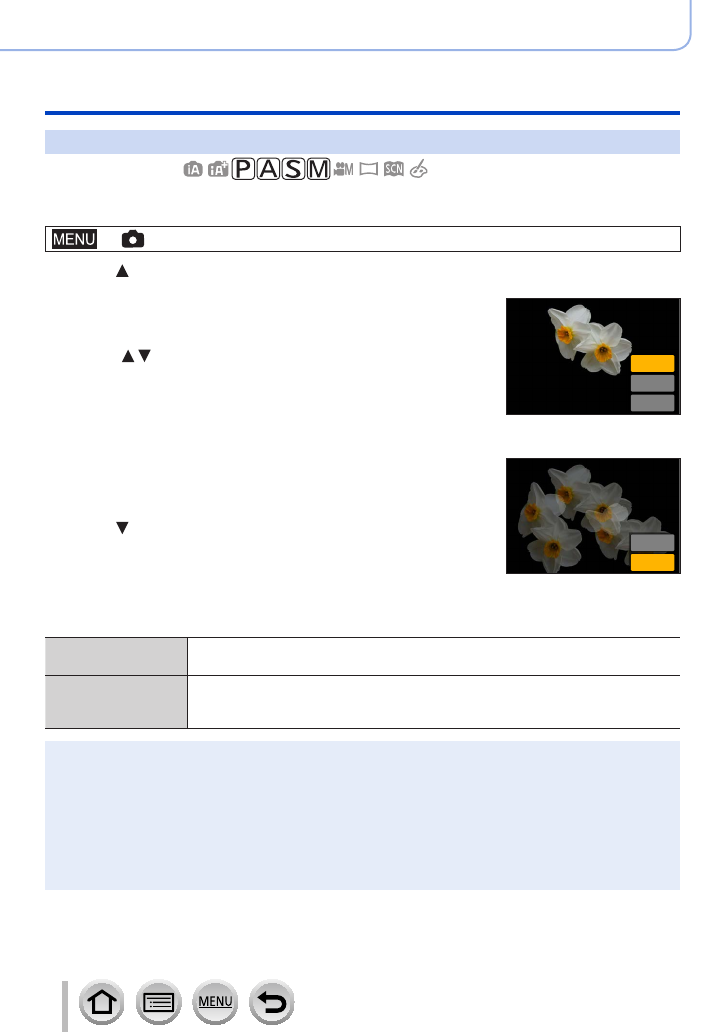
1
Press to select [Start] and press [MENU/SET]
2
Decide on your composition and take the first picture
• After recording the first picture, press the shutter button halfway
to proceed to the next recording.
• Press
to select the item and press [MENU/SET]. You can
perform the following operations.
– [Next]: Proceed to the next recording.
– [Retake]: Delete the result of the last shot and take another
picture.
– [Exit]: Exit Multi Exposure and save the picture that was taken.
Next
Retake
Exit
3
Record the second, third, and fourth pictures
• When you press [Fn1] button while taking pictures, the pictures
that you took are saved and Multi Exposure is closed.
Retake
Exit
4
Press to select [Exit] and press [MENU/SET]
• You can also end the operation by pressing the shutter button
halfway.
■
Changing the settings
[Auto Gain]
If you select [OFF], all exposure results are superimposed as they are.
Compensate the exposure as necessary, depending on the subject.
[Overlay]
If you select [ON], you can apply Multi Exposure to previously recorded
pictures. After [Start] is selected, pictures on the card will be displayed. Select
a RAW image, and press [MENU/SET] to proceed to recording.
●
Information for the picture taken last will be used as recording information of pictures taken using
Multi Exposure.
●
While [Multi Exp.] recording is being performed, you cannot set items displayed in grey on the
menu screen.
●
You can perform [Overlay] on RAW file pictures recorded using this camera only.
●
This function is not available in the following cases:
• In Self Shot Mode
• When using [Time Lapse Shot]
• When using [Stop Motion Animation]