
User's Manual Part 2


226
Osaifu-Keitai/ToruCa
You can obtain the ToruCa file from a scanning device
using the IC card function. By obtaining detailed
information, a ToruCa file becomes a ToruCa file
(details) which has more pieces of information.
p
For a ToruCa file (details), you can download up to 100
Kbytes per file, and for a ToruCa file before obtaining the
details, you can download up to 1 Kbyte per file.
1
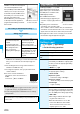
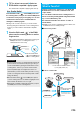
Place the FeliCa mark “ ” of the FOMA
phone over the scanning device.
Obtain ToruCa Files
Obtaining ToruCa Files
Obtain from Scanning Device
<>
■
When the ToruCa file is obtained
A ToruCa obtained tone sounds, the
Call/Charging indicator flickers.
p
When “Receiving display” is set to
“ON”, detailed display of obtained
ToruCa file appears.
p
For a ToruCa file before obtaining
detailed information, the
confirmation display appears asking
whether to connect to a site to download detailed
information. Select “YES” to display a ToruCa file (details)
with detailed information obtained. Select “NO” to display a
ToruCa file without detailed information.
p
If no keys are pressed for about 15 seconds or “Receiving
display” is set to “OFF”, “ ” appears on the desktop.
Press
Oo
, highlight , and press
Oo
( ); then
the ToruCa File List appears.
■
About Auto-reading Function of ToruCa
If you set “Auto reading” to “Accept” to use the ToruCa files
by placing the FOMA phone over the scanning device, the
available ToruCa files are automatically recognized. The
used ToruCa files are converted into “Used” and then moved
to the “Used ToruCa” folder. Up to 20 used ToruCa files are
saved, and when the number of the files exceeds 20, the
files are deleted from the one downloaded at the oldest date.
p
Even if “Auto reading” is set to “Reject”, the confirmation
display might appear asking whether to use “Auto reading”
when you place the FOMA phone over the scanning
device. To use ToruCa files, select “YES”, and then set
“Auto reading” to “Accept”.
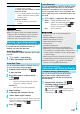
You can display the ToruCa file obtained using the IC
card function, or from sites or mail.
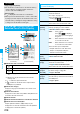
1
m
Osaifu-Keitai
ToruCa
Select a folder.
p
Each time you press
m
from
the ToruCa Folder List, you can
switch folders between the
FOMA phone and the microSD
memory card.
p
When the folder contains unread ToruCa files, “ ”
appears.
2
Select a ToruCa file.
Information
p
When you fail to obtain the ToruCa file, a ToruCa
failed-to-obtain tone sounds, Call/Charging indicator lights.
p
A ToruCa obtained tone and a ToruCa failed-to-obtain tone
sound at the volume set for “Phone” of “Ring volume”.
p
Depending on the settings by IPs (Information Providers),
you might not be able to update ToruCa files or send them
by mail or infrared data exchange.
ToruCa Viewer
Displaying ToruCa Files
<>
ToruCa Folder List
Detailed ToruCa File display
ToruCa File List
■
When obtaining detailed information from a ToruCa file
A ToruCa file before obtaining detailed information itself
does not show the detailed information. Select “
詳細
(Details)” on the ToruCa file display and select “YES” to
connect to the site to obtain more detailed information.
After obtaining the detailed information, the ToruCa file is
overwritten and saved.
Information
p
You are charged the ordinary packet fee for obtaining.
Function Menu of the ToruCa Folder List
Function menu
Operation/Explanation
Operate folder
(Add folder)
You can create a user folder. You can create
up to 20 folders.
Add folder
Enter a folder name.
p
You can enter up to 10 full-pitch/20
half-pitch characters for the FOMA phone.
p
You can enter up to 31 full-pitch/63 half-pitch
characters for the microSD memory card.