
User's Manual Part 2


143
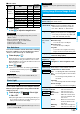
Camera
■
Inside camera
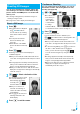
1
Finder display
Use
No
to adjust the magnification.
You can shoot with the outside camera after confirming
the focus conditions. You can use Autofocus, even if
“Focus” is set to “Close-up” or “Landscape”.
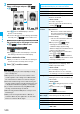
1
Finder display
Xo
When the subject is focused, a confirmation tone sounds,
then the frame becomes green and the focus is locked.
When the subject is not focused, the frame becomes red.
p
Press
r
to focus again.
2
Press
Oo
().
p
If “Focus” is set to “Auto”, the subject is automatically
focused on and shot when you press
Oo
() from
the Finder display.
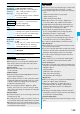
You can light the photo light as a spare light for when you
use the outside camera to shoot in a dark place.
In Photo
Mode, the photo light flashes strong at the instant the
shutter is pressed.
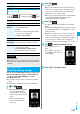
1
Finder display
i
()
Photo light
ON or OFF
p
The photo light returns to the flickering state when you
do not operate for about 30 seconds. Further, it goes off
when you show the Post View display.
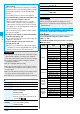
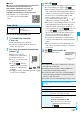
Camera
mode
Size
Level of
zoom
The maximum
magnifications
(Approx.)
Photo/
Continuous
VGA (640 x 480) 1 level 1.0 times
CIF (352 x 288) 11 levels 1.6 times
QVGA (240 x 320) 11 levels 1.5 times
QCIF (176 x 144) 31 levels 3.3 times
Sub-QCIF (128 x 96) 31 levels 5.0 times
Movie
VGA (640 x 480) 1 level 1.0 times
HVGA Wide (640 x 352) 1 level 1.0 times
QVGA (320 x 240) 21 levels 2.0 times
QCIF (176 x 144) 31 levels 3.3 times
Sub-QCIF (128 x 96) 31 levels 5.0 times
Information
p
The image quality may slightly change when you select
“Wide” or “Tele”.
p
“Tele” is released in the following cases:
・
When you press
-h
to end the camera
・
When a size is changed
・
When camera mode is switched
Use Autofocus
Information
p
If “Movie type set” is set to “Voice” in Movie Mode, you
cannot use Autofocus.
Photo Light
At Camera start-up OFF
Information
p
You cannot use the photo light when “Movie type set” is set
to “Voice” in Movie Mode.
p
You cannot use the photo light when the battery level shows
very low.
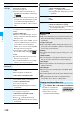
Setting Image Size and Image Quality
Function Menu of the Finder Display
Information
Function menu
Operation/Explanation
Inside camera/
Outside camera
You can switch between the inside camera
and outside camera.
CHG
camera-mode
Select a mode.
p
When you select “Continuous mode”, the
camera starts in the mode you used last
time, “Auto”, “Manual”, or “Auto bracket”.
Image size
Select an image size.
p
When you shoot a photo for sending during
a voice call, you can select only “QCIF (176
x 144)” and “Sub-QCIF (128 x 96)”.
File size setting
[Movie Mode
only]
Select an item.
Mail restrict’n (S)
. . . . You can shoot up to 500 Kbytes.
Mail restrict’n (L)
. . . . You can shoot up to 2 Mbytes.
Long time
. . . You can shoot for a long time. The moving
image is saved to the microSD memory card.
Image quality
You can set the image quality for saving.
Select an image quality.
Camera settings
(Brightness)
You can adjust to -3 (dark) through +3
(bright).
Brightness
Select a brightness level.
Camera settings
(White balance)
You can adjust the coloring of the image on the
Finder display to create a natural color tone.
White balance
Select an item.
Auto
. . . For adjusting white balance automatically
Fine
. . . For shooting outdoors in fine weather
Cloudy
. . . . . . . For shooting in cloudy weather or in
the shade
Light bulb
. . . . . . . For shooting under incandescent light
Fluorescent light
. . . . . . .For shooting under fluorescent lighting
Camera settings
(Color mode set)
Color mode set
Select a color mode.
Normal
. . . . . . . . . Shoots in normal color.
Sepia
. . . . . . . . . . Shoots in sepia color.
Monochrome
. . . Shoots in monochrome.
Vivid
. . . . . . . . . . Makes the contours vivid,
raises the saturation, and
then shoots.
Natural
. . . . . . . . . Makes the contours smooth,
downs the saturation, and
then shoots.
Whitening
. . . . . . Shoots faces in bright color.
Suntan
. . . . . . . . . Shoots faces in dark color.
At Camera start-up
±
0
At Camera start-up
Auto
At Camera start-up
Normal
ᵡᶍᶌᶒᶇᶌᶓᶃᶂ