
User's Manual Part 2


278
Data Display/Edit/Management
2
i
()
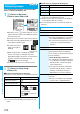
Edit the still image.
See page 278 to page 280 for how to operate.
3
Oo
()
YES or NO
YES
. . . Overwrites the image to save.
NO
. . . . Saves the image as a new still image.
The edited still image is saved.
p
To edit and save an edited still image on the microSD
memory card, press
Oo
( ) in step 3; then it is
saved to the “i-mode” folder anew.
p
Not to save the edited still image, press
r
or
h
;
then select “YES”.
p
See page 162 when images are stored to the maximum.
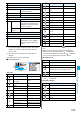
■
The size of still image you can edit
○
: Editing picture is enabled.
×
: Editing picture is disabled.
※
1 You cannot edit the still image smaller than 24 x 24 dots.
※
2 You cannot edit the still image of Chat Picture (80 x 80)
size or smaller.
p
You can edit the still images of 1920 x 1440 dots, 1616 x
1212 dots, 1632 x 1224 dots, and 1280 x 906 dots as well.
Edit menu
5M
3M
2M
VGA
CIF
QVGA
QCIF
Sub-QCIF
3.7M Wide
2M Wide
Stand-by
Other
sizes
smaller
than
VGA
Marker stamp
○○○○
Frame
○×○×
Character
stamp
○○○○
※1
Cushy mark
○○×○
Change size
○○○○
Trim away
○○○○
※2
Retouch
○○×○
Rotate
○○○○
Brightness
○○○○
Attach to mail
○○○○
Information
p
You can execute “Edit picture” only for the “File
unrestricted” files of still images shot by the cameras,
obtained by data communication, downloaded from sites, or
retrieved from i-mode mail.
p
You may not be able to execute “Edit picture” depending on
the still image.
p
If you repeat editing image such as pasting frames or
marker stamps to the shot still image, the image quality may
deteriorate or the file size may become larger.
p
You cannot edit some still images as you like.
p
If you change the size of a still image, some still images
cannot be allowed to edit picture.
p
If the battery runs out during editing, the edited contents are
discarded.
p
The file name, title, storage location, and acquired source of
the newly saved still image are as follows:
・
File name: “YYYYMMDDhhmmnnnn”
(Y: year, M: month, D: date, h: hour, m: minute, n: number)
・
Title: “YYYY/MM/DD hh:mm”
(Y: year, M: month, D: date, h: hour, m: minute)
・
Storage location: Folder the source file is saved to
(Still images on the microSD memory card are saved to
the “i-mode” folder.)
・
Acquired source: The same as the source file
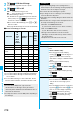
Function Menu of the Edit Picture Display
Information
Function menu
Operation/Explanation
Marker stamp
You can add the marker stamp in the “Stamp”
folder.
Select a marker stamp.
p
You can rotate the marker stamp by
pressing
i
( ) and selecting “90° to
right/90° to left/180°”. Select “Scale up/
Scale down” to enlarge or shrink the marker
stamp.
p
You can reselect a marker stamp by
pressing
l
().
Use
Mo
to position the marker stamp
and press
Oo
()
p
You can add a marker stamp by pressing
l
().
Oo
()
Frame
Select a frame
Oo
()
p
You can add the frame whose size is the
same as the size of the image you are
editing.
p
You can display the previous or next frame
by pressing
No
. Press and hold
No
for at
least one second to display sequentially.
p
You can rotate the frame by pressing
i
( ) and selecting “180° rotation”.
p
You can reselect a frame by pressing
l
().