
User's Manual Part 2


149
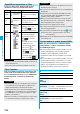
Camera
You can scan printed phone numbers, mail addresses
or alphanumeric characters such as URLs using the
outside camera, and store them as text information.
Use the text information to make calls, compose i-mode
mail, connect to the Internet, and so on.
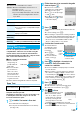
■
When scanning with Text Reader
p
Take the character
strings as large as
possible within the
guide frame.
p
Autofocus works when
you scan characters
about 10 cm or more
away from them. When
you scan characters in
the out-of-focus state, the
recognition rate lowers.
p
Scan the character string with the camera set in parallel.
You can store eight scanned data files of up to 256
half-pitch characters per item.
The number of characters you can scan at a time is up
to 50 half-pitch characters, and you can scan the
increased characters in parts.
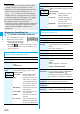
1
m
LifeKit
Text reader
Scan text
The Text Reader menu is displayed.
p
You can paste the Text Reader menu to the desktop.
(See page 114)
Information
p
The titles for the scanned data are as follows:
(Example) When the scanned data is saved at 10:00 on
November 15, 2007;
Title name: 20071115_1000_0000
・
If you store multiple data items for the same date
and time, the lower four-digit numbers increase
up to “9999”.
Function Menu of the Bar Code Reader List
Function menu
Operation/Explanation
Edit title
Enter a title.
p
You can enter up to 9 full-pitch/18 half-pitch
characters.
Result
You can bring up the Scanned Code Result
display for stored data.
Delete
(Delete this)
Delete this
YES
Delete
(Delete all)
Delete all
Enter your Terminal Security Code
YES
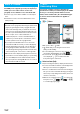
Text Reader
Using Text Reader
<>
Scan Text
At Text Reader start-up
Photo light: OFF
Zoom: Magnified view
Guide frame
2
Fit the characters to be scanned to the guide
frame and press
Xo
.
When the focus is locked, a
confirmation tone sounds and the
guide frame becomes green.
p
Press
m
to set the photo light
to “ON” or “OFF”.
p
Press
Co
to show the reduced
display, and press
Vo
to return
to the former display.
3
Press
Oo
().
The characters are scanned. (The shutter tone does not
sound.)
p
To cancel scanning, press
r
.
p
When scanning is completed, the scanning completion
tone sounds and the Call/Charging indicator lights. The
sound level is fixed and cannot be changed. However,
the tone does not sound in Manner Mode or while
“Phone” of “Ring volume” is set to “Silent”.
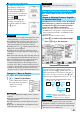
4
Confirm the scanned result.
The scanned characters
are underlined. Confirm
the scanned characters
for mistakes.
p
Press
r
to
restart scanning.
p
To store the characters
without correcting, go
to step 7.
5
Press
Mo
to highlight a character to be
corrected
Press the number of the
conversion candidate.
p
Conversion candidates are displayed up to four kinds
for each character.
p
When you want to correct the character to other than
the conversion candidate, highlight a character to be
corrected and press
l
( ), then enter a character
after switching to “Alphabet entry mode” or “Numeric entry
mode”. However you
cannot enter characters such as
“.ne.jp” or “.co.jp” by pressing
-a
.
6
Press
Oo
().
The scanned characters are set.
p
To link characters, repeat step 2 through step 6.
p
To release the set characters, press
r
.
7
i
()
Store
The scanned characters are stored.
p
When scanned text contains
“tel”, “@”, or “http://”, you can
execute Phone To or Web To
function by selecting the text.
(See page 163) You can select
only first item even if multiple items are found.
p
Press
l
( ) to overwrite the scanned characters
and activate Text Reader. Go to step 2.
Scanning Text display
Scanned Text
Confirmation display
Scanned
result
Conversion
candidate
Scanned Text Result
display
ᵡᶍᶌᶒᶇᶌᶓᶃᶂ