
Operator's Manual
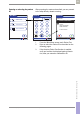
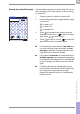

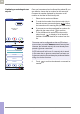
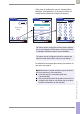
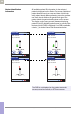
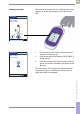
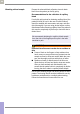
Table Of Contents
- What is new in publication version 7.2?
- 1 Introduction
- 1.1 Before you start
- 1.2 Important safety instructions and additional information
- Important information regarding safety
- Disposal of the system
- Product safety
- General care
- Accessory box
- Meter
- Power off meter
- Automatic power-off
- Shut down meter
- Automatic shutdown
- Battery Pack
- Touchscreen
- Electromagnetic compatibility (EMC)
- Electrostatic discharge (ESD)
- Wireless connectivity
- Radiofrequency radiation exposure information
- Local Area Network: protection from unauthorized access
- Wired network connection
- 1.3 System components
- 1.4 Overview of the meter
- 1.5 Overview of the code key reader
- 1.6 Overview of the Accu-Chek Inform II Base Unit
- 1.7 Overview of the Accu-Chek Inform II Base Unit Hub
- 1.8 Overview of the accessory box
- 1.9 Reagents and consumables
- 1.10 Instructions for initial setup
- 2 Powering Up and Entering an Operator ID
- 3 Patient Glucose Testing
- 3.1 Information regarding blood glucose testing
- 3.2 Performing a patient glucose test
- Overview of test procedure
- Entering or selecting the patient ID
- Entering the patient ID manually
- Selecting the patient ID from a list
- Entering a patient ID with barcode scanner
- Confirming or selecting the test strip lot
- Patient identification information
- Inserting test strips
- Obtaining a blood sample
- Applying a blood sample
- Results screen
- Adding comments
- Add barcode content to a result
- Additional Patient Test
- 4 Glucose Control Testing
- 5 Review Results
- 6 Storing Test Strip, Control Solution, and Linearity Solution Information in the Meter
- 7 Linearity Testing
- 8 Proficiency Testing
- 9 Initial Startup
- 9.1 Connecting the base unit
- 9.2 Installing or replacing the battery pack
- 9.3 Docking the meter
- 9.4 Initial setup on the meter
- 9.5 Opening the Setup Menu
- 9.6 Date and time format
- 9.7 Display options and optional tests
- 9.8 Options for test strips
- 9.9 Options for glucose control tests
- 9.10 Value ranges (normal, critical, reportable)
- 9.11 Options for Operator ID Entry
- 9.12 Patient ID options
- 9.13 Creating a setup password
- 9.14 Setting the date and time
- 9.15 Beeper options
- 10 Maintenance and Care
- 11 Troubleshooting
- 12 General Product Information
- A Appendix
- B Appendix
- C Supplement for Other Test Entry
- D Supplement for Observed Test Sequence
- E Supplement for Enhanced Workflows
- F Appendix for Accu-Chek Inform II Base Unit (legacy version)
- G Limited Warranty
- Index

Patient Glucose Testing • 3
57
08424705001 (04) 2021-06 USA • Accu-Chek Inform II Operator’s Manual Version 7.2
If the meter is configured to use the “Isolation Room
Workflow” (see Appendix A.1) the strip lot will be con-
firmed before a patient ID is entered or selected.
For additional information about storing lot numbers for
test strips, see page 87.
Patient Test
Use Strip Lot
12:48 pm
123456?
03/17/20
Strip Lots
344789
545794
545777
344654
12:48 pm
03/17/20
123
456
789
A-O0
Patient ID
12:48 pm
03/17/20
123456789
The meter can be configured so that manual confirma-
tion is not necessary. In this setup, only the lot number
is displayed. Additional options are not available.
The meter can be configured so that lot numbers are
entered via barcode scanner only (see note below).
Note: Barcodes on control solutions may not be availa-
ble in all countries. In this case either
■ manually enter the lot number each time
(recommended),
■ pick a previously entered lot number from the list, or
■ configure the meter to only display the lot number
(without confirmation by the operator).