
Operator's Manual
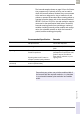


Table Of Contents
- What is new in publication version 7.2?
- 1 Introduction
- 1.1 Before you start
- 1.2 Important safety instructions and additional information
- Important information regarding safety
- Disposal of the system
- Product safety
- General care
- Accessory box
- Meter
- Power off meter
- Automatic power-off
- Shut down meter
- Automatic shutdown
- Battery Pack
- Touchscreen
- Electromagnetic compatibility (EMC)
- Electrostatic discharge (ESD)
- Wireless connectivity
- Radiofrequency radiation exposure information
- Local Area Network: protection from unauthorized access
- Wired network connection
- 1.3 System components
- 1.4 Overview of the meter
- 1.5 Overview of the code key reader
- 1.6 Overview of the Accu-Chek Inform II Base Unit
- 1.7 Overview of the Accu-Chek Inform II Base Unit Hub
- 1.8 Overview of the accessory box
- 1.9 Reagents and consumables
- 1.10 Instructions for initial setup
- 2 Powering Up and Entering an Operator ID
- 3 Patient Glucose Testing
- 3.1 Information regarding blood glucose testing
- 3.2 Performing a patient glucose test
- Overview of test procedure
- Entering or selecting the patient ID
- Entering the patient ID manually
- Selecting the patient ID from a list
- Entering a patient ID with barcode scanner
- Confirming or selecting the test strip lot
- Patient identification information
- Inserting test strips
- Obtaining a blood sample
- Applying a blood sample
- Results screen
- Adding comments
- Add barcode content to a result
- Additional Patient Test
- 4 Glucose Control Testing
- 5 Review Results
- 6 Storing Test Strip, Control Solution, and Linearity Solution Information in the Meter
- 7 Linearity Testing
- 8 Proficiency Testing
- 9 Initial Startup
- 9.1 Connecting the base unit
- 9.2 Installing or replacing the battery pack
- 9.3 Docking the meter
- 9.4 Initial setup on the meter
- 9.5 Opening the Setup Menu
- 9.6 Date and time format
- 9.7 Display options and optional tests
- 9.8 Options for test strips
- 9.9 Options for glucose control tests
- 9.10 Value ranges (normal, critical, reportable)
- 9.11 Options for Operator ID Entry
- 9.12 Patient ID options
- 9.13 Creating a setup password
- 9.14 Setting the date and time
- 9.15 Beeper options
- 10 Maintenance and Care
- 11 Troubleshooting
- 12 General Product Information
- A Appendix
- B Appendix
- C Supplement for Other Test Entry
- D Supplement for Observed Test Sequence
- E Supplement for Enhanced Workflows
- F Appendix for Accu-Chek Inform II Base Unit (legacy version)
- G Limited Warranty
- Index

Appendix • A
211
08424705001 (04) 2021-06 USA • Accu-Chek Inform II Operator’s Manual Version 7.2
The barcode samples shown on page 212 are for illustra-
tion purposes only. If printed out, they can be used to
check the barcode scanner. However, they are not meant
to be used as a reference for size or resolution of real
patient or operator ID barcodes. When creating patient or
operator barcodes always refer to the relevant standard
ISO/IEC 15416 and 15415 for size and resolution require-
ments and to the specification listed below. Successful
barcode scanning results from optimizing a number of
variables including barcode printer method and configu-
ration, the substrate material on which the barcode is
printed, and the resulting print quality.
Recommended Specification Remarks
Print resolution 300 dpi preferred
200 dpi minimum
At 200 dpi issues with the wide-to-
narrow ratio may exist.
Reflective contrast 70% or greater Matte finish is preferred over gloss
finish.
Symbol grade Grade C or above
Grade B is preferred
Symbol grades are A-F based on
analysis of several quality elements.
Depending on quality grade
parameters for a specific bar code,
grade C may not be sufficient
when motion, reflection, or poor
lighting occur.
Module width
(minimum)
0.16 mm (linear barcodes)
0.20 mm (2D barcodes)
Ensure that your printer can print the module width of
the barcode with the required resolution, i.e., that there
is no mismatch between print resolution and module
width.