
Operator's Manual


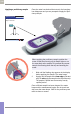
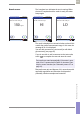

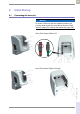
Table Of Contents
- What is new in publication version 7.2?
- 1 Introduction
- 1.1 Before you start
- 1.2 Important safety instructions and additional information
- Important information regarding safety
- Disposal of the system
- Product safety
- General care
- Accessory box
- Meter
- Power off meter
- Automatic power-off
- Shut down meter
- Automatic shutdown
- Battery Pack
- Touchscreen
- Electromagnetic compatibility (EMC)
- Electrostatic discharge (ESD)
- Wireless connectivity
- Radiofrequency radiation exposure information
- Local Area Network: protection from unauthorized access
- Wired network connection
- 1.3 System components
- 1.4 Overview of the meter
- 1.5 Overview of the code key reader
- 1.6 Overview of the Accu-Chek Inform II Base Unit
- 1.7 Overview of the Accu-Chek Inform II Base Unit Hub
- 1.8 Overview of the accessory box
- 1.9 Reagents and consumables
- 1.10 Instructions for initial setup
- 2 Powering Up and Entering an Operator ID
- 3 Patient Glucose Testing
- 3.1 Information regarding blood glucose testing
- 3.2 Performing a patient glucose test
- Overview of test procedure
- Entering or selecting the patient ID
- Entering the patient ID manually
- Selecting the patient ID from a list
- Entering a patient ID with barcode scanner
- Confirming or selecting the test strip lot
- Patient identification information
- Inserting test strips
- Obtaining a blood sample
- Applying a blood sample
- Results screen
- Adding comments
- Add barcode content to a result
- Additional Patient Test
- 4 Glucose Control Testing
- 5 Review Results
- 6 Storing Test Strip, Control Solution, and Linearity Solution Information in the Meter
- 7 Linearity Testing
- 8 Proficiency Testing
- 9 Initial Startup
- 9.1 Connecting the base unit
- 9.2 Installing or replacing the battery pack
- 9.3 Docking the meter
- 9.4 Initial setup on the meter
- 9.5 Opening the Setup Menu
- 9.6 Date and time format
- 9.7 Display options and optional tests
- 9.8 Options for test strips
- 9.9 Options for glucose control tests
- 9.10 Value ranges (normal, critical, reportable)
- 9.11 Options for Operator ID Entry
- 9.12 Patient ID options
- 9.13 Creating a setup password
- 9.14 Setting the date and time
- 9.15 Beeper options
- 10 Maintenance and Care
- 11 Troubleshooting
- 12 General Product Information
- A Appendix
- B Appendix
- C Supplement for Other Test Entry
- D Supplement for Observed Test Sequence
- E Supplement for Enhanced Workflows
- F Appendix for Accu-Chek Inform II Base Unit (legacy version)
- G Limited Warranty
- Index

Proficiency Testing • 8
117
08424705001 (04) 2021-06 USA • Accu-Chek Inform II Operator’s Manual Version 7.2
Results screen The hourglass icon indicates the test is running. When
the test is completed and the result is ready, the meter
beeps again.
The result is displayed as a numerical value, unless it falls
outside the system measurement range. In this case, the
message Hi or Lo is displayed.
You can add comments to a test result (as with blood
glucose tests) (see page 65).
If you do not wish to add a comment to the test results,
touch to complete the test and store the result.
Remove the test strip and dispose of it in accordance with
applicable regulations and directives for disposal of
potentially infectious samples and materials.
Proficiency Test
HI
Sample 123456789
Date 03/17/20 12:48 pm
12:48 pm
03/17/20
Proficiency Test
150
Sample 123456789
Date 03/17/20 12:48 pm
mg/dL
12:48 pm
03/17/20
Proficiency Test
LO
Sample 123456789
Date 03/17/20 12:48 pm
12:48 pm
03/17/20
Test results are saved automatically if the meter is pow-
ered off or if it powers itself off after 10 minutes of inac-
tivity/no screen touches (see “Automatic power-off” on
page 21).