REFRIGERATOR use & care Introduction.......................................................2 Automatic Water Dispenser..................... 22 Important Safety information.....................3 Storage Features .......................................... 23 Features .............................................................6 Saving Energy ............................................... 27 Installation .........................................................8 Filter Replacement ..................
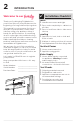
INTRODUCTION Welcome to our family Thank you for bringing Frigidaire into your home! We see your purchase as the beginning of a long relationship together. This manual is your resource for the use and care of your product. Please read it before using your appliance. Keep it handy for quick reference. If something doesn’t seem right, the troubleshooting section will help you with common issues.
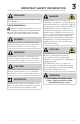
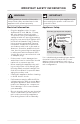
IMPORTANT SAFETY INFORMATION WARNING Please read all instructions before using this appliance. Safety Definitions This is the safety alert symbol. It is used to alert of potential personal injury hazards. Obey all safety messages that follow this symbol to avoid possible injury or death. DANGER DANGER indicates an imminently hazardous situation which, if not avoided, will result in death or serious injury. 3 DANGER DANGER Risk of fire or explosion. Flammable refrigerant used.
IMPORTANT SAFETY INFORMATION Child Safety Proper Disposal of your Appliance This appliance is not intended for use by persons (including children) with reduced physical, sensory or mental capabilities, or lack of experience and knowledge, unless they have been given supervision or instruction concerning use of the appliance by a person responsible for their safety.
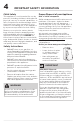
IMPORTANT SAFETY INFORMATION WARNING These guidelines must be followed to ensure that safety mechanisms in this appliance will operate properly. Electrical information • Plug the appliance into its own dedicated 115 Volt, 60 Hz., 15 Amp, AC only duplex electrical outlet. The power cord of the appliance is equipped with a 3-prong grounding plug for your protection against electrical shock hazards. Plug it directly into a properly grounded 3-prong receptacle.
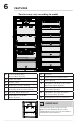
FEATURES *Features may vary according to model H I G I J K J I G I K N F L E J C J D J J M B M A A Lower Drawer with Removable Dividers B Slide-out Shelf C Water Filter D Appliance Control Display E H Air Filter I *Multi-Port Air Exhaust Ducts J LED Lighting K Adjustable Half Gallon Door Bins with Removable Dividers CrispSeal Plus Drawer with Auto Humidity and Produce Keeper™ L Adjustable Gallon Door Bin with Removable Divider F Internal Water Dispenser M G Adjusta
FEATURES 7 IMPORTANT Cleaning your Appliance Remove tape and glue residue from surfaces before turning on the appliance. Rub a small amount of liquid dish soap over any remaining adhesive with your fingers. Rinse with warm water and dry with a soft cloth. Do not use sharp instruments, rubbing alcohol, flammable fluids, or abrasive cleaners to remove tape or glue. These products can damage the surface of your appliance.
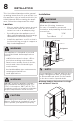
INSTALLATION This Use & Care Manual provides general operating instructions for your model. Use the appliance only as instructed in this Use & Care Manual. Before starting the appliance, follow these important first steps. Location • Choose a place that is near a grounded electrical outlet. Do Not use an extension cord or an adapter plug. • If possible, place the appliance out of direct sunlight and away from the range, dishwasher or other heat sources.
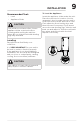
INSTALLATION Recommended Tools • Level • Appliance Slider CAUTION This unit does not have rollers. Use an appliance slider or protective floor covering while moving the unit into place. Do not slide the unit with leveling legs fully extended. To Level the Appliance: Insert the appliance slider under the unit. Place the unit into its location. Use the carpenter’s level to make sure the unit is level from front to back and side to side.
INSTALLATION Setting the anti-tip bracket: Freezer Hinge Adjustment Units are equipped with an anti-tip bracket. The anti-tip bracket is located on the lower front corner of the cabinet, on the lower hinge bracket. After fully leveling the unit, lower the anti-tip foot by turning it clockwise until is securely contacts the floor. Do not raise the cabinet.
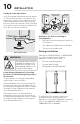
DOOR REVERSAL 11 Single Unit Door Swing Reversal: • Refrigerator: Right-hand to Left-hand Swing order TTDRRVFRKIT • Freezer: Left-hand to Right-hand Swing order TTDRRVFFKIT Order the kit on Frigidaire.com or by calling 1-800-374-4432 (Frigidaire.ca or 1-800-265-8352 in Canada). Right-hand Swing Left-hand Swing Dual Unit Door Reversal: • Moving the Refrigerator door to the Freezer also changes the left-hand swing to a right-hand swing.
DOOR REMOVAL Tools Necessary: PhillipsTM Head or #2 Square Drive Head or or Adjustable Wrench and Socket Wrench Set Flathead Screwdriver 8mm (M5x16mm) Hex head screw x3 or 5/16" (8mm) Fixed Wrench x2 Door removal: IMPORTANT Before you begin, remove the electrical power cord from the wall outlet. Remove any food from door bins. • Lift the door upwards and pull up and away from the cabinet until free of the bottom hinge pin mounted on the front of the cabinet.
DOOR REMOVAL If transporting your unit requires door removal, you must have a consistent 9 mm door gap around the perimeter of the cabinet to ensure proper gasket sealing to prevent frost in freezer. Measure the 9 mm gap from the metal of the cabinet to the metal on the door.
DOOR HANDLE INSTALLATION CAUTION Wear gloves and use extreme CAUTION when installing these handles. The rounded end of the handles may be sharp. Door Handle Mounting Instructions NOTE All set screws should be tightened and sub-flush (Allen set screw should be seated just below the surface of the end cap) of handle end cap. The end caps should be drawn tight to door with no gaps. 1. Remove handle and any protective packaging from inside the appliance. 2.
WATER SUPPLY CONNECTION (SOME MODELS) WARNING To avoid electric shock, which can cause death or severe personal injury, disconnect the unit from electrical power source before connecting a water supply line to the appliance. CAUTION Before Installing The Water Supply Line, You Will Need: • Basic Tools: adjustable wrench, flat-blade screwdriver, and PhillipsTM screwdriver • Access to a household cold water line with water pressure between 30 and 100 psi.
WATER SUPPLY CONNECTION (SOME MODELS) To Connect Water Supply Line To Water Inlet Valve 1. Disconnect the refrigerator from electrical power source. 2. Place the end of the water supply line into a sink or bucket. Turn ON the water supply and flush the supply line until the water is clear. Turn OFF the water supply at the shutoff valve. 3. B A C G F H Remove the plastic cap from the water valve inlet and discard the cap. 4.
WATER SUPPLY CONNECTION (SOME MODELS) 5. With the steel clamp and screw, secure the water supply line (copper tubing only) to the rear panel of refrigerator as shown. 6. Coil the excess water supply line (copper tubing only), about 2½ turns, behind refrigerator as shown and arrange coils so they do not vibrate or wear against any other surface. 7. Turn ON the water supply at shutoff valve and tighten any connections that leak. 8. Reconnect the appliance to electrical power source.
CONTROLS AND SETTINGS Cool Down Period To ensure safe food storage, allow the appliance to operate with the door closed for at least 8 hours before loading it with food. Power On Upon opening the door, the settings icon will illuminate on the control panel. By pressing the settings icon, you will illuminate all of the icons on the appliance control. After 10 seconds of no user interaction with the icons or door closure, all the icons will fade, except for the settings icon.
CONTROLS AND SETTINGS 19 Alarms 1 DOOR OPEN This alert indicates the door has been open for 5 minutes or more. The DOOR OPEN LED will illuminate and the audible alert will sound until the door is closed. The audible alert can be turned off by pressing the DOOR OPEN key or by closing the door. If the door is ajar for 5 minutes, the interior light will turn off. 2 POWER OUTAGE The POWER OUTAGE indicator light informs you there has been a power interruption. Reset the alarm by pressing POWER OUTAGE.
CONTROLS AND SETTINGS Sabbath Mode The Sabbath Mode is a feature that disables portions of the appliance and its controls in accordance with observance of the weekly Sabbath and religious holidays within the Orthodox Jewish community. To enter Sabbath Mode Simultaneously press and hold — and TEMP F/C for 5 seconds. Sb will appear on the appliance control display indicating that the unit is in Sabbath mode.
CONTROLS AND SETTINGS 21 To exit Sabbath Mode Simultaneously press and hold — and TEMP F/C for 5 seconds. The appliance control display will show all of the icons depending on your model. In the Sabbath mode, the HIGH TEMP alarm is active for health reasons. For example, if you leave the door ajar, the HIGH TEMP alarm is activated. The refrigerator will function normally once you close the door, without any violation of the Sabbath/ holidays.
AUTOMATIC WATER DISPENSER Your refrigerator might be equipped with an internal water dispenser mounted inside the cabinet, along the left-hand cabinet wall (varies by model). Before using the water dispenser for the first time or after changing the water filter, you must prime your water supply system. Priming the water supply system CAUTION For proper dispenser operation, the recommended water supply pressure should fall between 30 psi and 100 psi.
STORAGE FEATURES Full Width Cantilever Shelves 23 Slide-Out Shelf Multi-position adjustable glass shelves The slide-out shelf can hold many can be moved to any position for larger different containers and food types for or smaller packages. The shipping spacers your convenience. that stabilize the shelves for shipping may be removed and discarded. To Adjust The Shelves • Remove all food from the shelf. • Shelves are heavy. We recommend using 2 hands to install and remove the shelf.
STORAGE FEATURES CrispSeal® Crisper with Auto Humidity and PureAir Produce Keeper™ The CrispSeal Crisper with Auto Humidity keeps produce fresher longer, so you waste less food and save money. It blocks dry air by maintaining the perfect amount of moisture while removing excess moisture. The crisper drawer contains the PureAir Produce Keeper to ensure your produce stays fresher longer. For more information about your PureAir Produce Keeper, see FILTER REPLACEMENT.
STORAGE FEATURES Lower Drawer with Dividers The lower drawer with dividers works great for food that may need to be separated. The drawer can easily be used with the dividers or without by removing or adding the inserts. 25 We recommend opening and closing the lower drawer by grabbing the center of the handle. To remove the lower drawer: 1. Remove all items from the lower drawer. 2. We recommend using 2 hands to remove and install the lower drawer from slide rail supports.
STORAGE FEATURES Adjustable Door Bins with Dividers The adjustable door bins are specially designed to hold large containers or storage bags. Each bin type can be used only in the zone indicated below so the door can close correctly. Your unit has two 2-Liter Door Bins (A), a Gallon Door Bin (B), and two Tall Item Door Bins (C). The bins can be used easily with or without the dividers. Customize your unit to fit different sized items as your needs change with door bin dividers.
SAVING ENERGY 27 • Locate the appliance in the coolest part of the room, out of direct sunlight, and away from heating ducts or registers. Do not place the unit next to heatproducing appliances such as a range, oven, or dishwasher. If this is not possible, a section of cabinetry or an added layer of insulation between the two appliances will help the unit operate more efficiently. • Level appliance so that the door closes tightly.
FILTER REPLACEMENT PurePour™ Water Filter Keep safe, great-tasting water flowing with a PurePour water filter. Using a PurePour water filter: • • • Makes Safe Water Second Nature PurePour water filters are certified to reduce contaminates* and keep great-tasting water flowing for you and your family. Produces Purity You Can Trust Know for certain your PurePour water filter is a protector. Counterfeits and knockoffs put your refrigerator and health at risk.
FILTER REPLACEMENT 4. Push firmly until the cartridge snaps into place (you should hear a click as the cartridge engages the snap-in connector). 5. Press a drinking glass against the water dispenser while checking for any leaks at the filter housing. Any spurts and sputters that occur as the system purges air out of the dispenser system are normal. 6. After filling one glass of water, continue flushing the system for about 4 minutes. 7.
FILTER REPLACEMENT PureAir Produce Keeper™ Here are the product numbers to request when ordering: PureAir Produce Keeper™ PK-1™ FRPAPKRF™ . Installing the PureAir Produce Keeper: Your ethelene absorber holder is attached to the rear wall of the Upper Crisper Drawer. Remove it to install the PureAir Produce Keeper. 1. Fully extend the crisper for easy access. Grab the cover with your hand pulling until it releases from the crisper. 2. Remove the plastic wrapper.
CARE AND CLEANING 31 Protecting Your investment Vacation and Moving Tips Before cleaning your appliance, turn off power to your appliance by unpluging the power cord from the electrical outlet. Keeping your appliance clean maintains appearance and prevents odor build-up. Wipe up any spills immediately and clean the appliance at least twice a year. When cleaning, take the following precautions: Short Vacations: Leave the unit operating during vacations of less than 3 weeks.
CARE AND CLEANING Care & Cleaning Tips Part What To Use Tips and Precautions Interior & Door Liners • Soap and water • Baking soda and water Use 2 tbsp of baking soda in 1 qt of warm water. Be sure to wring excess water out of sponge or cloth before cleaning around controls, light bulb or any electrical part. Door Gaskets • Soap and water Wipe gaskets with a clean soft cloth. Drawers & Bins • Soap and water Use a soft cloth to clean drawer runners and tracks.
TROUBLESHOOTING 33 Let us help you troubleshoot your concern! This section will help you with common issues. If you need us, visit our website, chat with an agent, or call us. We may be able to help you avoid a service visit. If you do need service, we can get that started for you! 1-800-374-4432 (United States) Frigidaire.com CONCERN CAUSE 1-800-265-8352 (Canada) Frigidaire.ca SOLUTION APPLIANCE OPERATION Appliance does not run. Appliance temperature is warmer than preferred.
TROUBLESHOOTING CONCERN CAUSE SOLUTION APPLIANCE TEMPERATURES (cont’d) Temperature inside appliance is too warm. • Temperature control is set too warm. • Turn control to a colder setting. Allow several hours for temperature to stabilize. • Door is opened too frequently or too long. • Warm air enters the appliance every time the door is opened. Open door less often. • Door may not be seating properly.
TROUBLESHOOTING CONCERN CAUSE 35 SOLUTION WATER / MOISTURE / FROST INSIDE APPLIANCE Moisture forms • Weather is hot and • This is normal. on inside aphumid, which increaspliance walls. es internal rate of frost buildup. • Door is slightly open. • Door is kept open too long. ODOR IN APPLIANCE Odors in • Interior needs to appliance. be cleaned. • Foods with strong odors are in the appliance. • The air filter needs to be replaced. DOOR PROBLEMS Door will • Appliance is not level. It not close.
LIMITED WARRANTY Your appliance is covered by a one year limited warranty. For one year from your original date of purchase, Electrolux will pay all costs for repairing or replacing any parts of this appliance that prove to be defective in materials or workmanship when such appliance is installed, used and maintained in accordance with the provided instructions. Exclusions This warranty does not cover the following: 1.
welcome home Our home is your home. Visit us if you need help with any of these things: owner support accessories service registration (See your registration card for more information.) Frigidaire.com 1-800-374-4432 Frigidaire.