INSTALLATION AND PROGRAMMING MANUAL Rev.
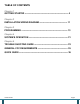
TABLE OF CONTENTS Chapter 1 GETTING STARTED -------------------------------------------------------------- 4 Chapter 2 INSTALLATION WIRING DIAGRAM ---------------------------------------- 11 Chapter 3 PROGRAMMING ------------------------------------------------------------------ 13 Chapter 4 SYSTEM’S OPERATION -------------------------------------------------------- 21 Chapter 5 TROUBLE SHOOTING GUIDE ------------------------------------------------ 23 GENERAL FCC REQUIREMENTS ------------------------------
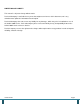
LIMITATIONS OF LIABILITY This manual is subject to change without notice. Pach and Company is not liable for any errors that might occur from use of this document, nor is any commitment to update the information herein implied. Pach and Company does not assume any liability for any damages, which may arise in installation or use of the AeGIS 7000P Series. Pach and Company does not assume liability for any incompatibility between the AeGIS 7000P Series and users devices.
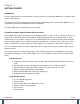
Chapter 1 GETTING STARTED Introduction Pach & Company thanks and congratulates you on the purchase of your AeGIS 7000P Series Telephone Entry Access Control Systems. The manual is designed to guide you through the proper programming and use of the AeGIS 7000P Series. It is important for you to read and follow the manual completely. The Aegis 7000P Series comes with two years warranty.
Technical Specifications o o o o o o o o o o o o o o Power Input: 12 VAC 40 VA (supplied) or 12 VDC 40VA UL Listed Transformer Current Consumption: 500mA idle, 700mA operation Emergency Battery: 12Vdc, 4Ahr rechargeable (not supplied) Telephone Line: Standard voice grade RJ11 jack. Night Light: 14V 0.080A 15,000 Average life hours. Operating Environment: Temp. 32°F to +140°F Relative Humidity 0% to 95% non-condensing. Heater Pad (AHP5) is required if the ambient temperature is below 32°F.
Limited Warranty Pach and Company new products are warranted to be free of defects in material or workmanship for a period of 24 month from the date of purchase. This warranty extends only to wholesale customers who buy direct from Pach and Company or through Pach and Company’s normal distribution channels. Pach and Company does not warrant this product in any way to the end user consumer.
There are no obligations and/or liabilities on the part of Pach and Company for consequential damages arising out of or in connection with use or performance of Pach and Company products or other indirect damages with respect to loss of property, revenue, or profit, or cost of removal, installation, or reinstallation. Any use or change to Pach and Company products not expressly approved by the manufacturer, and performed by an authorized dealer/installer will immediately void the warranty.
o o o o o o o o o o The products must be properly installed as specified; and maintained or used as intended Cause of product failure is not due to vandalism or malicious mischief, improper installation, abnormal physical or electrical stress, lightning, power surges, misuse, negligence, accidents, or Natural disasters Warranty is immediately null and void if the product has been altered, repaired, or modified without express written authorization from Pach and Company Technical Department, with such au
o o o o o o Pach and Company reserves the right to replace a warranted product with a like product of equal value in the event original system cannot be repaired. Distributors and/or Dealer-Installer must first obtain a Return Merchandise Authorization (RMA) number from Pach and Company Technical Department before returning any product to factory for repair, whether under warranty or not. No returns accepted without RMA.
o o insurance fees, for products shipped to Pach and Company repair center. Pach and Company warranty does not guarantee any product, new or repaired, to be free of operation error or service interruption in any way during the course of daily product operation.
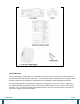
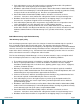
Chapter 2 INSTALLATION WIRING DIAGRAM Figure 2.
1. Turn the “Power” On, the display will go into cycle mode as show LCD DISPLAY OK FLASH OK DTMF OK INIT START COMPLETE . . . Welcome to Pach’s WARNING: IF THE DISPLAY SHOWS BLANK SCREEN, TURN THE SYSTEM IMMEDIATELY 2. Check for the tone on the keypad buttons 0-9, # and * 3. Clear the memory. REFER TO FUNCTION CODE 50 TO CLEAR SYSTEM’S MEMORY 4. Adjust the speaker volume, press # wait for dial tone, clockwise-decrease, counter clockwise-increase refer to figure 2.1 5.
Chapter 3 PROGRAMMMING I. Two ways to Log-on to programming mode: First using system’s keypad 1. Press 0 and # simultaneously then release, see below Press 0# simultaneously, LCD screen will stop scrolling if the LCD is still scrolling repeat the process then 4-digit Master Code (0000 is default master code) 2.
II. Keypad Function and Layout III. Programming Function Codes FUNCTION CODE 00 MASTER CODE (0000 is default) Change the master code for your security PROGRAMMING Must be in programming mode, see Two ways to Log-on to programming mode: on page 13 1. Enter function code 00 then press # MASTER CODE: 0000 2. Enter new 4-digit master code then press # 01 ADDING NEW TENANT DIRECTORY Each tenant must have unique directory. Directory can be set 2-4 digit.
Enter the Name NOTE: DIRECTORY MUST BE UNIQUE FOR EACH TENANT OTHERWISE THE DISPLAY WILL SHOW DIR # is used ! WARNING: IF THE DIRECTORY IS USED TO PROGRAM THE 4‐DIGIT ACCESS CODE OR TELEPHONE NUMBER WITHOUT NAME, THEN YOU MUST KNOW THE DIRECTORY CODE TO DELETE THE 4‐DIGIT ACCESS CODE OR PHONE NUMBER. IF THE DIRECTORY IS FORGOTTEN, YOU MUST ERASE THE SYSTEM TO FACTORY DEFAULT. _____________ 3. Enter the person name up to 16-characters.
5. Enter 4-digit access code then press #. Repeat step 1 to edit another tenant directory. 03 DELETING A DIRECTORY NOTE: IF DIRECTORY DOES NOT EXIST, THE DISPLAY WILL SHOW Must be in programming mode, see Two ways to Log-on to programming mode: on page 13 1. Enter function code 03 then press # Delete Dir: _ _ _ Error on Delete ! 2. Enter directory number to be deleted (i.e.
press # Wait ….. WARNING: CHANGING THE DIRECTORY DIGIT WILL ERASE ALL TENANT DIRECTORY 07 SINGLE OR MULTI SYSTEM 1= Single 0= Multi Default is single NOTE: SET TO MULTI IF MORE THAN ONE SYSTEM SHARING ONE PHONE LINE Must be in programming mode, see Two ways to Log-on to programming mode: on page 13 1. Enter function code 07 then press # SING=1, MULT=0: 1 2.
MC_MASK 1=YES:0 2. Select 0=Unmask or 1=Mask then press # WARNING: MASKING THE MASTER CODE WILL DISABLE THE RETRIEVAL BUTTON. THERE ISN’T A WAY TO RECOVER THE MASTER CODE. PACH AND COMPANY WILL NOT COVER THE WARRANTY IF THE MASTER CODE HAS BEEN FORGOTTEN. IF YOU ARE THE INSTALLER DO NOT MASK THE MASTER CODE. 46 FIRMWARE VERSION Must be in programming mode, see Two ways to Log-on to programming mode: on page 13 1.
TALK TIME:060 2. Press 010-180 then press # 71 DOOR OPEN TIME 04-99 Seconds Default is 12 seconds Must be in programming mode, see Two ways to Log-on to programming mode: on page 13 1. Enter function code 71 then press # DOOR OPEN:12 2. Press 04-99 then press # 72 LOCK OUT COUNT 1-9 Times Default is 3 times Must be in programming mode, see Two ways to Log-on to programming mode: on page 13 1.
UnlockBeep (1,0) 1 2. Press 1= enable or 0= disable then press # 77 PBX 0= disable 1= enable Default is disable Must be in programming mode, see Two ways to Log-on to programming mode: on page 13 1. Enter function code 77 then press # PBX_EN(1,0):0 2. Press 1= enable or 0= disable then press #, if 1 is selected, the screen will show: PBX _No(0‐9): _ 3. Select the number for the PBX to access an outside line, typically is 9, Delay(1‐5S): 4.
Chapter 4 SYSTEM’S OPERATION A. How to view tenant’s directory B. How to initiate a call from the system 1. Press (scroll A-Z) or 2. Press (scroll Z-A) Two ways to initiate a call 1. By scrolling (see A, press 3 or 6 to scroll) then press # to call 2. By directory, press # (wait for dial tone) then press the tenant’s directory number. NOTE: VISITOR MUST KNOW THE TENANT’S DIRECTORY NUMBER C. How to release the door remotely 1. Establish a communication 2. Tenant must press 9 to release the door.
G. How to use the 4-digit access code to open the door 1. Press , the welcome screen will stop scrolling otherwise repeat this step. 2. Press 4-digit valid access code. WARNING: SYSTEM WILL BE DISABLED FOR 90 SECONDS IF INVALID ACCESS CODE HAS BEEN ENTERED ACCORDING TO THE SETTING OF LOCK‐OUT COUNT (FUNCTION CODE 72, p19) H. How to increase or decrease the display’s intensity I. How to increase or decrease the speaker’s volume J. How to check the total tenant’s directory in the system K.
Chapter 5 TROUBLE SHOOTING GUIDE AUDIO PROBLEMS No audio on key(s) press 1. Turn the system’s power off and on 2. Check the speaker and microphone connection, check for broken wires. 3. Disconnect the microphone and speaker connector then check the speaker’s impedance, must read between 18-24 ohms No dial tone 1. Turn the system’s power off and on 2. Check the phone line for dial tone. Must check at the end of the phone cord. 3.
1. Turn the system’s power off and on 2. Check the phone line for dial tone. Must check at the end of the phone cord. 3. Disconnect the microphone and speaker connector then check the speaker’s impedance, must read between 18-24 ohms 4. Check the telephone line voltage, standard analog line voltage is 48-52 Vdc. 1. Press # for dial tone if no dial tone; check the telephone line using a standard phone. Must check at the end of the phone cord. 2. Press #, make sure the dial-tone has no static. 3.
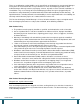
This equipment complies with Part 68 of the FCC rules. Located on the back of your AeGIS system is a label that contains, among other information, the FCC registration and ringer equivalence number (REN) for the system. Prior to installing your AeGIS system, please call your telephone company and provide them the FCC registration and REN numbers as well as the telephone number of the line to which you will connect the system.
AeGIS 7000P Page 26