
Owner's Manual
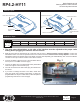
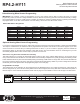
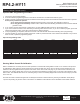
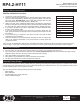
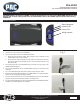
Table Of Contents

Radio Replacement &
Steering Wheel Control Interface
for Select Hyundai Vehicles
RP4.2-HY11
© 2018 AAMP Global. All rights reserved. PAC is a Power Brand of AAMP Global.
PAC-audio.com
Pacific Accessory Corporation
Page 2
Rev: 2
Date: 092118
PIN 14
PIN 6
1. The radio select dipswitches on the side of the interface must be adjusted to the proper radio
setting before plugging the interface into the vehicle.
2. Make all connections as described in the connection chart on page 1. Vehicles without a factory amplier: Connect the
aftermarket radio’s front and rear speaker wires to the vehicle connector. Vehicles with a factory amplier: Connect the
aftermarket radio’s front speaker wires to the SPDIF converter (sold separately, part # RPA-SPDIF), then connect the SPDIF
converter to the 6-pin connector located on the RP4.2 harness.
3. Connect the White / Red wire to pin 6 and the White / Black
wire to pin 14 in the OBDII connector (Fig.1)
4. Connect the SWC wire to the aftermarket radio (aftermarket
radio must support a wired remote input).
5. Once all connections have been made, plug the interface into
the vehicle.
6. If you wish to reassign functions to the SWC, utilize short
press long press dual command functionality, or assign the
programmable 12v output to a SWC button, follow the optional
programming instructions on the next page.
Installation Steps
Module Layout
Module Status LED
Programmable
Output/USB Status
LED
Interface Connector 1
Expansion
Port
Interface Connector 2
Programming
Button
USB Port
Radio Select Dipswitches
Fig. 1
DIP
1 2 3 4
ON
Alpine JVC Kenwood Clarion Pioneer/Other Sony Fusion
1 2 1 and 2 3 1, 2, and 3 4 1 and 4
SET RADIO DIPSWITCHES TO THE ON POSITION
Other = Advent, BOYO, Dual, Lightning Audio, Rockford Fosgate, Visteon