
Installation Manual

BX-SVN-JAYOSAH001-1A-EN 3
Installer's Guide
VERTICAL RETURN DUCT APPLICATION
In this application the return duct cover supplied with the
unit should be discarded. The vertical return air opening
in the unit should be uncovered.
1. Set the unit in place on optional roofcurb or other
support. Install duct per instruction provided with
unit.
2. Install provided 1/8” gasket on mating flanges of
manual outside air panel.
3. Install the manual outside air panel over the
horizontal return opening in the unit. See Figure 2.
4. Screw panel to unit through pre-punched holes in
panel and unit using (4) #10 self-drilling screws
provided.
5. Install provided 1/8” thick gasket on 3 perimeter
mating flanges on hood.
6. Set hood over screen in panel, align holes and
screws hood to panel using provided #10 selfdrilling
screws. See Figure 2.
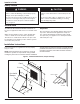
7. Set damper position in hood using spring latch to
meet outside air requirements. See Figure 1.
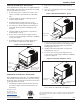
Figure 2. Vertical installation
Panel
with Screen
Filter access panel
(For unit mounted
filter accessory)
Hood with
Damper
Roofcurb
HORIZONTAL RETURN DUCT APPLICATION
In this application the return duct cover supplied with the
unit should be installed on the base of the unit covering
the bottom return opening. The horizontal return air duct
opening should be uncovered.
1. Install field provided horizontal return air duct onto
the unit. See Figure 3. Follow unit instructions for
duct sizing.
2. Snip out the screen from the manual outside air
panel.
3. Cut a 7” x 7” opening in the side of the field provided
duct. See Figure 3.
Figure 3. Horizontal installation - Cutout
7” x 7” cutout
in return duct
Field pro
vided
retur
n duct
Screen trimmed from
manual outside air panel
4. Screw the screen from step 2 over the 7” x 7” cutout
in return duct with provided #10 self-drilling screws.
Install provided 1/8” thick gasket on 3 perimeter
mating flanges on hood.
5. Install provided 1/8” thick gasket on 3 perimeter
mating flanges on hood.
6. Set hood over screen in panel, align holes and
screws hood to panel using provided #10 selfdrilling
screws. See Figure 4.
Figure 4. Horizontal installation - Hood
Screen cutout
Field pro
vided
retur
n duct
Manual outside
air hood
7. Set damper position in hood using spring latch to
meet outside air requirements. See Figure 1.
TwentyThreeC, LLC
800 Beaty Street,
Davidson, NC 28036
www.oxboxhvac.com
For more information contact
your local dealer (distributor).
Since the manufacturer has a policy of continuous product and product data
improvement, it reserves the right to change the design and specification
without notice.
© 2019 TwentyThreeC, LLC 03/19