
Install Instructions
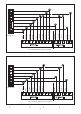
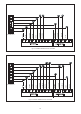


24
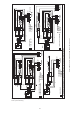
TXV-Replace Steps
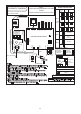
TXV Replacement Information for J4AH6E61A1C00AA
NOTE:
1、The TXV replacement options noted in this sheet supersede those in the installation guide. Please
reference this sheet for all refrigerant metering options.
Step 1: Remove the screws and front coil panel.
Step 2: Remove the rubber plugs from the liquid and vapor lines
Step 3: Unwrap copper strap on sensing bulb and dismount the sensing bulb
Step 4: Using a backup wrench to loose the nut of TXV
Step 5: Take off TXV mounting clip ring.
Step 6: Use wet rag to protect pipe in coil,Al-Copper transition section(The black section of vapor line)
Step 7: Braze and take off two pipes from TXV, Be extra care not to overheat the pipes
Step 8: Wrap the new TXV with a wet rag to prevent overheating. connect and braze pipe to new TXV.While
brazing,
use nitrogen flow and braze all connections
Step 9: Replace a new sealing ring to the pipe joint, connect the TXV with pipe joint and tight the nut to 22 (±2)
ft-lb .
Step 10: Allow tube to cool and pressurize line sets with 150 PSI of nitrogen to check braze connections for
leaks Make repairs if needed.
Step 11: Use the supplied copper straps to secure the TXV sensing bulb on top of the vapor line as pictured.
Step 12: Use clip ring to hold TXV on mounting plate.
Step 13: Insulate the entire vapor line and sensing bulb.It is also recommended to insulate the TXV and liquid
line to prevent condensation in hot humid environments.
Step 14: Replace the front coil pance and secure in place
Step 15: Follow the steps in the installation guide for vacuum requirements and system start up procedures.
Step 16: Allow system to run for an additional 10 minutes to verify the subcooling and superheat readings.
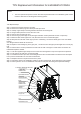
VAPOR LINE
CONNECTION
LIQUID LINE
CONNECTION
MOUNTING PLATE
COPPER STRAPS
EQUALIZATION PIPE
TIGHTEN TORQUE
22 (±2) ft-lb
TXV
BULB
Al-COPPER TRANSITION SECTION
SENSOR T2
SLEEVE