
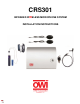
Instruction Manual


8
19. Microphone A control – Main Volume for the microphone A
20. IR SENSOR JACKS – Three, 3.5mm mini jacks connect to the CRS-IRS IR Sensors for input of IR pulses
(audio signals) from the Headset, Lapel, Pendant or Handheld Microphones. Use any two of the three inputs
with the included IR Sensors
21. Microphone B control - Main Volume for the microphone B
22. WIRE ACCESS – Space in the CRS-301-CASE cabinet allows connection to an external audio source and two
wired microphones, with the door closed.
23. Power switch and power transformer input – One power supply to power the CRS-301.
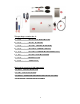
Figure 7. CRS-IRS IR Sensor Figure 8. CRS-PMIC Pendant Mic/Charger
CRS-IRS IR SENSOR FEATURES
24. MINI PLUG – One, 3.5mm mini plug connects to one of the three IR Sensor Jacks on the CRS-301-CASE Side
Panel.
25. CABLE – 50’ cable allows the IR Sensors to be positioned away from the CRS-301-CASE for optimum coverage
for reception of IR pulses from the CRS IR Microphones.
26. ON LED – One, LED illuminates green to indicate that the CRS System is ON and the IR Sensors are connected
and active.
27. IR SENSOR – Senses the IR pulses output from the CRS IR Microphones. Must be positioned to have clear
‘line-of-sight’ to the classroom and any location that the CRS Microphones may be used. The IR Sensor
senses IR in an omni-directional pattern (140° off-axis) and will also sense IR reflected off the ceiling, wall and
hard floor surfaces. It has a range of 66 feet. INPUT – One,
CRS-PMIC PENDANT MIC/CHARGER FEATURES
The CRS-PMIC Pendant Microphone can be used as a wireless microphone itself or as an IR Transmitter when used
with the Lapel or Headset Mics.
27. MIC INPUT – One, 3.5mm mini jack connects to the mini plug on either the CRS Lapel Mic or Headset Mic. When
either is connected to this jack, it overrides the Pendant Microphone, so only the Lapel Mic or Headset Mic will be
active.
28. CLIP – Clips the Pendant Mic on to the included lanyard or a coat or shirt pocket for use as a hands free
microphone.
29. BATTERY DOOR – Removable battery door for access to the AA re-chargeable Lithium battery. A regular alkaline
battery can be used if necessary, but will not last as long as the Lithium (approx. 4 hours).
NOTE: THE PENDANT IS ALSO A CHARGER. DO NOT CONNECT THE CHARGER POWER SUPPLY WHEN USING
NON-RECHARGEABLE BATTERIES!
30. IR OUTPUT ARRAY – High output IR LED’s output audio as infrared pulses in an omni-directional pattern that are
received by the CRS-IRS IR Sensors. The IR Sensors output electrical DC pulses to the CRS-301-CASE which
converts them back to audio signals, amplifies them and outputs the audio to the Speakers.
31. MICROPHONE – The Pendant Microphone is located at the top of the Pendant.
32. ON LED – One LED illuminates green to indicate that the microphone is ON.
33. ON/OFF SWITCH – Turns the Pendant ON/OFF.
34. 6V DC IN – One 3.5mm mini jack connects to the included CRS-PENCH Charger Power Supply for re-charging the
Lithium battery. (Charging Time: 3 Hours).
NOTE: THE PENDANT IS ALSO A CHARGER. DO NOT CONNECT THE CHARGER POWER SUPPLY
WHEN USING NON-RECHARGEABLE BATTERIES!