
Installation manual


4 Assembly
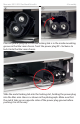
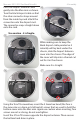
Turn the Mac mini back around so you are looking from the rear ports.
Line up the SATA connectors so that they are not going to interfere with
the logic board and then gently slide the logic board back into the Mac
mini chassis. When you hit the plastic retainer clips on the port fence,
you may want to be certain that you have equal pressure as one side
may pop into position before the other - it’s easier if you get the board
in straight the rst time. Reconnect the IR board cable and both SATA
connectors - upper and lower drives.
⑩
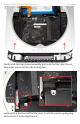
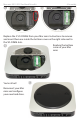
Place the top hard drive into the Mac mini chassis.
Note: The two screw pins on the drive must t in holes on the internal
side wall of the housing. Maneuver the drive until the pins secure to the
holes in the housing.
Wiggling the drive with the Torx T8 screwdriver inserted into one of the
drive’s screw holes may be helpful. The drive should not move sideways
once secure.
⑨
Mac mini 2011-2012 2nd Hard Drive Kit