Mac mini 2011-2012 2nd Hard Drive Installation Manual
Mac mini 2011-2012 2nd Hard Drive Kit 1 INTRODUCTION 1.1 STATIC PRECAUTIONS 1.2 KIT CONTENTS 2 DISASSEMBLY 3 DRIVE CARRIER ASSEMBLY 4 ASSEMBLY 5 FAQ 5.1 FAQ 6 CUSTOMER SERVICE 6.1 Before Contacting Customer Service 6.
Mac mini 2011-2012 2nd Hard Drive Kit 1 Introduction 1 INTRODUCTION Thank you for purchasing the Mac mini 2011-2012 2nd Hard Drive Installation Kit from OWC. We’re confident that it will provide years of high-performance service for your storage and backup needs. This guide will demonstrate how to disassemble your Mac mini and install a second hard drive into it.
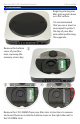
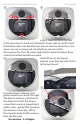
2 Disassembly Mac mini 2011-2012 2nd Hard Drive Kit 2 DISASSEMBLY ① Begin by placing your Mac mini upside down on a flat surface. It is recommended that you use a towel or mousepad to protect the top of your Mac mini while performing this upgrade. Remove the bottom cover of your Mac mini, exposing the memory access bay. ③ ② ④ Remove the 2 SO-DIMMs from your Mac mini. Instructions to remove and insert them are inside the bottom cover on the right side next to the SO-DIMM slots.
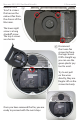
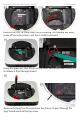
Mac mini 2011-2012 2nd Hard Drive Kit 2 Disassembly Remove the 3 ⑤ Torx T-6 screws that secure the exhaust fan from the chassis of the Mac mini. The lower right screw is a long standoff screw. The top 2 screws are shorter. ⑥ Disconnect the 4 wire fan connector from the logic board. It lifts straight up, you can use the green plastic pry tool to assist. Try to not pull on the wires directly, they are fragile. Lift on the connector body.
Mac mini 2011-2012 2nd Hard Drive Kit ⑧ ⑨ 2 Disassembly Using the Torx T8 screwdriver, remove the 3 2mm hex head (the Torx is the same size as a 2mm or 5/64 hex bit) screws that are used to hold the bottom cover onto the Mac mini. Do not exert too much force, Torx drivers are not as strong and can strip if you are not careful. Also remove the 2 Torx T8 screws opposite the Airport antenna. These secure the bottom hard drive in place.
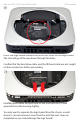
Mac mini 2011-2012 2nd Hard Drive Kit ⑬ ⤹ ⑫ 2 Disassembly Remove the Torx T6 screw from the fan cowling. The cowling will easily come off once the screw is out. Set it aside to proceed. ⑭ ⑮ Using the green pry tool, lift up on the lower hard drive cable connector to release it from the logic board. ⑯ ⑰ Remove the long Torx T6 screw from the chassis. It goes through the logic board and into the top cover.
Mac mini 2011-2012 2nd Hard Drive Kit ⑱ 2 Disassembly Disconnect the IR board cable by lifting up on the connector body from behind using the green pry tool. Be extremely careful as VST connectors are very fragile. Do not get UNDER the connector on the logic board, you want to lift the body of the connector itself. Lift on the body only, do not pull on the wires. NOTE: The 2012 Mac mini has less clearance between the hard drive and the logic board.
Mac mini 2011-2012 2nd Hard Drive Kit ⑳ 2 Disassembly Insert the logic board removal tool into the 2 holes on the logic board. The tool will go all the way down through the holes. Confirm that the hard drive cable, and the IR Board cable are not caught on their connectors before proceeding. ㉑ ➥ ➦ Carefully push down and pull back on the tool until the I/O wall separates from the housing slightly.
Mac mini 2011-2012 2nd Hard Drive Kit ㉒ 2 Disassembly Looking from the front of the Mac mini, locate the power supply plug and disconnect it from the logic board. You can either use the green pry tool or your fingernails to unplug the connector, do not pull on the wires. ㉓ Slide the logic board out of the chassis carefully. Keep it as flat as possible to avoid interference with the memory slots.
Mac mini 2011-2012 2nd Hard Drive Kit ㉔ 2 Disassembly Once you have removed the logic board, the chassis will be exposed. ㉕ Remove the 2 Torx T6 screws that secure the hard drive carrier and power supply into the chassis.
Mac mini 2011-2012 2nd Hard Drive Kit ㉖ 2 Disassembly Remove the upper hard drive from the hard drive carrier. It will just lift out. ㉗ Look at the back of the Mac mini and locate the power port. Inside the chassis to the left of the power port is a metal tab that is angled up at a 45º angle. Slide this silver metal tab to the left and remove it from the Mac mini chassis, unlocking the power connector.
Mac mini 2011-2012 2nd Hard Drive Kit ㉘ ㉙ 2 Disassembly ⤹ Grasp the power plug with your fingers and turn it 90˚ counterclockwise until it releases from the Mac mini chassis. ㉚ Slide the power supply out of the Mac mini chassis. You will possibly have to lift up on the mounting tab to get it started.
Mac mini 2011-2012 2nd Hard Drive Kit ㉛ 2 Disassembly Lift up on the hard drive carrier and remove it from the Mac mini chassis.
Mac mini 2011-2012 2nd Hard Drive Kit 3 Drive Carrier Assembly 3 DRIVE CARRIER ASSEMBLY ① Set the drive carrier in front of you with the mounting tabs pointed away from you. ② Insert the 4 rubber grommets in the holes. Make certain that they are centered on the plastic sides of the drive carrier.
Mac mini 2011-2012 2nd Hard Drive Kit ③ 3 Drive Carrier Assembly Remove your drive from it’s packaging. ④ Insert the flex cable into the SATA port on your drive.
Mac mini 2011-2012 2nd Hard Drive Kit ⑤ ↑ 3 Drive Carrier Assembly ↑ ⑥ Make sure that the flex cable is correctly oriented and then insert the drive into the drive carrier as shown. Insert the 4 included hex head screws using your Torx T8 screwdriver into the drive through the rubber grommets. Do not overtighten! The drive carrier will bulge slightly when everything is inserted, this is normal.
Mac mini 2011-2012 2nd Hard Drive Kit 4. Assembly 4 ASSEMBLY ① Place the drive carrier back into the Mac mini housing and replace the left Torx T6 screw from step 25. The mounting tabs for the drive carrier will line back up on the Mac mini housing top shell and lock into place when you have it in the correct position. ② ③ ↑ Slide the power supply back into the Mac mini chassis. Note when inserting the power supply, there is a small metal guide pin on the back of the power supply.
Mac mini 2011-2012 2nd Hard Drive Kit ⑤ ⤹ ④ 4 Assembly Line the power plug up so that the locking tab is in the inside mounting groove in the Mac mini chassis. Twist the power plug 90˚ clockwise to lock it into the Mac mini chassis. ⑥ ↑ Slide the metal locking tab into the locking slot, holding the power plug into the Mac mini chassis as shown in the photograph. Make sure that the metal tabs are on opposite sides of the power plug groove before pushing it in all the way.
Mac mini 2011-2012 2nd Hard Drive Kit ⑦ ↑ 4 Assembly ↑ Gently slide the logic board assembly back into the Mac mini chassis. Stop when you reach the side locking tabs. ⑧ Looking from the front of the Mac mini, locate the power supply plug and connect it to the logic board.
Mac mini 2011-2012 2nd Hard Drive Kit ⑨ 4 Assembly Place the top hard drive into the Mac mini chassis. Note: The two screw pins on the drive must fit in holes on the internal side wall of the housing. Maneuver the drive until the pins secure to the holes in the housing. Wiggling the drive with the Torx T8 screwdriver inserted into one of the drive’s screw holes may be helpful. The drive should not move sideways once secure. ⑩ Turn the Mac mini back around so you are looking from the rear ports.
Mac mini 2011-2012 2nd Hard Drive Kit 4 Assembly ⑪ Replace the Torx T6 screw into the logic board. ⑫ ⤹ ⑬ Reinstall the fan cowling and insert the short T6 screw that you removed.
Mac mini 2011-2012 2nd Hard Drive Kit Pivot the Airport antenna cover gently into the Mac mini as shown. Turn the black Airport cable so that the silver connector loops around from the inside top and attach the connector onto the Airport card. The connector snaps straight down onto the card. ⑮ ⑭ 4 Assembly Use caution - it is fragile. While making sure to keep the black Airport cable pointed so it naturally will lay back under the chassis, slide the Airport Antenna cover into the chassis.
Mac mini 2011-2012 2nd Hard Drive Kit ⑱ 4 Assembly Insert the fan connector onto the logic board. Remember, it came straight up off of the logic board. It needs to go back onto the logic board the same way - a firm push will seat it into place. Be careful - the connector is fragile. Replace the 3 ⑲ Torx T-6 screws that secure the exhaust fan from the chassis of the Mac mini. The lower right screw is a long standoff screw. The top 2 screws are shorter.
Mac mini 2011-2012 2nd Hard Drive Kit ⑳ ㉑ 4 Assembly Replace the 2 SO-DIMMs from your Mac mini. Instructions to remove and insert them are inside the bottom cover on the right side next to the SO-DIMM slots. Replace the bottom ㉒ cover of your Mac mini. You’re all set! Reconnect your Mac mini and configure your new hard drive.
Mac mini 2011-2012 2nd Hard Drive Kit 5 & 6 FAQ & Customer Service 5 FAQ 5.1 FAQ Q: How do I format my storage solution? A: OWC has detailed instructions online for most popular operating systems, located at: http://eshop.macsales.com/tech_center/fwhdd.cfm 6 CUSTOMER SERVICE 6.1 Before Contacting Customer Service •Visit our tech center for more support suggestions, including FAQs. http://eshop.macsales.com/tech_center/index.
This page left blank intentionally
Copyrights: Copyright © 2012-2013 Other World Computing, Inc. All rights reserved. OWC is a registered trademark of Other World Computing. Other World Computing and Mercury Elite-AL Pro are trademarks of Other World Computing. Other marks may be the trademark or registered trademark property of their respective owners.