User Guide & Owners Manual
OWC Mercury Rack Pro Table of Contents 1 INTRODUCTION 1.1 SYSTEM REQUIREMENTS 1.1.1 Mac Requirements 1.1.2 PC Requirements 1.1.3 Supported Drives 1.2 PACKAGE CONTENTS 1.3 ABOUT THIS MANUAL 1.4 FRONT VIEW 1.4.1 Buttons 1.4.2 LED Drive Bay Indicators 1.5 REAR VIEW 1.5.1 Connections 1.5.2 Fan Alarm Mute Button 1.5.3 RAID Selector Switches 1.6 RAID SETTINGS 1.6.1 Changing the RAID mode 1.6.2 RAID Modes 2 SYSTEM SETUP 2.1 DRIVE INSTALLATION 2.2 REPLACING DRIVES 2.3 CONNECTIONS TO COMPUTER 2.
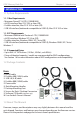
OWC Mercury Rack Pro Chapter 1 - Introduction 1 INTRODUCTION 1.1 System Requirements 1.1.1 Mac Requirements • Minimum PowerPC G4 CPU, 128MB RAM • eSATA interface, Mac OS X 10.3 or later (OR) • FireWire interface, Mac OS X 10.2 or later (OR) • USB 3.0 interface (backwards compatible to USB 2.0), Mac OS X 10.2 or later 1.1.2 PC Requirements • Minimum 500MHz Intel Pentium 3 CPU, 128MB RAM • eSATA interface, Windows XP / Vista (OR) • FireWire interface, Windows 2000 / XP / Vista (OR) • USB 3.
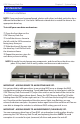
OWC Mercury Rack Pro Chapter 1 - Introduction 1.4 Front View 1.4.1 Buttons Power On/Off and SET/MUTE button are inside the front door on the left side. The SET/MUTE button is used for setting the RAID modes (covered in section 1.6 RAID Settings) and disabling the audible alarm when there is a drive failure. 1.4.2 LED Drive Bay Indicators Each drive bay has a multicolor LED indicator.
OWC Mercury Rack Pro Chapter 1 - Introduction 1.5.2 Fan Alarm Mute Button In the event one of the fans within the OWC Mercury Rack Pro fails, an alarm will sound. The “Fan Alarm Mute” button located on the rear panel of the unit, will mute the alarm. It is recommended to replace the failed fan as soon as possible in order to adequately cool the unit, prevent damage to components, and avoid data loss. 1.5.
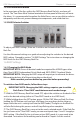
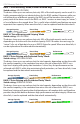
OWC Mercury Rack Pro 1.6.2 RAID Modes Chapter 1 - Introduction IMPORTANT NOTES: ! Drives of identical size and model are required for all RAID types other than Clear & JBOD (Independent Drive) Mode and JBOD (SPAN) “Combine” Mode. Changing the RAID mode will require you to reformat the drives. Be sure to back up your data first! ! Clear & JBOD (Independent Drive) Mode Switch setting: DOWN-DOWN-DOWN Each drive will appear as a single volume.
OWC Mercury Rack Pro Chapter 1 - Introduction RAID 1 “Drive Mirroring” Mode (2 drives installed only) Switch setting: UP-UP-DOWN The drives show up as one volume, but only 50% of the total capacity can be used. It is highly recommended to use identical drives for this RAID method. However, while you can utilize drives of different capacity, the RAID size will be based on the smallest capacity total of the drives used in the RAID set.
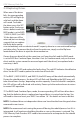
OWC Mercury Rack Pro Chapter 2 - System Setup 2 SYSTEM SETUP 2.1 Drive Installation NOTE: If you purchased a preconfigured solution with drives included, each drive has a different colored dot on it. Use these 4 different colored dots to match the drive to the appropriate drive bay. To install your own drive mechanisms: ➀ Open the front door on the OWC Mercury Rack Pro. ➁ Install the drive as shown to the left, with the SATA connector facing away from you.
OWC Mercury Rack Pro Chapter 2 - System Setup 2.2 Replacing Drives When one of the drives fails, the corresponding activity LED will light up solid red and the alarm will sound. To disable the alarm, press the SET button once.
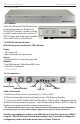
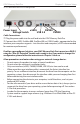
OWC Mercury Rack Pro Chapter 2 - System Setup 2.3 Connections to Computer Power Input eSATA FW400 FW800 Voltage Switch USB 3.0 Cable Connections: ➀ Plug the power cable into the wall and into the OWC Mercury Rack Pro. ➁ Connect the eSATA, FireWire 800, FireWire 400, or USB 3.0 cable - appropriate for the interface your computer supports - into the drive and computer.
OWC Mercury Rack Pro Chapter 2 - System Setup 2.4 Converting to Desktop Unit The OWC Mercury Rack Pro can be converted from a rack mounting enclosure to a desktop unit by removing the rack pulls from the sides of the enclosure, and attaching the included rubber feet to the enclosure. To remove the rack pulls, simply remove the 4 Phillips screws on the side of the rack and the rack pull will come off.
OWC Mercury Rack Pro Chapter 3 - Formatting 3 FORMATTING 3.1 Formatting your OWC Mercury Rack Pro on a Macintosh with Mac OS X IMPORTANT NOTE: This procedure will erase all data on your disk drives in the OWC Mercury Rack Pro. Back up any important data before proceeding! ➀ Click on the “Initialize” button. ➁ Select the device with no volumes attached to it; in this picture, that would be the 4 TB OWC device. Click on the picture of the drive icon next to the text.
OWC Mercury Rack Pro Chapter 3 - Formatting ➂ Once you’ve selected the OWC device, you will notice the above change in the Disk Utility application. Click on the “Partition” tab in this picture. ➃ You then need to choose how many partitions you wish your OWC Mercury Rack Pro to have. For ease of use we’re selecting one partition here but of course you could select more if you wish to have multiple volumes created. Simply use the pulldown menu under Volume Scheme to create more partitions.
OWC Mercury Rack Pro Chapter 3 - Formatting ➄ Choose a name for the volume. You will need to repeat this step for each volume if you selected multiple partitions. Click Apply to finish. ➅ After a few moments, partitioning will complete and the OWC Mercury Rack Pro volume will mount on your desktop.
OWC Mercury Rack Pro Chapter 3 - Formatting 3.2 Removing the GUID Partition Scheme Only for XP, 2000, ME and earlier. (XP 64-BIT, Vista & Windows 7 can continue to the next section) If you are not installing a brand-new drive into your enclosure, it may have a GUID drive partition already installed on it, especially if it was originally used with a Macintosh. Unfortunately, this is not readable by Windows without special software.
OWC Mercury Rack Pro Chapter 3 - Formatting 3.3 Formatting your OWC Mercury Rack Pro on Windows 2000 and later Instructions for other operating systems can be found at http://www.macsales.com/format. IMPORTANT NOTE: This procedure will erase all data on your disk drives in the OWC Mercury Rack Pro. Back up any important data before proceeding! ➀ With the drive connected to the computer and powered on, right click on the “My Computer” icon and select “Manage” from the menu.
OWC Mercury Rack Pro ➃ Your drive will appear similar to how Disk 1 does below. Notice that the space on the lower right reads as “Unallocated.” Right click in this space and choose “New Partition.” ➄ The “New Partition Wizard” will launch. Click “Next” to continue. ➅ Specify your partition type as “Primary,” and click “Next.” ➆ The wizard will display the maximum partition size for your drive. It is strongly recommended that you do not change the default value.
OWC Mercury Rack Pro ➇ If you like, you can specify the drive letter designation for your new drive. Otherwise, one will automatically be assigned. Click “Next.” ➈ Before you can use the drive, it must be formatted. On most systems running Windows 2000 or later, it is advisable to specify the file system as NTFS. Leave the Allocation unit size as “Default,” and feel free to give the drive whatever name you prefer. Be sure to check the box “Perform a quick format”.
OWC Mercury Rack Pro ⑪ Once you have finished with the formatting wizard, you will see that your new drive (represented as “Disk E” in this case) will display a message of “Formatting.” This should only take a couple of minutes if you chose the quick format option. ⑫ After a moment or two, the drive’s status will change from “Formatting” to “Healthy.
OWC Mercury Rack Pro Chapter 3 - Formatting ⑬ At this point, you may close the Computer Management window. Your drive is ready to use and can be found in “My Computer.” Using your new Storage Solution on both Macs and PCs? MacDrive takes the guesswork out of sharing files. Whether you are transferring files between home and the office, a class room lab and your dorm room or even on the same computer, MacDrive makes it painless. In fact, you’ll hardly know MacDrive is working.
OWC Mercury Rack Pro Chapter 4 -Troubleshooting & Tips 4 TROUBLESHOOTING & TIPS 4.1 Troubleshooting Some of the most simple problems can be traced to power, or connectivity issues. Begin your troubleshooting by verifying that power is plugged into the external storage solution, and if connected to a power strip. Make sure that the power is turned on at the switch on the strip. Then, simply verify that your cables (both ends!) are properly plugged into the computer and storage solution.
OWC Mercury Rack Pro Chapter 5 - Appendix 5 APPENDIX 5.1 FAQ Q: How do I format my storage solution? A: OWC has included some formatting instructions in chapter 3. These are also located online at: http://eshop.macsales.com/tech_center/formatting.
OWC Mercury Rack Pro Chapter 6 - Customer Service 6 CUSTOMER SERVICE 6.1 Before Contacting Customer Service •Read this manual and review Chapter 4: Troubleshooting & Tips. •Try to confirm the problem is with the drive. If you have a second computer, move the enclosure to that system and verify that the solution does not function with that machine. •Visit our tech center for more support suggestions, including FAQs. http://eshop.macsales.com/tech_center/index.
Copyrights: Copyright © 2009-12 Other World Computing, Inc. All rights reserved. No part of this publication may be reproduced, stored in a retrieval system, or transmitted in any form or by any means, electronic, mechanical, photocopying, recording or otherwise, without the prior written consent of Other World Computing. Changes: The material in this document is for information only and subject to change without notice.