
User guide


OWC MERCURY ELITE PRO Qx2
INTRODUCTION
3
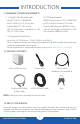
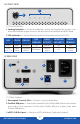
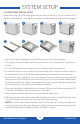
4. USB 3.0 port — Attach the included USB 3.0 (Standard-A to Standard-B) cable here.
5. On/o switch — Turn on and off the Mercury Elite Pro Qx2 here.
6. Power input — Connect the included power cable here.
NOTE:
•Although the on/off switch controls power to the device, the Qx2 requires a data signal
in order to turn on. As long as the on/off switch is in the ‘on’ position, the Qx2 will turn
on when it receives a data signal through the interface cable (FireWire 800, USB 3.0, or
eSATA). If there is no interface cable connected, or if the computer is off or in a sleep or
hibernation mode, the Qx2 will turn off.
•Only one interface (FireWire 800, USB 3.0, eSATA) at a time can be used. When more
than one interface cable is connected, the fastest interface has priority.
•For the safe removal of your drive and to ensure that no data is lost, always eject or
unmount the drive from your operating system before powering off.
•In order for the computer to access volumes larger than 2TB, the operating system
needs to support large volumes (e.g., Windows Vista or OS X 10.4 and above).
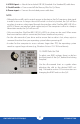
1.5.2 RAID Selector Dial
To adjust your RAID settings, there is a dial on
the front panel of the Qx2, behind the locking
faceplate.
Use the silkscreened chart as a guide when
adjusting the dial to the desired RAID set-
ting. Proceed to section 2.3 for instructions on
changing the RAID levels on the Qx2.