OWC Mercury Elite Pro Qx2 ASSEMBLY MANUAL & USER GUIDE
TABLE OF CONTENTS 1. INTRODUCTION............................................................................................1 1.1 MINIMUM SYSTEM REQUIREMENTS 1.1.1 Apple® Mac Requirements 1.1.2 PC Requirements 1.1.3 Supported Hard Drives 1.2 PACKAGE CONTENTS 1.3 ABOUT THIS MANUAL 1.4 FRONT VIEW 1.4.1 Front Features 1.5 REAR VIEW 1.5.1 Rear Features 2. SYSTEM SETUP..............................................................................................4 2.1 HARD DRIVE INSTALLATION 2.2 QUICK START 2.2.
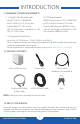
INTRODUCTION 1.1 MINIMUM SYSTEM REQUIREMENTS 1.1.1 Apple® Mac Requirements 1.1.2 PC Requirements • PowerPC G4 CPU, 128MB RAM • eSATA (3.0Gb/s): OS X 10.3 or later • FireWire 800: OS X 10.2 or later • USB 3.0 (backwards compatible to USB 2.0): OS X 10.2 or later • 500MHz Intel Pentium 3 CPU, 128MB RAM • eSATA (3.0Gb/s): Windows XP or later • FireWire 800: Windows 2000/XP or later • USB 3.0 (backwards compatible to USB 2.0): Windows 2000/XP or later 1.1.3 Supported Hard Drives • Up to four 3.
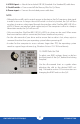
1.4 FRONT VIEW 2 1 1.4.1 Front Features 1. Locking faceplate — Use the included keys to lock the faceplate for security, or remove the faceplate to gain access to the drive bays and configure the RAID mode. 2. LED indicators — See the following chart for information on the Qx2’s LEDs.
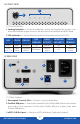
4. USB 3.0 port — Attach the included USB 3.0 (Standard-A to Standard-B) cable here. 5. On/off switch — Turn on and off the Mercury Elite Pro Qx2 here. 6. Power input — Connect the included power cable here. NOTE: • Although the on/off switch controls power to the device, the Qx2 requires a data signal in order to turn on. As long as the on/off switch is in the ‘on’ position, the Qx2 will turn on when it receives a data signal through the interface cable (FireWire 800, USB 3.0, or eSATA).
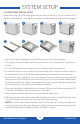
SYSTEM SETUP 2.1 HARD DRIVE INSTALLATION Follow these steps to install hard drives into your Mercury Elite Pro Qx2, or to replace existing drives. Repeat steps 1 through 8 as necessary for the number of drives you are installing. 1 2 3 4 5 6 7 8 1. Insert one of the included keys into the lock on the top left of the faceplate. 2. Turn the key clockwise, then pull the key towards you. The faceplate will swing open, as shown. 3.
2.2 QUICK START If your Mercury Elite Pro Qx2 was purchased as a preconfigured solution with drives included, it has been configured in the following way. A software bundle and the OWC Drive Guide formatting utility have been installed on your Qx2, and it has been set to RAID 5 mode. If you wish to change the RAID mode (see section 2.3), doing so before you use the OWC Drive Guide formatting utility will erase the software bundle and formatting utility from your Qx2.
matted volume (or individual disks if you selected independent drive mode). 3. Format the new volume. Formatting instructions can be found at: www.macsales.com/format 2.3.2 RAID Modes IMPORTANT NOTE: Drives of identical model and capacity are required for all RAID types other than independent drive mode and span mode. ! WARNING: Changing the RAID mode will destroy the data on the drives. Be sure to back up your data first! See section 3.2 for information on proper backup strategies.
RAID 1 “Drive Mirroring” Mode (Two Drives Installed) Dial position: 1 Storage Capacity Data Safety Performance The drives show up as one volume with a size equal to the capacity of one of the two drives used in the array. RAID 1 copies (or “mirrors”) a set of data from the first drive to the second drive. This is useful when reliability and redundancy are more important than capacity. When one drive fails, it can be replaced and the data will be rebuilt automatically.
2.4.2 Adding Drives to an Existing RAID Set It is not possible to add more drives to an existing RAID set. In order to add drives, a new RAID set must be created, which will destroy the data on the existing RAID set. If you wish to add more drives, shut off the Mercury Elite Pro Qx2, then add the drives. Once all of the drives that you wish to use are installed, go through the steps in section 2.3.1 to create the new RAID set. 2.4.
APPENDIX 3.1 TROUBLESHOOTING Begin your troubleshooting by verifying that the power cable is connected to the Mercury Elite Pro Qx2 and to a power source. If the power cable is connected to a power strip, make sure that the power switch on the strip is turned on. Then, simply verify that both ends of your cables are properly plugged into the computer and the Qx2. If the Qx2 is still not working properly, try connecting to another interface such as the USB connection and see if the device works properly.
Changes: The material in this document is for information only and subject to change without notice. While reasonable efforts have been made in the preparation of this document to assure its accuracy, Other World Computing assumes no liability resulting from errors or omissions in this document, or from the use of the information contained herein.