OWC™ Mercury Elite Pro™ Dual mini Assembly Manual
OWC Mercury Elite Pro Dual mini Table of Contents 1 INTRODUCTION 1.1 SYSTEM REQUIREMENTS 1.1.1 Mac® Requirements 1.1.2 PC Requirements 1.2 PACKAGE CONTENTS 1.3 ABOUT THIS MANUAL 1.4 PORT VIEW & CABLE CONNECTIONS 1.5 DETAILED VIEW 1.5.1 Front Activity Light View 2 SYSTEM SETUP 2.1 HARD DRIVE ASSEMBLY 2.2 RAID CONFIGURATION 2.3 CONNECTIONS TO COMPUTER 3 FORMATTING 3.1 MACINTOSH FORMATTING 3.2 REMOVING AN EXISTING GUID PARTITION 3.3 WINDOWS FORMATTING 4 TROUBLESHOOTING & TIPS 4.1 TROUBLESHOOTING 4.
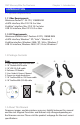
OWC Mercury Elite Pro Dual mini Chapter 1 - Introduction 1 INTRODUCTION 1.1 System Requirements 1.1.1 Mac Requirements •Minimum PowerPC® G4 CPU, 128MB RAM •eSATA interface, Mac OS X 10.3 or later •FireWire® interface, Mac OS X 10.2 or later •USB 2.0 interface, Mac OS X 10.2 or later 1.1.2 PC Requirements •Minimum 500MHz Intel® Pentium III CPU, 128MB RAM •eSATA interface, Windows® XP / Vista® / Windows 7 •FireWire interface, Windows 2000 / XP / Vista / Windows 7 •USB 2.
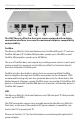
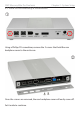
OWC Mercury Elite Pro Dual mini Chapter 1 - Introduction 1.4 Port View & Cable Connections ➀ ➁ ➂ ➃ ➄ ➅ The OWC Mercury Elite Pro Dual mini comes equipped with multiple connection interfaces to ensure the maximum computer compatibility and portability. FireWire The Mercury Elite Pro Dual mini features two FireWire 800 ports ➀ and one FireWire 400 port ➁. FireWire 800 provides speeds up to 100 MB/sec and FireWire 400 provides speeds up to 50 MB/sec.
eSATA The fastest connection on the Mercury Elite Pro Dual mini is the eSATA connection (4), which provides speeds up to 300 MB/sec. eSATA is not a powered connection and requires the use of an auxiliary power source such as the included FireWire 800 to 12V cable or the optional AC power adapter to connect to the DC In power port ➅. While connected via eSATA, the Mercury Elite Pro Dual mini can also be powered by utilizing any of the FireWire 800/400 ports.
OWC Mercury Elite Pro Dual mini Chapter 2 - System Setup 2 SYSTEM SETUP This guide will get you up and running quickly, demonstrating how to install your own 2.5” hard drives into the OWC Mercury Elite Pro Dual mini enclosure. Your computer is a static-sensitive device. It is susceptible to invisible damage if not protected during installation. We recommend proper grounding by using a grounding strap.
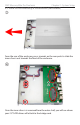
OWC Mercury Elite Pro Dual mini 2.1 Hard Drive Assembly & Installation Chapter 2 - System Setup ➀ Using a Phillips P0 screwdriver, remove the 2 screws that hold the rear backplane cover to the enclosure. ➁ Once the screws are removed, the rear backplane cover will easily come off. Set it aside to continue.
OWC Mercury Elite Pro Dual mini Chapter 2 - System Setup 2.1 Hard Drive Assembly & Installation (continued) ➂ ➙ From the rear of the enclosure, press inwards on the rear ports to slide the inner chassis out towards the front of the enclosure. ➃ Once the inner chassis is removed from the outer shell, you will see where your 2.5” SATA drives will attach to the bridge card.
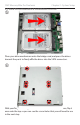
OWC Mercury Elite Pro Dual mini Chapter 2 - System Setup 2.1 Hard Drive Assembly & Installation (continued) ➄ ➙ ➙ Place your drive mechanisms onto the bridge card, and press the drives towards the ports to firmly affix the drives into the SATA connectors. ➅ With your fingers holding the drive mechanisms into the enclosure, flip it over onto the top so you can see the screw holes that you will need to use in the next step.
OWC Mercury Elite Pro Dual mini Chapter 2 - System Setup 2.1 Hard Drive Assembly & Installation (concluded) ➆ Using the included screws from the plastic bag, attach the drive mechanisms to the enclosure through the rubber grommets using your Phillips P0 screwdriver. It is recommended that you start using 2 screws in each drive, and not fully tighten them until all 8 screws are started into the drive mechanisms.
OWC Mercury Elite Pro Dual mini Chapter 2 - System Setup 2.2 RAID Configuration To adjust the RAID configuration on your OWC Mercury Elite Pro Dual mini, you need to gain access to the internal bridge board. Visit Section 2.1; Hard Drive Assembly & Installation to review the basic steps in this procedure.
OWC Mercury Elite Pro Dual mini Chapter 2 - System Setup 2.2 RAID Configuration (continued) The OWC Mercury Elite Pro Dual mini is able to utilize the 2 hard drives in 3 different RAID modes; Disk Spanning (SPAN), Disk Striping (RAID-0), or Disk Mirroring (RAID-1). You need to choose the RAID mode that suits your needs properly. The OWC Mercury Elite Pro Dual mini also is able to utilize drives in “Single Drive” mode.
OWC Mercury Elite Pro Dual mini Chapter 2 - System Setup 2.3 Computer Connections Please see the previous section 1.4 which details the different interface options available to you with your OWC Mercury Elite Pro Dual mini. Choose which interface you wish to connect to your computer, connect that interface and then you need to format the hard drives you just installed into your new OWC Mercury Elite Pro Dual mini enclosure. Proceed to the next page to learn how to do that.
OWC Mercury Elite Pro Dual mini Chapter 3 - Formatting 3 FORMATTING 3.1 Formatting your OWC Mercury Elite Pro Dual mini on a Macintosh with Mac OS X IMPORTANT NOTE: This procedure will erase all data on the hard drive in the OWC Mercury Elite Pro Dual mini. Back up any important data before proceeding! ➀ Click on the “Initialize” button.
OWC Mercury Elite Pro Dual mini Chapter 3 - Formatting ➂ Once you’ve selected the OWC device, you will notice the above change in the Disk Utility application. Click on the “Erase” tab in this picture. ➃ You then need to name the volume that you want to format, and erase it. Type the name of the volume in the space provided and then choose your desired format (Mac OS Extended (Journaled) is default, and preferred). Click the Erase button.
OWC Mercury Elite Pro Dual mini Chapter 3 - Formatting ➄ Click the erase button to confirm you wish to erase the disk. ➅ After a few moments, the erase command will complete and the OWC Mercury Elite Pro Dual mini volume will mount on your desktop. You can quit Disk Utility and start using your drive.
OWC Mercury Elite Pro Dual mini Chapter 3 - Formatting 3.2 Removing the GUID Partition Scheme Only for XP, 2000, ME and earlier. (XP 64-BIT, Vista & Windows 7 can continue to the next section) If you are not installing a brand-new hard drive into your enclosure, it may have a GUID drive partition already installed on it, especially if it was originally used with a Macintosh. Unfortunately, this is not readable by Windows without special software.
OWC Mercury Elite Pro Dual mini Chapter 3 - Formatting 3.3 Formatting your OWC Mercury Elite Pro Dual mini on Windows 2000 and later Instructions for other operating systems can be found at http://www.macsales.com/format. IMPORTANT NOTE: This procedure will erase all data on your hard disk drives in the OWC Mercury Elite Pro Dual mini.
OWC Mercury Elite Pro Dual mini ④ Your drive will appear similar to how Disk 1 does below. Notice that the space on the lower right reads as “Unallocated.” Right click in this space and choose “New Partition.” ⑤ The “New Parti- tion Wizard” will launch. Click “Next” to continue. ⑥ Specify your partition type as “Primary,” and click “Next.” ⑦ The wizard will display the maximum partition size for your drive. It is strongly recommended that you do not change the default value.
OWC Mercury Elite Pro Dual mini Chapter 3 - Formatting ⑧ If you like, you can specify the drive letter designation for your new drive. Otherwise, one will automatically be assigned. Click “Next.” ⑨ Before you can use the drive, it must be formatted. On most systems running Windows 2000 or later, it is advisable to specify the file system as NTFS. Leave the Allocation unit size as “Default,” and feel free to give the drive whatever name you prefer. Be sure to check the box “Perform a quick format”.
OWC Mercury Elite Pro Dual mini ⑪ Once you have finished with the formatting wizard, you will see that your new drive (represented as “Disk E” in this case) will display a message of “Formatting.” This should only take a couple of minutes if you chose the quick format option. ⑫ After a moment or two, the drive’s status will change from “Formatting” to “Healthy.
OWC Mercury Elite Pro Dual mini Chapter 3 - Formatting ➀➂ At this point, you may close the Computer Management win- dow. Your drive is ready to use and can be found in “My Computer.” Using your new Storage Solution on both Macs and PCs? MacDrive™ takes the guesswork out of sharing files. Whether you are transferring files between home and the office, a class room lab and your dorm room or even on the same computer, MacDrive makes it painless. In fact, you’ll hardly know MacDrive is working.
OWC Mercury Elite Pro Dual mini Chapter 4 -Troubleshooting & Tips 4 TROUBLESHOOTING, TIPS & FAQ 4.1 Troubleshooting Some of the most simple problems can be traced to power, or connectivity issues. Verify that your cables (both ends!) are properly plugged into the computer and storage solution. If one connection type does not work, switch to another interface and try the solution again. If these suggestions do not work, try the OWC Mercury Elite Pro Dual mini on a different computer, if available to you.
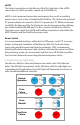
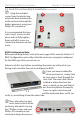
OWC Mercury Elite Pro Dual mini Chapter 4 -Troubleshooting & Tips 4.2 Tips Identifying the LED indicators on your drive The OWC Mercury Elite Pro Dual mini has 2 separate multicolor LED indicator lights that will illuminate different colors depending on the operation currently running.
OWC Mercury Elite Pro Dual mini Chapter 4 -Troubleshooting & Tips Optional AC Adapter or FireWire 800 Power required for eSATA interface While The OWC Mercury Elite Pro Dual mini series is designed to be bus powered via FireWire, connections using the eSATA interface do require a power source. There are two options available to do this; either using the included FireWire 800 power adapter cable, or using an AC power adapter.
OWC Mercury Elite Pro Dual mini Chapter 5 - Appendix 5 APPENDIX 5.1 FAQ Q: How do I format my storage solution? A: OWC has detailed instructions online for most popular operating systems, located at: http://eshop.macsales.com/tech_center/formatting.
OWC Mercury Elite Pro Dual mini Chapter 6 - Customer Service 6 TECHNICAL SUPPORT 6.1 Before Contacting Technical Support •Read this manual and review Chapter 4: Troubleshooting & Tips. •Try to confirm the problem is with the hard drive. If you have a second computer, move the enclosure to that system and verify that the solution does not function with that machine. •Visit our tech center for more support suggestions, including FAQs. http://eshop.macsales.com/tech_center/index.
Copyrights: Copyright © 2010- 2012 Other World Computing, Inc. All rights reserved. OWC is a registered tracdemark of Other World Computing. Other World Computing and Mercury Elite Pro are trademarks of Other World Computing. Other marks may be the trademark or registered trademark property of their respective owners.