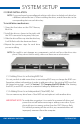
OWC Mercury Rack Pro Assembly Manual & User Guide
Table of Contents 1. INTRODUCTION............................................................................................................. 1 1.1 MINIMUM SYSTEM REQUIREMENTS 1.1.1 Mac® Requirements 1.1.2 PC Requirements 1.1.3 Supported Hard Drives 1.2 PACKAGE CONTENTS 1.3 ABOUT THIS MANUAL 1.4 FRONT VIEW 1.4.1 Buttons 1.4.2 LED Drive Bay Indicators 1.5 REAR VIEW 1.5.1 Connection 1.5.2 Fan Alarm Mute Button 1.5.3 RAID Selector Switches 1.6 PRECONFIGURED SOLUTIONS 1.7 RAID SETTINGS 1.7.
Introduction 1.1 Minimum System Requirements 1.1.1 Mac Requirements 1.1.2 PC Requirements • PowerPC G4 CPU, 128MB RAM • eSATA: Mac OS X 10.3 or later • FireWire: Mac OS X 10.2 or later • USB 3.0 (backwards compatible to USB 2.0): Mac OS X 10.2 or later • 500MHz Intel Pentium 3 CPU, 128MB RAM • eSATA: Windows XP or later • FireWire: Windows 2000/XP or later • USB 3.0 (backwards compatible to USB 2.0): Windows 2000/XP or later 1.1.3 Supported Hard Drives • Up to four 3.5” SATA drives (1.5Gb/s, 3.
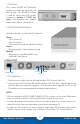
1.4.1 Buttons The “Power On/Off” and “Set/Mute” buttons are inside the front door on the left side. The SET/MUTE button is used for setting the RAID modes (covered in Section 1.7, RAID Settings) and disabling the audible alarm when there is a drive failure. 1.4.2 LED Drive Bay Indicators Each drive bay has a multicolor LED indicator.
1.5.2 Fan Alarm Mute Button In the event one of the fans within the OWC Mercury Rack Pro fails, an alarm will sound. The “Fan Alarm Mute” button located on the rear panel of the unit will mute the alarm. It is recommended to replace the failed fan as soon as possible in order to adequately cool the unit, prevent damage to components, and avoid data loss. 1.5.3 RAID Selector Switches To adjust your RAID settings, there are 3 switches on the back of the OWC Mercury Rack Pro.
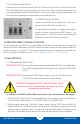
3. The OWC Mercury Rack Pro is now set to the new mode. If the Rack Pro has just been set to “Clear RAID” mode, you can now repeat steps 1 and 2 to apply a RAID setting. If the Rack Pro has just been set to a RAID mode, it is now ready to be formatted. Instructions for formatting can be found at: http://www.macsales.com/format 1.7.2 RAID Modes IMPORTANT NOTE: Drives of identical size and model are required for all RAID types other than Clear/JBOD (Independent Drive) mode and Combine/ JBOD (SPAN) mode.
RAID 1 “Drive Mirroring” Mode (2 Drives Installed) Switch setting: UP-UP-DOWN The drives show up as one volume with a size equal to the capacity of one of the two drives used in the array. RAID 1 copies (or “mirrors”) a set of data from the first drive to the second drive. This is useful when reliability and backup are more important than capacity. When one drive fails, it can be replaced and the data will be rebuilt automatically.
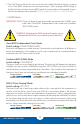
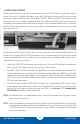
system setup 2.1 Drive Installation NOTE: If you purchased a preconfigured solution with drives included, each drive has a different colored dot on it. When installing the drives, match these dots to the corresponding dots on each drive bay. To install drive mechanisms: 1. Open the front door on the OWC Mercury Rack Pro. 2. Install the drive as shown to the right, with the SATA connector facing away from you. 3. Slide the drive all the way into the drive bay. It will fit flush with the aluminum frame. 4.
2.2 Replacing Drives When one of the drives fails, the corresponding activity LED will light up solid red and the alarm will sound. To disable the alarm, press the “Set/Mute” button once. If only one drive is defective and the RAID mode is set to RAID 1, RAID 3, RAID 5, or RAID 10, the data can still be accessed, but it is strongly suggested that you replace the faulty drive mechanism immediately with an identical model/capacity drive to assure continued data safety.
Appendix 3.1 rack/desktop conversion The OWC Mercury Rack Pro comes with two rack handles to help move the Rack Pro into and out of a rack system. Four rubber feet are also included for use in a desktop environment. The rack handles and desktop feet are included with the unit, but have not been installed. Use a Phillips screwdriver to install either the handles or feet, depending on how you intend to use the Rack Pro.
3.5 Troubleshooting Begin your troubleshooting by verifying that the power cable is connected to the OWC Mercury Rack Pro and to a power source. If the power cable is connected to a power strip, make sure that the power switch on the strip is turned on. Then, simply verify that both ends of your cables are properly plugged into the computer and the Rack Pro. If the Rack Pro is still not working properly, try connecting to another interface (USB, FireWire, or eSATA) and see if the device works properly.
Copyrights: Copyright ©2009-13 Other World Computing, Inc. All rights reserved. No part of this publication may be reproduced, stored in a retrieval system, or transmitted in any form or by any means, electronic, mechanical, photocopying, recording or otherwise, without the prior written consent of Other World Computing. Changes: The material in this document is for information only and subject to change without notice.