
User Manual


OWC MERCURY ON-THE-GO PRO INTRODUCTION
2
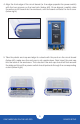
1.4 LED Indicator
The Mercury On-The-Go Pro has a blue LED at the front. The LED emits a solid blue
light when the unit is powered on and ashes during drive activity.
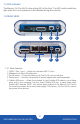
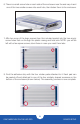
1.5 REAR VIEW
1.5.1 Rear Features
1. USB 3.1 Gen 1 port — Attach the included USB 3.1 Gen 1
2. (Standard-A to Micro-B) cable here.
3. On/O switch — Power the Mercury On-The-Go Pro on and o here.
4. Power input — Connect the optional 5V power adapter here (sold separately).
5. FireWire 800 ports — Attach the included 9-9 pin FireWire 800 cable to one of these
ports and to the computer. Use the other FireWire 800 port to daisy-chain other
FireWire 800 devices. NOTE: Any device daisy-chained to the Mercury On-The-Go
Pro must be powered by its own power supply. The Mercury On-The-Go Pro cannot
bus power other devices.
4
1 2
3
1 2
3