Mercury Elite Pro mini ASSEMBLY MANUAL & USER GUIDE
TABLE OF CONTENTS 1. INTRODUCTION....................................................................................... 1 1.1 MINIMUM SYSTEM REQUIREMENTS 1.1.1 Mac® Requirements 1.1.2 PC Requirements 1.2 PACKAGE CONTENTS 1.3 ABOUT THIS MANUAL 1.4 REAR VIEW 1.4.1 Rear Features 2. DEVICE SETUP.......................................................................................... 4 2.1 QUICK START 2.2 ASSEMBLY 3. SUPPORT RESOURCES..........................................................................
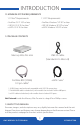
INTRODUCTION 1.1 MINIMUM SYSTEM REQUIREMENTS 1.1.1 Mac® Requirements 1.1.2 PC Requirements • FireWire: OS X® 10.2 or later • USB 3.0: OS X 10.3 or later1 • eSATA: OS X 10.3 or later • FireWire: Windows® XP SP2 or later • USB 3.0: Windows XP SP2 or later1 • eSATA: Windows XP SP2 or later 1.2 PACKAGE CONTENTS Mercury Elite Pro mini USB 3.0 cable (Standard-A to Micro-B) FireWire 800 (1394b) 9-9 pin cable2 eSATA Cable3 1: USB 3.0 ports are backward compatible with USB 2.0 connections.
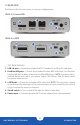
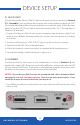
1.4 REAR VIEW The Mercury Elite Pro mini comes in two port configurations: USB 3.0 / Firewire 800 2 1 4 5 USB 3.0 / eSATA 3 1 4 5 1.4.1 Rear Features 1. USB 3.0 port — Attach the included USB 3.0 (Standard-A to Micro-B) cable here. 2. FireWire 800 ports — Attach the included FireWire 800 cable here. Use the other FireWire 800 port to daisy-chain other FireWire 800 devices. NOTE: Any device daisychained device must use its own power supply. The Mercury Elite Pro mini cannot bus-power other devices.
IMPORTANT: • The Mercury Elite Pro mini is designed to receive all needed power through the USB or FireWire cable, therefore a separate power adapter is not necessary and not included. For the few situations in which external power may be necessary, an optional 5V power adapter is available at: http://eshop.macsales.com/item/owc/motgpwr/ • If the Mercury Elite Pro mini is daisy-chained to another FireWire device instead of being connected directly to a computer, you must use the optional 5V power adapter.
DEVICE SETUP 2.1 QUICK START If you purchased the Mercury Elite Pro mini as an empty enclosure, proceed to Section 2.2 - Assembly. If you purchased the enclosure with a drive already installed, the OWC Drive Guide formatting utility has been installed to assist with the setup. Follow the steps below to use the OWC Drive Guide to format the drive for Mac (OS X 10.4 and later) or Windows (XP and later). 1. Connect the Mercury Elite Pro mini to your computer using the proper cable.
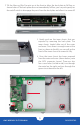
2. Tilt the Mercury Elite Pro mini up at the front to allow the back plate to fall free, as shown below. If the back plate does not immediately fall free, you can push gently on the on/off switch to disengage the ports from the back plate and allow it to come off. 3. Gently push on the inner chassis that was exposed by removing the back plate. The inner chassis should slide out of the outer enclosure.
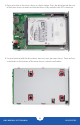
5. Place your drive in the inner chassis as shown below. Press the drive toward the rear of the inner chassis to make sure that the drive is fully seated in the SATA connector. 6. Use one hand to hold the drive down, then turn over the inner chassis. There are four screw holes on the bottom of the inner chassis (circled in red below).
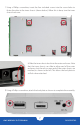
7. Using a Phillips screwdriver, insert the four included screws into the screw holes to fasten the drive to the inner chassis (shown below). When this is done, turn the inner chassis back over. 8. Slide the inner chassis back into the outer enclosure. Note that the inner chassis can slide in either end of the outer enclosure, but the rails on one end of the outer chassis are notched, as shown to the left. This allows the back plate to sit flush when attached. 9.
SUPPORT RESOURCES 3.1 FORMATTING For additional formatting information, please visit: http://www.macsales.com/format 3.2 UNMOUNTING DRIVES To properly unmount any connected drives from your computer, you need to follow a few simple steps. OS X: There are two main methods to umount disks with Mac OS X systems. Either drag the icon for the disk you wish to unmount to the trash can, or right-click the disk icon on the desktop, then click “Eject”. Windows: 1.
3.4 ABOUT DATA BACKUP To ensure that your files are protected and to prevent data loss, we strongly suggest that you keep two copies of your data: one copy on your Mercury Elite Pro mini and a second copy on either your internal drive or another storage medium, such as an optical backup, or on another external storage unit.
Changes: The material in this document is for information purposes only and subject to change without notice. While reasonable efforts have been made in the preparation of this document to assure its accuracy, Other World Computing and its officers and employees assume no liability resulting from errors or omissions in this document, or from the use of the information contained herein.