Mercury Elite Pro Dual Assembly Manual & User Guide
TABLE OF CONTENTS 1. INTRODUCTION............................................................................................1 1.1 MINIMUM SYSTEM REQUIREMENTS 1.1.1 Apple Mac Requirements 1.1.2 PC Requirements 1.1.3 Supported Drives 1.2 PACKAGE CONTENTS 1.3 ABOUT THIS MANUAL 1.4 FRONT VIEW 1.4.1 LED Indicators 1.5 REAR VIEW 1.5.1 Rear Features 2. DEVICE SETUP...............................................................................................4 2.1 QUICK START 2.2 ASSEMBLY 2.3 RAID SETTINGS 2.3.
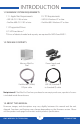
INTRODUCTION 1.1 MINIMUM SYSTEM REQUIREMENTS 1.1.1 Apple Mac Requirements 1.1.2 PC Requirements • USB 3.0: OS X 10.6 or later • FireWire 800: OS X 10.2 or later • USB 3.0: Windows XP or later • FireWire 800: Windows XP or later 1.1.3 Supported Drives 3.5” SATA hard drives * * Drives of identical model and capacity are required for RAID 0 and RAID 1. 1.2 PACKAGE CONTENTS Mercury Elite Pro Dual Power Supply and cable FireWire 800 (1394b) 9-9 pin cable USB 3.
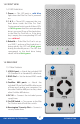
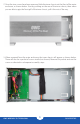
1.4 FRONT VIEW 1.4.1 LED Indicators 1. Power — This LED emits a solid blue light when the Elite Pro Dual is powered on. 2. 1 & 2 — These LEDs represent the two hard drives inside the Elite Pro Dual. During normal activity, each of these LEDs will blink green when the corresponding drive is accessed. If one of the hard drives in the Elite Pro Dual fails, or if the drive bay is empty, the corresponding LED will turn solid red. 3.
NOTES: • Only one interface (USB 3.0 or FireWire 800) at a time can be used. • For the safe removal of your drive and to ensure that no data is lost, always eject or unmount the drive from your operating system before powering off. • In order for the computer to access volumes larger than 2TB, the operating system needs to support large volumes (e.g., Windows Vista or OS X 10.4 and above).
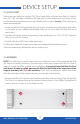
DEVICE SETUP 2.1 QUICK START Follow the steps below to use the OWC Drive Guide utility to format your Elite Pro Dual for Mac (OS X 10.4 and later) or Windows (XP and later). If you installed your own drives, please use the formatting method you are most familiar with, or check Section 3.1 for a link to our online formatting tips. 1. Power on the Elite Pro Dual and plug it into to your computer using the proper data cable.
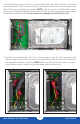
2. Once the two screws have been removed, slide the inner chassis out the front of the outer enclosure, as shown below. Start by pushing on the rear of the inner chassis, then when you are able to grip the front grill of the inner chassis, pull it the rest of the way. 3. When removed from the outer enclosure, the inner chassis will appear as shown below. There will also be a packet of screws inside (not shown). Remove this packet and use the screws as directed in subsequent assembly steps.
4. Install the first hard drive (Drive 1), as shown below. Slide the SATA connector on the hard drive into the black SATA connector (circled in red). Make sure the drive is firmly seated in the black SATA connector before proceeding. NOTE: In this picture, the red SATA cable used to connect the second hard drive has been removed. This was done to provide a better image of the drive installation only. Do not remove any cabling from the Elite Pro Dual. 5.
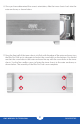
6. Using eight of the larger screws from the packet you removed from the inner chassis, fasten the inner chassis to the hard drives. There are four screw holes on each side of the inner chassis, circled below in red. 7. Slide the inner chassis back into the outer enclosure. Note that while the inner chassis can slide into both sides of the outer enclosure, there is only one correct way that will allow the screw holes to line up correctly.
8. Once you have determined the correct orientation, slide the inner chassis back into the outer enclosure, as shown below. 9. Once the front grill of the inner chassis sits flush with the edge of the outer enclosure, turn the Elite Pro Dual on its side again to look at the screw holes on the bottom. You should see that the screw holes in the outer enclosure line up with the screw holes in the inner chassis. Use the four smaller screws to fasten the inner chassis to the outer enclosure, as shown below.
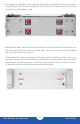
2.3 RAID SETTINGS ! WARNING: Changing the RAID mode will destroy the data on the drives. Be sure to back up your data first! See section 3.4 for information on proper backup strategies. ! 2.3.1 Changing the RAID Mode The RAID mode is controlled by a dial on the rear of the unit, as shown at left. The dial has four positions, each labeled with a different RAID mode. In order to change the RAID mode, follow the simple steps below.
2.3.2 RAID Modes RAID 0 “Drive Striping” Mode: The two drives show up as a single large volume with a size equal to the combined capacities of both drives. RAID 0 is used when speed is the primary objective; it does not provide data redundancy for protection. The reading and writing of data files is spread across both drives to gain speed by distributing the workload. This allows for the fastest data transfer rates, but if one drive fails the whole array becomes corrupted. The data will be lost.
2.4 DRIVE FAILURE In the event that one of the drives fails, the corresponding drive LED will turn solid red. If the Mercury Elite Pro Dual was configured as a RAID 0 or Span, the data on the array is lost and the volume is no longer usable. In a span, only the data stored on the failed drive is lost, although data recovery software will be required to recover the data from the other drive in the Span.
SUPPORT RESOURCES 3.1 FORMATTING For additional formatting information, including instructions on how to format your Elite Pro Dual for Mac or Windows, go to: www.owcdigital.com/format 3.2 UNMOUNTING DISKS To properly unmount any disks at the operating system level, you can follow these steps: OS X: There are several methods to unmount disks when using OS X systems. You can drag the icon for the disk you wish to unmount to the trash can, or right-click the disk icon on the desktop, then click “Eject”.
3.4 ABOUT DATA BACKUP To ensure that your files are protected and to prevent data loss, we strongly suggest that you keep two copies of your data: one copy on your Elite Pro Dual and a second copy on either your internal drive or another storage medium, such as an optical backup, or on another external storage unit.
Changes: The material in this document is for information purposes only and subject to change without notice. While reasonable efforts have been made in the preparation of this document to assure its accuracy, Other World Computing and its officers and employees assume no liability resulting from errors or omissions in this document, or from the use of the information contained herein.