
Operation Manual


OBTAIN THE ASSISTANCE OF AN EXPERIENCED PILOT Although the product can be
treated as a toy, it is not intended for those under fourteen years
of age. Those, who are
inexperienced in piloting remote
-controlled drones, must know that there will be a slight learning curve until
you become a skilled pilot. In order to make it easier to gain this skill we recommend exercises under the
supervision of professional drone pilots.
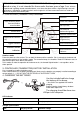
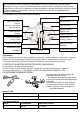
2. CONTROLLER (TRANSMITTER) DIAGRAM
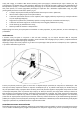
Headless mode
Place the drone on a flat surface. Turn on both the drone and the controller. Pair (synchronize) the drone and
the controller and turn on the headless mode. The controller beeps, the headless mode LED indicator starts to
glow and the lights of the drone start to blink.
In this mode, to make the operation of the drone easier, the forward flight direction is set regardless of the
drone position.
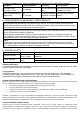
3. CONTROLLER (TRANSMITTER) BATTERY INSTALLATION
Use a screwdriver to open the battery cover.
Place 4 AAA batteries in the battery compartment. Make sure the batteries are properly installed according to
correct polarity (+ -). DO NOT MIX THE BATTERIES OF DIFFERENT TYPES
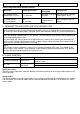
4. CHARGING THE BATTERIES
Use the included cable to charge
the battery of the drone.
** Use ONLY the supplied USB cord for
charging.
Battery charging should always be done
under adult supervision.
The charging should be done via a
USB port of a computer.
LED indicator
Red
- on
Red
- off
Charging...
Charging completed
Charger specifications
Input
Charging current
Maximum voltage
Press to take a photo.
Press and hold to
record a video
Throttle stick
Right and left rotation
key
Lights control
Headless mode
indicator
Power LED indicator
3D Flip mode
Forward and
backward migration
key
Direction control stick
Right and left
migration key
Speed mode button
Speed mode LED
indicator
Power switch
Antenna