
Operation Manual


4. CHARGING THE BATTERIES
Use the included cable to charge the battery of the
drone.
** Use ONLY the supplied USB cord for charging.
Battery charging should always be done under adult
supervision.
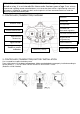
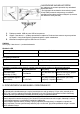
1. Connect the USB cable to a USB port in your computer.
2. Turn off your x-bee drone 1.1 and connect the cable to the device. The LED located on the plug
lights up. When the device is fully charged, the LED goes off.
3. The charging time (via USB) is about 60 minutes.
NOTE:
Do not use X-bee drone 1.1 when it is being charged
LED indicator
Red
- on
Red
- off
Charging completed
Charging...
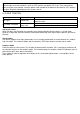
Charger specifications
Input
Charging current
Maximum voltage
5V
500MAH
4.2 ± 0.03V
Battery usage and charge duration reference
Battery type
Battery specification
Single charge
working time
Charging time
Rechargeable lithium
-
polymer battery (Li
-Poly)
3.7V/350MAH
Drone flight time: up to
10 minutes
About 60 minutes (charging
current approx. 0.5 A)
Zinc
-carbon battery
(Non rechargeable)
1.5V
(GP 15G R4P)
Controller (transmitter)
o
peration time: 18
hours
Non rechargeable (do not
charge)
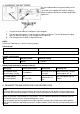
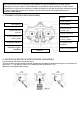
5. TRANSMITTER AND RECEIVER SYNCHRONIZATION
Step 1
Turn on the drone using the switch located on the front by moving it to "ON" position. Place the drone on a
flat surface to ensure the gyroscope
is centered. Do not move the drone during the synchronization process.
Step 2
Switch the controller's power button to "ON" position. The LED indicator located on the controller starts to
blink. Wait 5 seconds until the synchronization process starts.
Pus
h the throttle stick from the lowest to the highest position, and then push it back to the lowest position.
When the LED indicator stops blinking and starts to glow steadily it means that the synchronization process is
finished.