UTILITY TRANSPORT COVERAGE Jeep® Overland Limited Jogging Stroller Instructions Hoja de instrucciones de la carriola de Jogging Jeep® Overland Limited Instructions relatives à la poussette Jeep® Overland Limited S81-T-R2 4/10
WARNING Avoid serious injury from falling or sliding out. Always use Restraint System. Your child's safety depends on you. Proper stroller use cannot be assured unless you follow these instructions. DO NOT USE STROLLER UNTIL YOU READ AND UNDERSTAND THESE INSTRUCTIONS. IMPORTANT SAFETY INFORMATION: How to Keep Your Child Safe While Using this Stroller • Adult Assembly Required. • NEVER LEAVE YOUR CHILD UNATTENDED WHILE IN STROLLER. Accidents can happen quickly while your back is turned.
• DO NOT put child in basket. • Take care when folding and unfolding to prevent finger pinching. • Product may become unstable if a parcel bag, other than the one recommended by the manufacturer is used. • DO NOT allow children to climb into stroller unassisted. Stroller may tip over and injure child. • Keep wheels at a recommended tire pressure of 35 p.s.i. (241 kPa) or as specified on the tire wall. • Only use replacement parts supplied by the manufacturer.
• No utilice la carriola hasta que haya comprobado completamente y calibrado su freno de mano. Se pueden hacer ajustes periódicamente debido al estiramiento del cable y al desgaste en los zapatos de freno. Vea “Cómo ajustar el freno de mano” para más detalles. • Si no instala y ajusta las ruedas equipadas con los cubos de liberación rápida las ruedas se pueden salir durante el uso, resultando en heridas serias.
• Utilisez toujours le dispositif de retenue pour éviter que votre enfant se lève dans la poussette ou qu'il en tombe. N'utilisez pas ce produit sans le harnais complet de maintien cinq points. Le retrait des sangles d'épaules nuira à la retenue de l'enfant. • NE PAS utiliser de siège-auto pour bébé avec cette poussette. Des blessures graves pourraient se produire. • Verrouillez toujours la poussette en position ouverte avant de permettre à votre enfant d'y embarquer ou de s'en approcher.
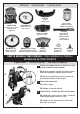
Parts List - Lista de partes - Liste des pièces Front Tray Charola Plateau avant Stroller Frame Estructura de la carriola Armature de la poussette Rear Wheels (2) Ruedas traseras (2) Roues arrière (2) iBaby™ (select models) (modelos selectos) (modèles sélectionnés) Front Wheel (1) Rueda delantera (1) Roue avant (1) Basic Parent Tray Charola para adultos Plateau de l’adulte Odometer (select models) Footrest Marcador (modelos selectos) Apoyapiés Odomètre (modèles sélectionnés) Repose-pied Air Pump (sele
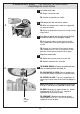
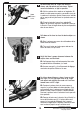
To Assemble Rear Wheels - Para ensamblar las ruedas traseras - Assemblage des roues arrières 1 Lay stroller on its side. ES: Ponga la carriola de lado. FR: Couchez la poussette sur le côté.. 2 Slide wheel pins into axle hole as shown. 2 ES: Meta los pasadores de la rueda en el agujero del eje, como se muestra. FR: Enfilez les boulons de roue dans le trou de l'essieu tel qu'illustré. down on wheel until you hear a click. Pull up 3 Push on wheel to make sure it is properly secured.
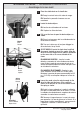
To Assemble Front Wheel - Para ensamblar la rueda delantera - Assemblage de la roue avant 1 Place the stroller back on its handle bar. 3 ES: Ponga la carriola hacia atrás sobre el mango. FR: Remettez la poussette à nouveau sur son mancheron. 2 Locate the brake calipers. ES: Localice los calibradores de los frenos. FR: Repérez les étriers de freins. up on the lever to open the brake calipers as 3 Pull shown. ES: Eleve la palanca para abrir los calibradores de los frenos como se muestra.
wheel lever, 90° angle from wheel as 6 Position shown, and slide wheel axle onto frame. Tighten round nut clockwise, as tight as possible. 6 Lever Palanca Levier ES: Sitúe la palanca de la rueda en un ángulo de 90° desde la rueda como se muestra y ensambla el eje de la rueda en la estructura. Ajuste la tuerca en el sentido de las agujas del reloj, de forma tan ajustada como se pueda. FR: Placez le levier de la roue à un angle de 90 degrés, tel qu'illustré, et glissez l'essieu de la roue sur le chassis.
TEST: Shake wheel back and forth to be sure it is tight on the frame. ES: PRUEBA: Mueva la rueda de un lado a otro para asegurarse de que está bien apretada en la estructura. FR: TEST : Remuez la roue vers l'avant et vers l'arrière pour vous assurer qu'elle est bien serrée sur le chassis. TO REMOVE WHEEL: Open lever to the 90° angle position. Rotate round nut on opposite side counter clockwise until the wheel can slide off of the frame.
a screwdriver, loosen the screw on the back of 2 Using the magnet. ES: Utilizando un destornillador, suelte el tornillo en la parte trasera del imán. FR: À l'aide d'un tournevis, desserrez la vis sur l'arrière de l'aimant. the magnet along the spoke so that it is as 3 Slide close as possible to the two lines on the bottom of the sensor. ES: Resbale el imán junto al rayo, de manera que esté tan cerca como sea posible de las dos líneas en la parte inferior del sensor.
- To Install Batteries into iBaby™ (select models) - Para instalar la charola para adultos ™iBaby™ (modelos selectos) - Installation le plateau-parent iBaby (modèles sélectionnés) Requires 4 “AAA” Batteries (Not Included). Requiere 4 Pilas “AAA” (No incluídas). Exige des piles 4 “AAA” (Non inclus). a Phillips screwdriver to remove the battery 1 Use door. ES: Use un destornillador phillips para desatornillar la puerta de la batería. FR: À l'aide d'un tournevis Phillips, retirez la petite trappe de pile.
To Attach Front Tray - Para instalar la charola delantera - Fixation du plateau avant 1 Slide tray onto round post while pushing in spring loaded buttons, and a click is heard. Make sure there is no gap between stroller frame and front tray. 1 ES: Resbale la charola sobre el poste redondo mientras presiona los botones de resorte, hasta que escuche un clic. Asegúrese de que no hay ningún hueco entre la estructura de la carriola y la charola delantera.
To Attach Parent Tray - Para instalar la charola para adultos - Pour attacher le plateau de l’adulte WARNING ADVERTENCIA MISE EN GARDE NO ponga más de 1.36 kg (3 NE PAS y placer plus de 1,36 DO NOT place more than 3 lbs. (1.36 kg) in this tray to avoid tipping! DO NOT place hot liquids in this tray. Hot liquids can burn your child. libras) de peso en esta charola para evitar volcaduras. NO coloque liquidos calientes en esta charola. Los líquidos calientes pueden quemar a su niño.
- To Install iBaby™ (select models) - Para situar la charola para adultos iBaby™ (modelos selectos) - Fixer le plateau-parent iBaby™ (modèles sélectionnés) WARNING ADVERTENCIA MISE EN GARDE • Si el volumen está demasiado • Les sons forts peuvent • Loud volume can damage your child’s hearing. When turning on music, gradually adjust the volume to a comfortable listening level so child is not startled. • Do not place more than 3 lbs. (1.
To Adjust Hand Brake - Para ajustar el freno de mano - Réglage du frein à main TO TIGHTEN HAND BRAKE TENSION: PARA AJUSTAR LA TENSIÓN DEL FRENO DE MANO: RESSERRAGE DE LA TENSION DU FREIN À MAIN: nut A by turning it away from you, while 1 Loosen holding nut B in place. ES: Suelte la tuerca A girandola en sentido contrario a usted, mientras mantiene la tuerca B en su lugar. FR: Desserrez l'écrou A en le tournant à l'opposé de vous tout en tenant l'écrou B en place.
To Attach Basket - Para adjuntar la canasta - Attacher le panier WARNING ADVERTENCIA MISE EN GARDE • Always balance the weight • Siempre mantenga el peso de • Maintenez toujours le poids of the stroller evenly. To la carriola repartido por igual. de la poussette uniforméprevent the stroller from Para evitar que la carriola esté ment.
HOW TO PROPERLY USE YOUR NEW STROLLER / CÓMO USAR SU NUEVO CARRIOLA CORRECTAMENTE / UTILISATION SÉCURITAIRE DE VOTRE NOUVELLE POUSSETTE To Recline Seat - Para reclinar el asiento - Inclinaison du siège WARNING ADVERTENCIA MISE EN GARDE Para evitar heridas en los dedos, Pour éviter que l’enfant ne se To avoid finger entrapment or pinching, do not adjust the seat back while child is in the stroller.
To Secure Child In Stroller - Para asegurar al niño en la carriola - Pour attacher l’enfant dans la poussette WARNING ADVERTENCIA MISE EN GARDE Evite daños serios causados por Pour eviter que l’enfant ne se Avoid serious injury from falling or sliding out. Always use restraint system. Do not use product without full 5-point Harness Restraint. Removing the shoulder straps will not adequately restrain child. caídas o al deslizarse del asiento. Use siempre el sistema de cinturónes.
To Adjust Shoulder Strap Height - Para ajustar la altura de las cintas de los hombros - Pour ajuster la hauteur des sangles passant aux épaules Lower Mas baja Plus bas Higher Mas alta Plus haut NOTE: For a secure fit, straps should be at or below the child's shoulder. Adjust straps to higher position as your child grows. ES: NOTA: Para que estén ajustadas de forma adecuada, las sujeciones deben estar en, o por abajo, del hombro del niño.
To Operate Hand Brake - Para operar el freno de mano - Fonctionnement du frein à main 1 Squeeze hand brake toward handle to temporarily activate the brakes on your stroller. 1 ES: Apriete el freno de mano hacia la barra para poner temporalmente los frenos en su carriola. FR: Pressez le frein à main vers la poignée pour déclencher temporairement les freins de votre poussette. CAUTION: Brakes will disengage when hand brake is released.
2 Air Tube Tubo de aire Chambre à air Attach Sujetar Fixez 2 Screw air tube to opposite end of pump. ES: Enrosque el tubo de aire en la punta contrario de la bomba. FR: Vissez la chambre à air sur l'extrémité opposée de la pompe. 3 Attach air pump to fill tube on tire. ES: Sujete la bomba de aire al tubo de llenar en la rueda. 4 Air Pump Bomba de aire Pompez de l’air FR: Fixez la pompe à air en place tandis que vous remplissez le tube du pneu.
™ 2 Turn on iBaby by locating the power button as shown. A red light will indicate that the power is on. 2 ES: Encienda iBaby™ localizando el botón de encendido como se muestra. Una luz roja indicará que está encendido. FR: Mettez le système iBaby™ en marche au moyen du bouton d'allumage comme illustré. 3 To avoid startling your child, adjust volume on your personal sound system to its lowest level.
To Set Up Odometer (select models) - Para iniciar el contador (modelos selectos) - Réglage de l'odomètre (modèles sélectionnés) WARNING ADVERTENCIA MISE EN GARDE • DO NOT use odometer in the • NO utilice el contador en la lluvia • NE PAS utiliser l'odomètre sous ni lo deje bajo el sol directo la pluie; ne le laissez pas en rain or leave in direct sunlight durante largos periodos de plein soleil pour de longues for prolonged periods of time tiempo. durées • Do not disassemble outer case.
3 Press and hold SET/RESET button until a set up screen appears. A number between 5” and 30” may be present. Hold the SET/RESET button down, until 16” appears, then STOP. Once the 16” is flashing, immediately hit the MODE button so that ML or Km are flashing. Once it is flashing, hit the SET/RESET button to select your desired setting. After you have made your selections, wait a few seconds and the odometer will return to the orginal screen.
TO DISPLAY BOTH DISTANCE & ELAPSED TIME MODE 1 To view elapsed time and dis- tance while jogging, press MODE button until an “ST” is displayed in the Mode Symbol area. Odometer will alternate time and distance views, every 5 seconds. Scan mode will not work while stroller is stopped.
To Trouble Shoot Odometer (select models) - Para resolver los problemas con el contador (modelos selectos) - Dépannage de l'odomètre (modèles sélectionnés) TROUBLE CHECK ITEMS REMEDY No LCD display. 1. Is the battery dead? 2. Is the battery properly installed? 1. Replace old battery with a new battery. 2. Make sure that the positive side of the battery is facing up. No current speed reading. 1. Check for: broken wire, odometer not properly positioned on clip, or sensor and magnet incorrectly aligned.
To Fold Stroller - Para plegar la carriola - Pliage de la poussette 1 Lock foot brake. ES: Asegure el freno de pie. FR: Verrouillage du frein à pied. 2 Recline seat. ES: Recline el asiento. FR: Inclinaison du siège. 3 Close canopy. ES: Cierre el toldo. FR: Fermeture de l'auvent. 4 4 Locate trigger fold on frame below parent tray. Pull up latches on frame to fold. ES: Localice el gatillo para plegar la estructura bajo la charola para padres. Jale los cierres en la estructura, para plegar.
CARE & MAINTENANCE • To keep your stroller running smoothly and avoid squeaking wheels use a silicone or graphite based lubricant. It is important to get it into the axle and the wheel assembly. • Clean metal parts with a damp cloth and wipe dry. • Clean woven fabric or vinyl parts with mild soap and water solution. • Dry wet stroller with a soft cloth to prevent rusting. • When storing stroller, never stack other items on top of it; this may damage the stroller.
LIMITED WARRANTY Jeep® is a registered trademark of Chrysler Group LLC and is used under license by Kolcraft®. © Chrysler Group LLC 2010. *iPod is a registered trademark of Apple Computer, Inc. Apple Computer, Inc. is not associated with Kolcraft® Enterprises, Inc. and no approval by them is to be implied.
GARANTÍA LIMITADA Jeep® es una marca registrada de Chrysler Group LLC y es utilizada, bajo licencia por Kolcraft®. © Chrysler Group LLC 2010. *iPod es una marca registrada de Apple Computer, Inc. Apple Computer, Inc. no están associadas con Kolcraft® Enterprises, Inc. oy no debe suponerse que han aprobado el producto.
GARANTIE LIMITÉE Jeep® est une marque déposée de la Chrysler Group LLC et est utilisé sous licence par Kolcraft®. © Chrysler Group LLC 2010. *iPod est une marque de commerce déposée Apple Computer, Inc.: la société Apple Computer, Inc. n’est pas associée à la compagnie Kolcraft® Enterprises, Inc. et il ne faut présumer d’une approbation implicite de leur part.
REPLACEMENT PARTS LIST - LISTA DE PIEZAS DE REPUESTO - LISTE DES PIÈCES DE RECHANGE Circle the Part You Need Marque con un círculo el repuesto que necesita Encerclez la pièce dont vous avez besoin Front Wheel Rueda delantera Roue avant $10.00 Basket Canasta Panier $13.00 iBaby™ (select models) (modelos selectos) (certains modèles) $20.00 Replacement parts may look slightly different than what is shown below. Las piezas de recambio se pueden ver ligeramente diferentes de como se muestran abajo.
Replacement Parts Order Form / Formulario para ordenar piezas de repuesto / Formulaire de commande pour pièces de rechange •Complete the following form. Your model number and date of manufacture must be included on the form to ensure proper replacement parts. •Complete el siguiente formulario. Debe incluir en el formulario el número de su modelo y fecha de fabricación para asegurarse de que obtenga las piezas de repuesto adecuadas. •Remplissez le formulaire suivant.