
Installation Guide


p. 2
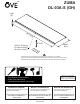
PARTS / PIÈCES / PIEZAS
HARDWARE / QUINCAILLERIE / HARDWARE
AA
NL
-+
B
BB
ø8x40mm
2x
M5x45mm
2x
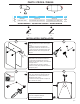
INSTALLATION / INSTALACIÓN
4
1 2
A
L N
Item Item Ítem Qty
A IR sensor Capteur IR Sensor IR 1
B LED Driver 15W Convertisseur pour LED 15W Convertisseur pour LED 15W 1
1
2
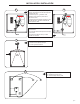
1.Setthemirrorinthedesirednalposition.
Mark the position of the center of the support
hooks.
1.Placezlemiroirdanssapositionnal.
Marquez la position des crochets sur le mur.
1.Fijarelespejoenladeseadaposiciónnal.
Marca la posición centro de los ganchos de
soporte.
2. Drill guide holes in the wall using a ø5/16”
(8mm) drill bit, and insert the wall anchors.
2. Percez les trous guides dans le mur en
utilisant un foret ø5/16” (8mm), puis insérez les
ancrages muraux.
2. Taladre los hoyos de guía en la pared
usando un ø5/16” (8mm), después inserte los
anclajes de pared.
AA
3
BB
3/16” [5mm]
3. Install the screws, leaving a gap of at least
3/16” (5mm) between the head and the wall.
3. Installez les vis. Laissez la tête de la vis
dépasser de 3/16” (5mm).
3. Instala los tornillos, dejando un espacio de
por lo menos 3/16” (5mm).
4. Open the electrical enclosure.
4. Ouvrir le réceptacle électrique.
4. Abre el gabinete eléctrico.