iVIEW / iMENU CLASSIC USER MANUAL
IMPORTANT SAFETY INSTRUCTIONS MAIN SUPPLY This equipment is designed to operate from a 100-240 Volt, 50/60Hz AC main supply. The use of other power sources may damage it. Check that the voltage marked on the rating plate located at the rear of the power adaptor states 100-240V. The manufacturer will NOT accept responsibility for damage or injury caused by connecting to the wrong voltage. MAIN ADAPTOR The power adaptor supplied is compatible with a standard mains socket. NB.
Dangerous voltage constituting a risk of electric shock is present inside this equipment. This mark is applied to show the equipment conforms to European safety and electro-magnetic compatibility standards. There are important operating and maintenance instructions in the literature accompanying this equipment. WARNING: • The mains plug shall be the main disconnect device and shall remain operable at all times. • Never let anyone push objects into holes and ventilation slots.
Table of Contents PAGE NO. 1. OVERVIEW 1.1 Components 1.2 Front View of the Product 1.3 Side A 1.4 Side B 1.4.1 Silicon Cover for Slots 1.4.2 USB Slot 1.4.3 Mini USB Slot 1.4.4 SD Card Slot 1.5 Back 1.5.1 DC Connector 1.5.2 On/Off Button 1.5.3 Rechargeable Battery Slot 5 5 6 6 6 7 7 7 7 7 7 8 2. OPERATING INSTRUCTIONS 2.1 Buttons & Remote Control 2.1.1 Buttons 2.1.2 Remote Control 2.2 Screen Status Indicators 2.3 Menu features 2.3.1 Playlist 2.3.2 WI-FI 2.3.3 Calendar 2.3.
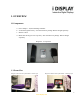
1. OVERVIEW 1.1Components: a. b. c. d. Power Adaptor – US, EU/UK Plugs available. 4 Cell Rechargeable battery – Not included in the package. Must be bought separately Remote Control Metal Shelf Clamp (not seen in picture) – Not included in the package. Must be bought separately. Diagram 1.1 Components 1.2 Front View Diagram 1.2A Front View of the Product – Portrait style Diagram 1.2B Front View of the Product – Landscape style 5 www.i-display.
1.3 Side A: Left In menu mode this function is used for moving left through the various options. In playback mode you can go to the previous content in the playlist.. (Note it is only operable for content copied from USB or SD card not for content downloaded from I Display Server.) Right In menu mode this function is used for moving right through the various options. In playback mode you can go to the next content in the playlist..
1.4 Side B: 1.4.1 SILICON COVER FOR SLOTS: This reduces access to slots or prevent stealing of SD card (if used). The Silicon cover needs to be open as shown and can be easily removed by just pulling it out. A screw can be added for extra security. Diagram 1.4.1 Silicon Cover for Slots 1.4.2 USB SLOT: This is used for connecting flash drives. Once the flash drive is connected, all its content is automatically copied to the internal memory. Note, deleting content is explained in Section 2.3.1 1.4.
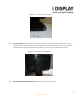
Diagram 1.5.1 Location of DC Connector 1.5.2 ON/OFF BUTTON: Located at the corner of the back part of unit. Once the unit is shut down, the on/off button will have a red color. When the unit is turned on, the on/off button will have a green color. Important comment: it takes about 10 seconds for the first image to appear after the on/off button is activated. Diagram 1.5.2 Location of On/Off Button 1.5.3 RECHARGEABLE BATTERY SLOT: Used to house rechargeable battery. 8 www.i-display.
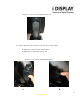
Diagram 1.5.3 Picture of Rechargeable Battery Slot 1.5.3.1 The rechargeable battery needs to be placed as shown in these images. - In diagram A it is slid in from the bottom end first. In diagram B it is snapped shut to the top end. Diagram 1.5.3.1. Placing of Rechargeable Battery A B 9 www.i-display.
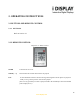
2. OPERATING INSTRUCTIONS 2.1 BUTTONS AND REMOTE CONTROL 2.1.1 BUTTONS: Refer to Section 1.3 2.1.2 REMOTE CONTROL: Diagram 1.7.1 Remote Control On/Off Turns the unit on or off. Volume (- / +) Increase/decrease volume when movies are played. Left In menu mode this function is used for moving left through the various options. In playback mode you can go to the previous content in the playlist.
Right In menu mode this function is used for moving right through the various options. In playback mode you can go to the next content in the playlist. (Note it is only operable for content copied from USB or SD card not for content downloaded from I Display Server) Up In menu mode it is used for moving up. It is not operable in playback mode. Down In menu mode it is used for moving down. It is not operable in playback mode Enter In menu mode, it is used to select an option.
Stop In playback mode, pressing this function once will stop the current content playing and will make the screen return to the menu mode. In menu mode, it is used to go back to main menu. Slide show In playback mode, it is used to change between “repeat one” (repeats the chosen file in endless loop) and “repeat all” (repeats the entire playlist in endless loop).
2.3.1 Playlist: The playlist holds a list of content which can be played on the unit. To view the playlist: a. Select internal memory or SD card NB. The playlist only shows content copied to internal memory by USB or SD card. It does not show content downloaded from a server: Diagram 2.3.1a. View of Main Menu Screen b. Choose any of the selected files that appear on the playlist by moving the up and down arrows on the remote. Then press “Enter” to play the relevant content.
Diagram 2.3.1.b View of Playlist c. Press OSD to copy/delete/sort content. (NB. This function is only operable on content copied from a USB or SD Card or a playlist viewed from a SD card and not for content downloaded from I Display Server). Use the arrows to move between these options and press “Enter” in order to see the drop down menu of each of these options as shown below: Diagram 2.3.1.c View Screen Shot showing Copy/Delete/Sort 14 www.i-display.
2.3.2 WIFI Holds 3 main features: WI-FI list / WI-FI Setup / Account Config Diagram 2.3.2a View of WI-FI options To activate the WI-FI: a. Select WI-FI list to see playlist downloaded from I Display server Diagram 2.3.2.b View of Playlist 15 www.i-display.
b. Select WI-FI Setup to be able to choose a method of connection to WIFI network. Either DHCP – Automatically locating available WIFI networks or Manual link – manually inserting network key. 2.3.2.1 DHCP Diagram 2.3.2.1 View of WI-FI Set Up Screen a) Automatically locate available WI-FI networks Diagram 2.3.2.1.a View of available WI-FI Networks 16 www.i-display.
b) On secure WIFI networks, insert relevant network code to connect to WIFI & press “Done”. Diagram 2.3.2.1.b View of Code Insertion c) Once unit is connected a WIFI signal will appear. 2.3.2.2 Manual Link From WI-FI Setup, choose manual link. Then insert the required information below and press “Done”. Diagram 2.3.2.2 View of Manual Link Set Up 17 www.i-display.
2.3.2.3 Account Config: a) After unit is connected to WIFI, the user name the unit is linked to will appear. Diagram 2.3.2.3 View of Account Config 2.3.4 Calendar This shows time and date set in unit. If content in internal memory (copied from USB or SD card) has JPG it will appear in a slide show below the digital clock. To change the date and time on the unit: a) Go to the “Settings” function by using the arrows to move across the top menu.
options. This will make the sub-menu disappear. g) And then you may return to the previous menu to select another option in “Settings” or return to another page on the Main Menu. Diagram 2.3.4 View of Calendar Page 2.3.5 Settings Holds a list of functions as shown in the screen short below e.g. Slideshow Frequency, Transition effect, etc.: Diagram 2.3.5 a View of Functions listed in Settings 19 www.i-display.
Diagram2.3.5b View of Firmware Upgrade Screen 1. Slide show frequency: Controls the amount of time each JPG will be shown when played. This only affects content copied from USB or SD to internal memory or content played from SD card and not for content downloaded from I Display Server 2. Transition Effect: Controls the way each JPG will appear on the screen. This function does not work for movies.
9. Default settings: Return unit to default settings. 10. Clear internal memory: Erases all content copied from USB or SD to internal memory. It does not erase content downloaded from the server. 11. Firmware upgrade: Allows upgrading the unit's current firmware. Upgrading can be done via SD card. First step is to insert the flash disk with the new firmware file. Then choose the firmware upgrade function in setting. The unit will start upgrading the firmware.