
- Outback Power Systems, Inc. Automobile Battery Charger User's Manual


Copyright 2003 OutBack Power Systems, Inc. FX & VFX Series Inverter/Charger System Installation & Programming Manual
19009 62
nd
Ave NE, Arlington WA 98223 USA 900-0027-1
Tel 360 435 6030 Fax 360 435 6019
Rev 7.2 08/26/05 Page 43
MATE SCREENS
Status Screens
The STATUS screens allow the system user to check the operation of the FX system. Both AC and DC voltage and AC current meters
are provided to enable monitoring, adjustment and troubleshooting of the system operation.
MODES MENU
The MODES section lets the user view and change the various modes for a specific FX by pressing the PORT button to access a
specific FX. The modes include inverter, ac in, charger, auxiliary, and equalize. The operation of these modes can be changed by
selecting the
CHANGE MODE option on the screen. This is helpful if the user wishes to quickly enable or disable a particular function
of a specific FX if necessary. If the system is “OutBack” stacked, only the Master’s modes, with the exception of the “Aux”, can be
changed.
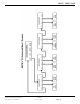
MAIN----------------
6:54:42P
SUM STATUS SETUP ADV
↓
STATUS--------------
choose product:
FX MX
↓
STATUS/FX/PAGE1----
choose category:
MODES METER BATT PG2
↓
STATUS/FX/MODE--P00
inv control: ON
CHANGE
DOWN STAT MODE PORT
↓
STATUS/FX/MODE--P00
ac in control: USE
CHANGE
DOWN UP MODE PORT
↓
STATUS/FX/MODE--P00
chr control: AUTO
CHANGE
DOWN UP MODE PORT
↓
STATUS/FX/MODE--P00
aux control: AUTO
CHANGE
DOWN UP MODE PORT
↓
STATUS/FX/MODE--P00
eq enabled: No
CHANGE
UP MODE PORT
The MAIN screen is where the menu system starts. The four words in the bottom line of the display
correspond to the four buttons located below the display. The word in
BOLD on the bottom line
indicates the selection used to advance the display to the next screen. Pressing the left two buttons
simultaneously from anywhere in the menu will return you to this screen.
Selecting
<STATUS> allows selection of the product type:
<FX> FX inverter/charger system
MX MX60 PV MPPT charge controller
<MODES> Shows status and allows adjustment of Inverter, AC input, Charger, Aux, and EQ
METER Provides the AC voltages and currents of the FX
BATT Provides the battery voltage and charger set points and timers
PG2 Displays additional sections – ERRORS, WARNINGS and PG3
The
INV CONTROL screen lets you see the status of the inverter function of the FX. Pressing the
STAT button returns you to the first page of the status menu. Pressing the CHANGE MODE button
opens a screen that gives the options of turning the inverter OFF, turning the inverter ON, or putting
the inverter into SEARCH. Pressing PORT will access the next FX if a HUB is present.
The
AC IN CONTROL screen lets you see if the FX will accept an AC source at its input terminals.
Pressing the UP button returns you to the previous page of the MODES menu. Pressing the
CHANGE MODE button opens a screen that gives the options of rejecting an AC source by pressing
DROP or accepting an AC source by pressing USE. Pressing PORT will access the next FX if a
HUB is present.
The
CHR CONTROL screen lets you see what mode the charger is in. Pressing the UP button
returns you to the previous page of the MODES menu. Pressing the CHANGE MODE button opens
a screen that gives the options of turning the charger OFF or putting the charger into AUTO where it
will follow the 5-stage charging algorithm. Pressing PORT will access the next FX if a HUB is
present.
The
AUX CONTROL screen lets you see the status of the auxiliary output. Pressing the UP button
returns you to the previous page of the MODES menu. Pressing the CHANGE MODE button opens
a screen that gives the options of turning the Aux OFF, turning the Aux ON, or putting the Aux into
AUTO mode. In AUTO mode it will follow the “Aux Output Function” and its parameters that can be
set in the Advanced (ADV) menu. Pressing PORT will access the next FX if a HUB is present.
The
EQ ENABLED screen lets you see if the FX is in an “equalize” charging cycle and can also start
or stop a cycle. Pressing the UP button returns you to the previous page of the MODES menu.
Pressing the CHANGE MODE button opens a screen that gives the options of START or STOP to
initiate or cancel an equalize charge. Pressing PORT will access the next FX if a HUB is present.