
- Outback Power Enclosures User's Guide

Installation Tips
• Never use less than the minimum recommended number and type of fasteners when installing
the FLEXware Mounting Plates.
• Each FX weighs in excess of 50 lbs and is often more easily installed by two people rather
than one.
• Be sure the DC enclosure is secured to the FLEXware Mounting Plate before attaching the
MX Charge Controller to it.
• Installation of each enclosure and breakers is normally easier by removing the breaker brackets
rst. Do not remove any breaker knockouts from these brackets without referring to the chosen
AC IOB kits and DC breaker selections rst.
• It is also easier if all conduit knockouts are removed before mounting the enclosures.
Mounting and Installation
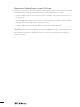
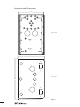
FLEXware 500 is designed for mounting on the FLEXware Mounting Plate (FW-MP). Although the
components can be secured to other surfaces, the FW-MP is an engineered platform designed
for the FLEXware 500 installation. This manual illustrates such an installation. OutBack does not
endorse other installation methods and therefore cannot recommend fasteners or other means of
attachment due to the variety of installations possible in the eld.
Please see the FLEXware Mounting Plate Instructions for further information.
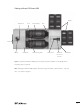
In addition to installing the AC and DC chassis, a typical installation includes two FX Series
Inverter/Chargers, an MX60 Charge Controller, a HUB Communications Manager, and AC and DC
conduit adapters. The installation of these components is also displayed in these instructions.
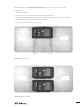
T
Slot indicates this is the top edge of the FW-MP
Figure 3: FLEXware Mounting Plate
5