
Instruction Manual


6
B.Select the Proper Heating Cable Length
First, several important terms should be defined as below:
Item Design
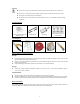
Attaching the cable
(Use only the clips and spacers provided to attach the cable)
Starting
Point
If an electrical receptacle already exists in an appropriate location
near the eave, that will be your starting point. Otherwise, select an
appropriate starting point and have an electrical receptacle installed.
First, lay out the cable flat against the roof so it
is not twisted or tangled.
Second, using the clips, attach the cable to the
edge shingles nearest the start point.
Using a spacer, arrange the cable to form a drip
loop to prevent water from tracking along the
and back into the receptacle.
Caution: Lift the shingle just enough to insert
the clip. Press shingle back down firmly.
An accurate estimate of the cable length you need is
critical
because you cannot change the
cable length by cutting, splicing, or altering it in any way.
Specification Table
Heating Length
(ft.)
Power Output
(Watts)
Amp.
(@120V)
20 100 0.83
30 150 1.25
60 300 2.50
80 400 3.33
100 500 4.17
120 600 5.00
140 700 5.83
160 800 6.67
180 900 7.50
200 1000 8.33
240 1200
10.0